


Demand Forecasting in Dynamics 365 Supply Chain Management using Azure Machine Learning
Views (818)
 Said Nikjou
 251
251
 Like
Like Share
Share
 Report
How to leverage Machine Learning to improve your demand forecasting accuracy and efficiency
Demand forecasting is the process of predicting future demand for products and services to estimate revenue and drive strategic and operational business planning, among other activities. In this blog post, we will explore how Dynamics 365 Supply Chain Management (SCM) can help you create and manage demand forecasts using Azure Machine Learning (AML), a cloud-based service that allows you to build, train, and deploy machine learning models quickly and easily.
Demand forecasting is useful for businesses because it can help them optimize their inventory levels, reduce their lead times, and prevent stock-outs. By using AML, you can leverage advanced algorithms and data science techniques to improve your forecast accuracy and reliability, as well as automate and streamline your forecasting workflows. You can also integrate your demand forecasts with other SCM features, such as master planning, sales and operations planning, and inventory management, to enable end-to-end visibility and control over your supply chain.
The following diagram shows the Dynamics 365 forecasting architecture:
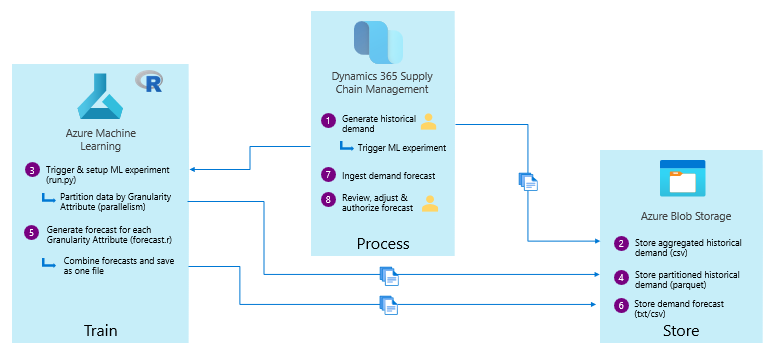
The three main components are Dynamics 365 Supply Chain Management, Azure Machine Learning, and Azure Blog Storage.
To generate forecasts in Dynamics 365 Supply Chain Management we use a time series forecasting machine learning models (Regression). A time series forecasting refers to models that use previous demand values to predict future demand. When we generate a forecast with time series models, we use our demand history data points to build out the forecast equation and estimate its accuracy. D365 SCM can use different time series models like ARIMA (AutoRegressive Integrated Moving Average), ETS (Error, Trend, Seasonal, also known as Exponential Smoothing) and STL (Seasonal and Trend decomposition using Loess) to generate the forecast:
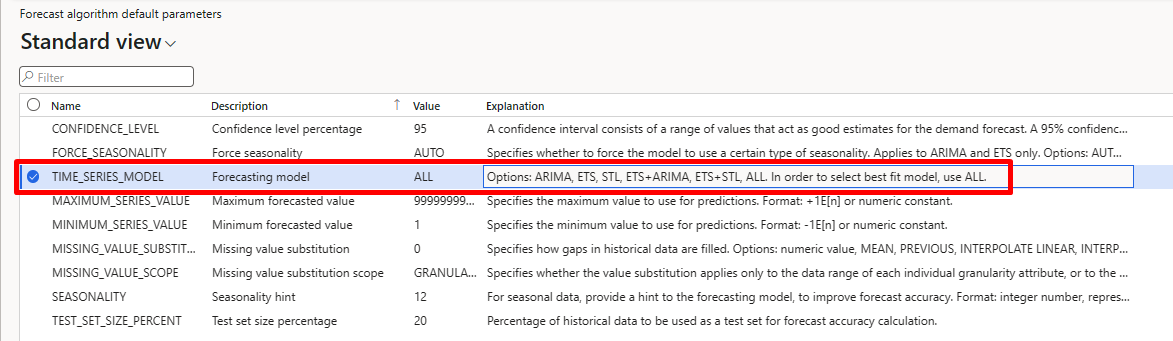
Note: to see the different forecasting parameters go to Master planning\ Demand forecasting \ Forecast algorithm parameters. These parameters are a subset of parameters used by the “forecast” package.
Set Up Azure Machine Learning Service
To enable Azure Machine Learning service to process the demand forecast within D365 SCM, you must set up Azure Machine Learning workspace. This is a quick overview of the configuration’s steps:
Demand forecasting is the process of predicting future demand for products and services to estimate revenue and drive strategic and operational business planning, among other activities. In this blog post, we will explore how Dynamics 365 Supply Chain Management (SCM) can help you create and manage demand forecasts using Azure Machine Learning (AML), a cloud-based service that allows you to build, train, and deploy machine learning models quickly and easily.
Demand forecasting is useful for businesses because it can help them optimize their inventory levels, reduce their lead times, and prevent stock-outs. By using AML, you can leverage advanced algorithms and data science techniques to improve your forecast accuracy and reliability, as well as automate and streamline your forecasting workflows. You can also integrate your demand forecasts with other SCM features, such as master planning, sales and operations planning, and inventory management, to enable end-to-end visibility and control over your supply chain.
The following diagram shows the Dynamics 365 forecasting architecture:
The three main components are Dynamics 365 Supply Chain Management, Azure Machine Learning, and Azure Blog Storage.
To generate forecasts in Dynamics 365 Supply Chain Management we use a time series forecasting machine learning models (Regression). A time series forecasting refers to models that use previous demand values to predict future demand. When we generate a forecast with time series models, we use our demand history data points to build out the forecast equation and estimate its accuracy. D365 SCM can use different time series models like ARIMA (AutoRegressive Integrated Moving Average), ETS (Error, Trend, Seasonal, also known as Exponential Smoothing) and STL (Seasonal and Trend decomposition using Loess) to generate the forecast:
Note: to see the different forecasting parameters go to Master planning\ Demand forecasting \ Forecast algorithm parameters. These parameters are a subset of parameters used by the “forecast” package.
Set Up Azure Machine Learning Service
To enable Azure Machine Learning service to process the demand forecast within D365 SCM, you must set up Azure Machine Learning workspace. This is a quick overview of the configuration’s steps:
Creating a new Workspace within Machine Learning Studio
To create the Azure Machine Learning Workspace, go to Azure Portal and click on create new Resource and select Machine Learning.
- On the wizard enter the details for the workspace
- Create or select Resource group
- Name your workspace
- Select the Region you want your workspace in
- Select an existing or create a new storage account. This will be used as a default Datastore for your workspace.
- A key vault is used to store secrets and other sensitive information that is needed by the workspace.
- The workspace uses Azure Application Insights to store monitoring information about your deployed models.
- Create a container for your workspace
- Click Review + Create button. This will validate all the details that have been entered accurately. Then click Create which will start deployment of the workspace and all the artifacts along with it within the new resource group.
Configure Storage
The next step is to configure the storge within your Machine Learning workspace:
- Go to GitHub
- On GitHub, open the Templates for Dynamics 365 Supply Chain Management demand forecasting with Azure Machine Learning repo, and download the entire templates folder.Ensure that the Sampleinput csv file is present in the folder:
- Then go to Azure Portal and open the Storage Account that you created earlier
- Click on Containers and create a new container with the name demplan-azurem
- Once the container is created, upload the sampleinput.csv file from the templates you downloaded from GitHub repo to the container (This file is required to publish the initial pipeline and generate a test forecast).
Configure a default Datastore
In this step we will configure default datastore for your Azure Machine Learning workspace
In this step we will configure default datastore for your Azure Machine Learning workspace
- To open the Machine Learning studio, go to the Machine Learning workspace you created within the Azure Portal
- Click on Launch studio which will redirect you to the Machine Learning studio and to your workspace:
- Next click on the Data button on navigation pane
- Click on Datastore tap and + Create
- Enter the details in the wizard
- Give your datastore a name
- Select Azure Blob storage as the datastore type
- Select the right Subscription ID
- Select the storage account that you created in the Azure Portal
- Select the Container that you created in the previous steps
- To retrieve the authentication key, go to Azure portal.
- Open the Datastore from within the Resource Group you just created.
- Navigate to the access keys section.
- Copy the key as you see on the Access Keys section:
- Enter this access key on the wizard and hit create.
- Set as default datastore:
Configure Compute Resources
Now we will configure the Compute:
Now we will configure the Compute:
- Go to your Machine Learning workspace and click on Compute.
- Click on + New and a Wizard will show up.
- Name the Compute instance –This will be used to create the initial demand forecasting pipeline.
- Select the desired Virtual Machine for your Compute instance:
- Enter the Cluster Name
- In this case we are using a virtual machine Standard_D2_V2 which offers 2 cores
- Select 2 in the Maximum number of nodes (on each node, there will be several worker processes that run forecasting scripts in parallel) and click on Crate.
Create Pipelines
This is the last step in configuration of the Machine Learning workspace:
- In this step we will create pipelines which will provide a way to start forecasting scripts from the SCM application
- Go to the templates folder that we downloaded from GitHub in previous steps. Note: The folder structure on the templates folder is important to be consistent with the folder structure you will create in the notebooks
- Go to the ML Studio and go to Notebook
- Create the Folder with structure Users/User name/src
- Upload the files in the src folder that you downloaded to the Notebooks
- Create a folder with the name REntryScript and upload the forcast.r file.
Note: the forecast.r file is an R script that use the Time series regresion Models. - Next click on the Parameters file and make sure the compute cluster name is the same as you created the compute cluster.
- You will have to edit the node count on the parameter files. The node count on the parameter file should be 1 less than the nodes you have on Compute cluster. In our case we have 2 nodes on the compute cluster so the value for node count I am setting at is 1.
- Once you save the parameters file, go to the api_trigger.py file and run it.
Note: Follow the instructions to login into the Azure Machine Learning terminal
The api_trigger.py file execution will create the pipeline for the first time and trigger a run for the sample input file that you had uploaded earlier.
- Check the pipeline running under the Pipeline tab
- Also, a Job (Experiment) will be created
Integrate the Azure Machine Learning Service with Dynamics 365 SCM
In order to integrate the Azure Machine Learning Service with Dynamics 365 SCM, An Active Directory application is required to authenticate with the resources that are dedicated to demand forecasting by using service principal.
Register a new application in the tenant's Azure Active Directory (Azure AD).
Note: Once the application is registered and client secret is generated, you will have Tenant ID, Application ID and client secret generated. Make sure you copy the secret as you will not be able to retrieve this again.
Give your new Active Directory application contributor access to the to the Azure subscription:
Switch to D365 SCM and go to D365 Master planning module, Demand Forecasting Parameters, Azure Machine learning service tab, populate the Tenant ID, Application ID, Service Principal Secret value and the name of the storage account:
Note: To get the Pipeline Endpoint address go to the Pipeline Endpoint tab within the Pipeline. Copy the Rest Endpoint into the Pipeline Endpoint address field.
Generate a forecast Process Overview
The different steps of the process can be represented by the following diagram:
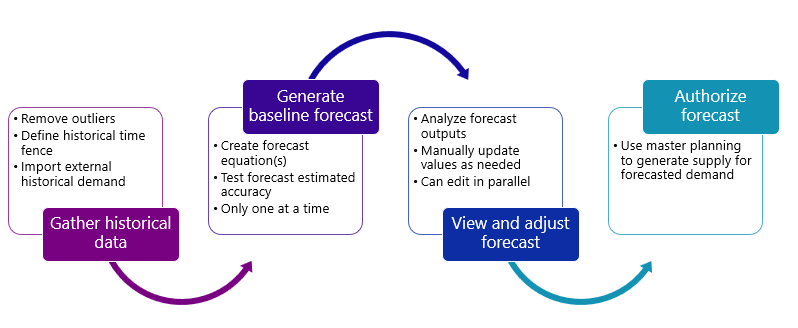
The different steps of the process can be represented by the following diagram:
- First, we gather our historical data – if we do not have enough history yet in Dynamics we can import external historical demand via the data migration framework.
- Next, we trigger forecast generation on the Azure side, which will create the forecast model. We can only have one forecast generation job going on at a time.
- Once the azure steps are complete, we can review the generated forecast in Dynamics and update the values as we see fit. Editing a forecast can be done by multiple people in parallel, unlike forecast generation.
- When everything is satisfactory, we can authorize the forecast which publishes it to the system for use in planning and other operations
Generate a forecast in D365 SCM
In the D365 SCM we can run demand forecasting from Master planning \ Forecasting \ Demand forecasting \ Generate statistical baseline forecast:
1.Set the historical horizon on D365 SCM, which is what are the dates for the data set of historical demand that we want to consider when generating our forecast in this case will do from January 2018 to the end of September 2023.
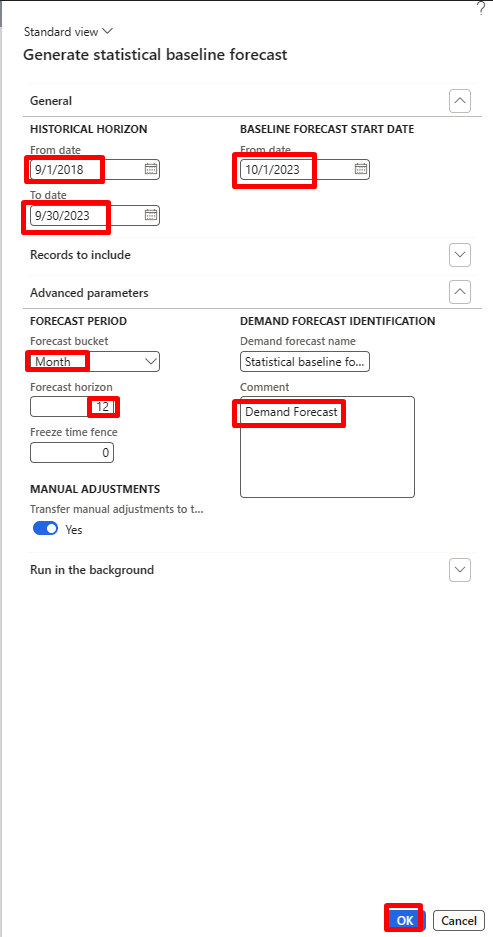
Note: Typically, you will want your historical horizon to be twice as long as your forecast horizon. So, if I'm forecasting out for the next year, then I want my historical horizon to the for the past two years.
My baseline forecast start date go. So going forward we will make a forecast starting on October 1st. We can select which records I want to include such a particular item allocation key. In this case we picked the forecast horizon which is how many of our buckets are going into the future. In this case 12 months.
2.Now the forecast was executed successfully, we can view the Azure Machine Learning Predictions in Master planning \ Forecasting \ Demand forecasting \ Adjusted demand forecast.
Note: This form shows the forecast lines that were generated as a result of the job we just ran. For this example, we are using the standard demo data. This is the reason most of my lines all have a value of 1 because it is a minimum forecasted value as the demo data didn't have demand history for these items.
3. As a final step we can Authorize adjusted demand forecast (Master planning \ Forecasting \ Demand forecasting \ authorize adjusted demand forecast)
Thanks for reading,
Said
Acknowledgments: I want to thank my colleague Amy Flowers (Cloud Solution Architect) for her contributions and peer review.
Source:
Part 1- Intro to Demand Forecasting in Dynamics 365 Supply Chain Management | April 6, 2022
Part 2: Implementation Guidance on Azure Machine Learning Service for Demand Forecasting | April 20, 2022 (dynamics.com)
*This post is locked for comments