


 9,040
9,040 Like
Like Share
Share
 Report
Hey Folks,
Once you go deep dive into Advance Warehousing then there’s many thing that comes into picture and Cross Dock is one of those method which could be very widely used once you experience this functionality and in today’s post am gonna explain this to you. Cross Dock is one of the most effective way in which you get rid of the entire Warehousing Put-Away process if the item that’s just been received can be utilised directly in the Sales order or somewhere in Production.
Am assuming you have all basic ideas of Zones and Bins and how its works in the system. So the very first thing you need to do is you have to do a basic setup for the Cross Dock bin, so navigate to your Location Card and define the bin in the Cross Dock Bin Code. Make sure the bin which you are defining is Cross Dock enabled bin.
Now after doing the setup in Location card what you need to do is you need to go back to the Item card and make sure in the Item Card too the Cross Dock is enabled.
All setup has been completed and now you have to go back to the Sales Order(Am Using Sales Order as an example) Make a new Sales Order for any an item with say 50 Quantity.
Now go back to the Purchase Order and make a Purchase of 50 quantity for the same Item for which you make the Sales Order. Now make the Whse. Receipt for the Purchase. Now enter the Quantity to Receive on Warehouse receipt and then click on Qty. to Cross-Dock on.
Here System will open a new screen for you i.e Cross Dock Opportunities. Now you have to Click on Refresh Cross-Dock Opportunities this will all bring all the respective areas from where this Item can be Cross-Docked, as I just made the Sales Order hence Sales Order for this item got appeared in front of me.
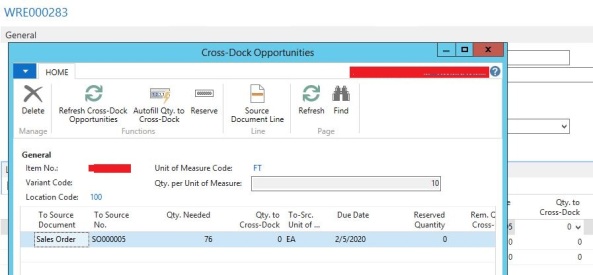
Now you have to click Auto-fill-Qty to Cross-Dock and then do it OK. System will update the Qty to Cross-*** section. Now Post the Receiving and this part is done.
Now if you will check you Put Away Document you will notice system is picking from the main Bin and placing it into the Cross Docked bin which you defined above. If the Bin is coming blank then simply move to right and there you will see one column which says Cross Dock Information which will make you understand like you just executed for the Cross Dock operation. If the Quantity is more in Purchase order then the quantity to be Cross Docked then system will place the remaining quantity to the main Bins. Register the Document and complete the Put-Away.
Now go back to the same Sales Order and execute the Warehouse Shipment Process and Create the Pick for this Item. Here you will notice that system is now picking the Item from the same Cross-Dock Bin where it placed while Put Away. So that means now it Picking from the Cross Dock Bin and placing it into the Shipping Bin.
Complete the Pick Document and Post the Shipment.
CHEERS
*This post is locked for comments