Paying a Vendor
Agenda
Introduction
Hi again! In this training lesson, we will study the payment process. Payment is a standalone process that does not influence the company profit or loss. This is because the company recognizes the profit or loss when an invoice is posted. After the invoice posting, the posted amount is recorded as the liabilities. The payment process is used to pay the vendor what the company owes.
The payment process generates the following transaction:
| Bank | Accounts payable | ||
| Debit | Credit | Debit | Credit |
| $Amount | $Amount | ||
Remember in the first lesson, we have studied that if the Assets increase, the Debit part is used, and if they decrease, the Credit part is used. For the Liabilities is the vice versa. But always Debit is “good” and Credit is “bad” for the company. The Bank account is the Assets account that contains the amount of money that the company has in the bank. The money in the bank decrease, so the Credit part is used. In other words, when the money decrease, it is “bad” for the company. The Accounts payable is the Liabilities account that contains the amounts of money that the company owes to others. The Accounts payable amount decreases, so the Debit part is used. In other words, when debts decrease, it is “good” for the company.
The company can pay for the delivered goods or services in different ways: by checks, electronic payments, cash, promissory notes, etc. The payment method and other payment parameters are set up per vendor under Accounts payable > Common Forms > Vendor Details > Payment tab > Terms of payment, Method of payment, Cash discount, Bank account fields. These parameters are used as default ones when the Invoice is created, but can be changed.
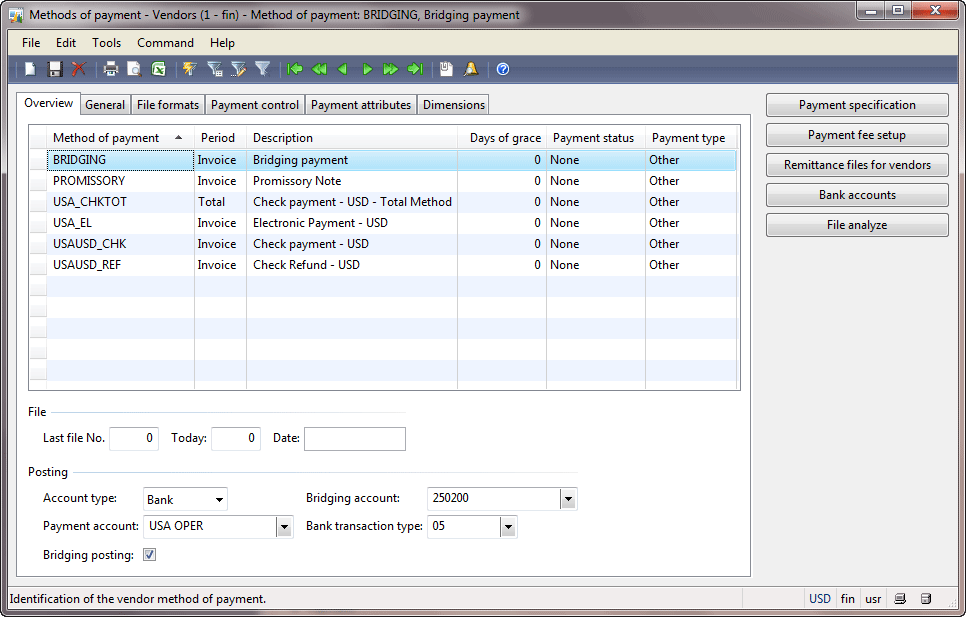
The list of methods of payments is located under Accounts payable > Setup > Payment > Methods of payment.
The method of payment is set up for an Invoice, but can be changed when the company pays. In the previous training lesson, the “USAUSD_CHK” payment method was set up for the Invoice.
The Invoice also contains information about the terms of payment and the cash discount. The terms of payment is used to define the due date (the last date when the company should pay to the vendor). If the company doesn’t pay to the vendor before or on the due date, the vendor will send the collection letter. We will learn collection letters in the next training lesson when we sell items to the customer, and the customer will not pay. We have used the “N030” terms of payment in invoices. The terms of payment is set up under Accounts payable > Setup > Payment > Terms of payment. The “N030” terms of payment has the following setup – the due date is the current date + 30 days.
The Cash discount is used to encourage the company to pay the vendor as quickly as possible. We have used the 1%D15 cash discount in all invoices. The cash discount is set up under Accounts payable > Setup > Payment > Cash discounts. The 1%D15 cash discount has the following setup – the discount for 1% is applied if the company pays to the vendor during 15 days.
Payment Steps
The Payment Manager performs the following steps (the payment process):
- Find what invoices should be paid on basis of due dates or cash discount dates.
- Create payments in the payment journal.
- Generate a payment document: a check, a file for electronic payment, a promissory note, etc.
- Send the payment document to the vendor.
- Receive an answer from the vendor.
- Record in the system that the company has to pay to the vendor, i.e. to post the payment.
Let’s go through all these steps in Microsoft Dynamics AX.
- Go to Accounts payable > Journals > Payments > Payment journal. The Journal form opens.
- Create a new line and select “APPay” in the Name field. Save the line.
- Click the Lines button. The Journal voucher form opens.
- Microsoft Dynamics AX allows automatically creating payments on basis of unpaid invoices. Click the Payment proposal > Create payment proposal button in the Journal voucher form. The Vendor payment proposal form opens. Select “Due date & cash discount” in the Proposal type field. Click OK.
- The Vendor payment proposal form opens.
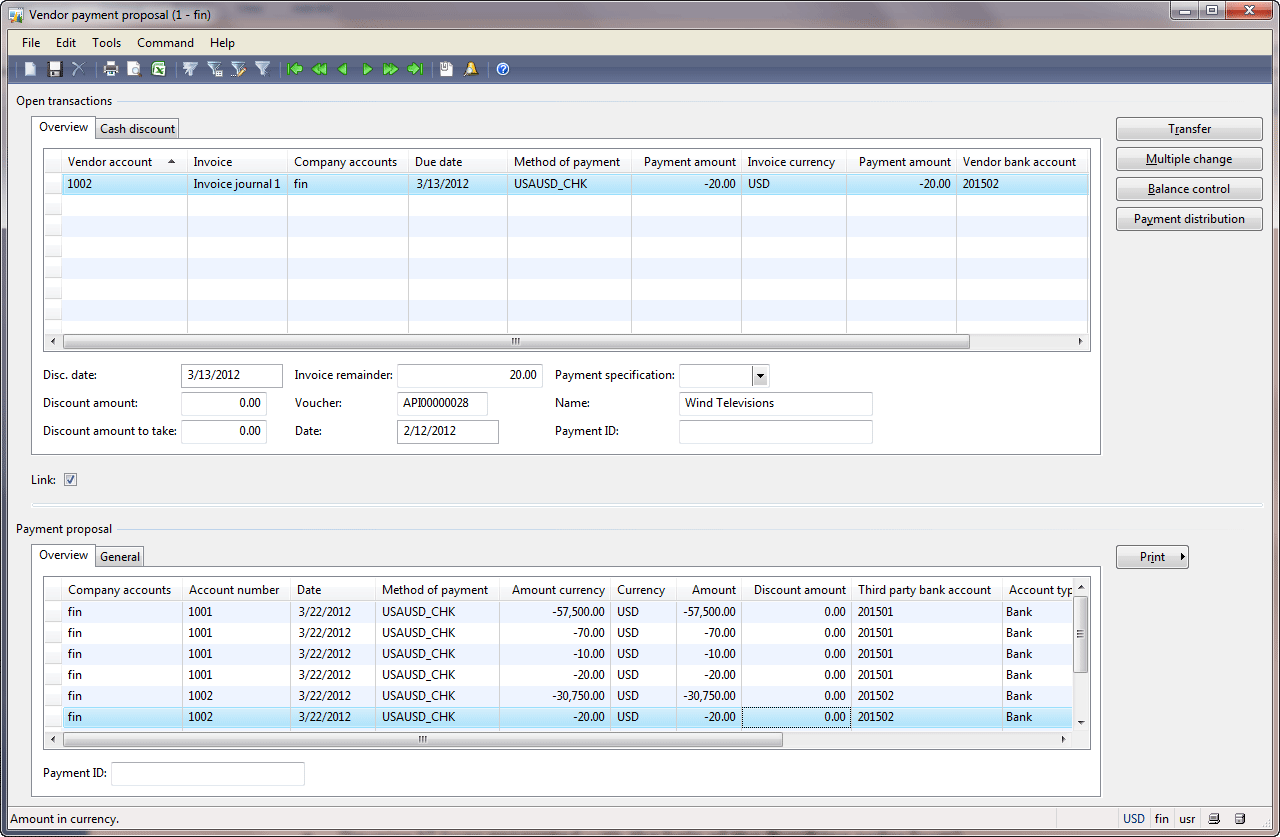
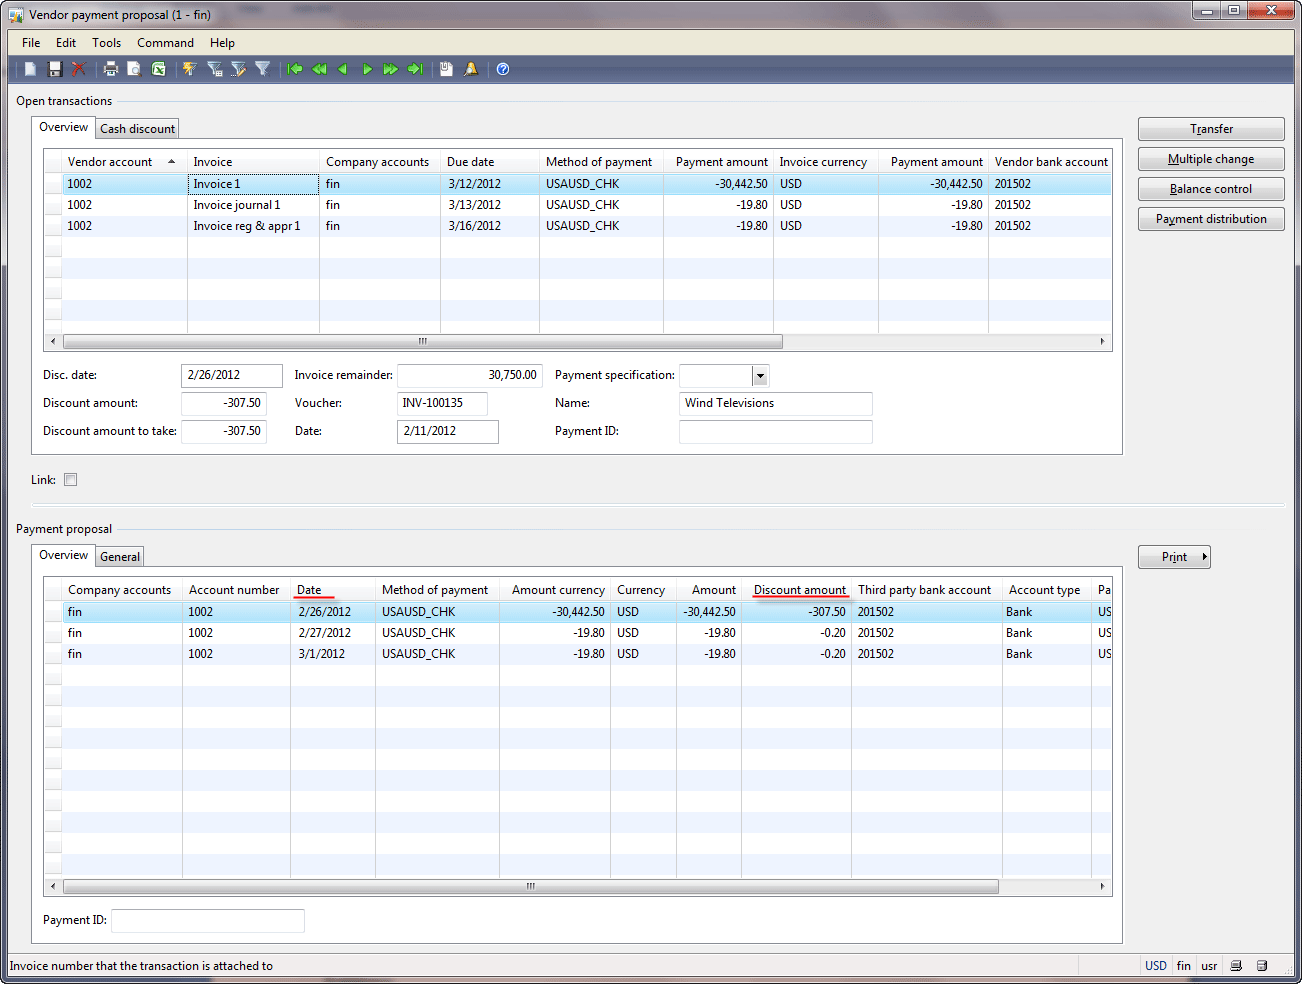
The Payment proposal pane contains the payments that are proposed to be paid by the company. The Open transactions pane contains the invoice for which the payment was proposed. If we select another payment in the Payment proposal pane, the information in the Open transactions pane changes. To view all invoices for which payments were proposed clear the Link check box.We can see that there are both invoices that were posted in the previous training lessons and a number of other ones. Select the “222”, “111”, and “485211188” invoices in the Open transactions pane and delete them from the grid (Alt+F9). The Open transactions pane will have only the following invoices:
- “Invoice 1” (was generated with the help of the Purchase order form)
- “Invoice journal 1” (was generated with the help of the Invoice journal)
- “Invoice reg & appr 1” (was generated with the help of the Invoice registration and approval journals).
We can see that Microsoft Dynamics AX proposes to pay these invoices later on the last day when the cash discount is valid.
Let’s assume that the Company decides to pay today for the “Invoice journal 1”invoice. Delete the invoices “Invoice 1” and “Invoice reg & appr 1” from the Open transactions pane.
- Click the Transfer button. The Transfer payment proposal box appears. Click OK.
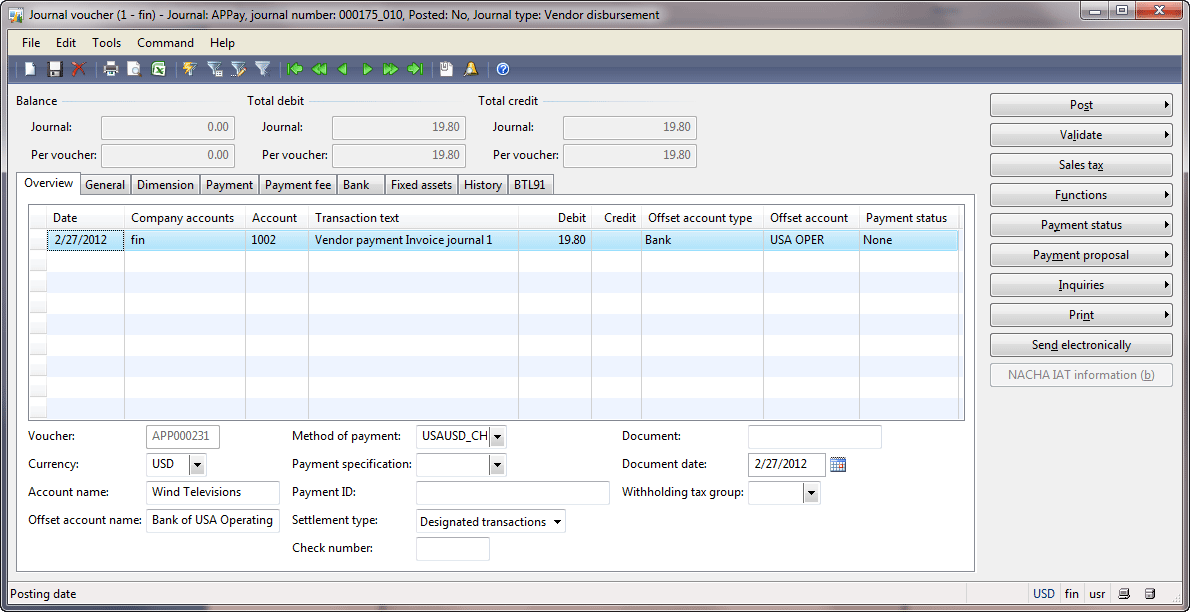
- The Journal voucherform will look as follows:
We can see that one payment line is created. The “1002” vendor account is debited (for the Liabilities, it means – decreased). The “USA OPER” bank account is credited (for the Assets, it means – decreased). As a result the following transactions will be generated:
- One vendor transaction for the 1002 vendor
- One bank transaction for the USA OPER bank account
- Two general ledger transactions for the controlling accounts.
The 1002 vendor has the 211100 general ledger controlling account (set up in the vendor posting profile). Note that for the bank account, the controlling account is set up under Bank > Common Forms > Bank Account Details > find the “USA OPER” bank account > Ledger account field. In our demo data, the controlling account for the bank account is 110110 (Bank account – USD). (This account belongs to the CASH&CASH EQUIVALENTS and Asset accounts). The Currency, Method of payments fields are filled in automatically from the invoice. The USA OPER bank account is taken from the method of payment under Accounts payable > Setup > Payment > Methods of payment > find UASUSD_CHK > General tab > Posting field group > Payment account field. We make sure that this field contains the USA OPER bank account. Note that the Transaction text field in the Journal voucher form contains the “Vendor payment Invoice journal 1” text that is also generated automatically on basis of the invoice name.
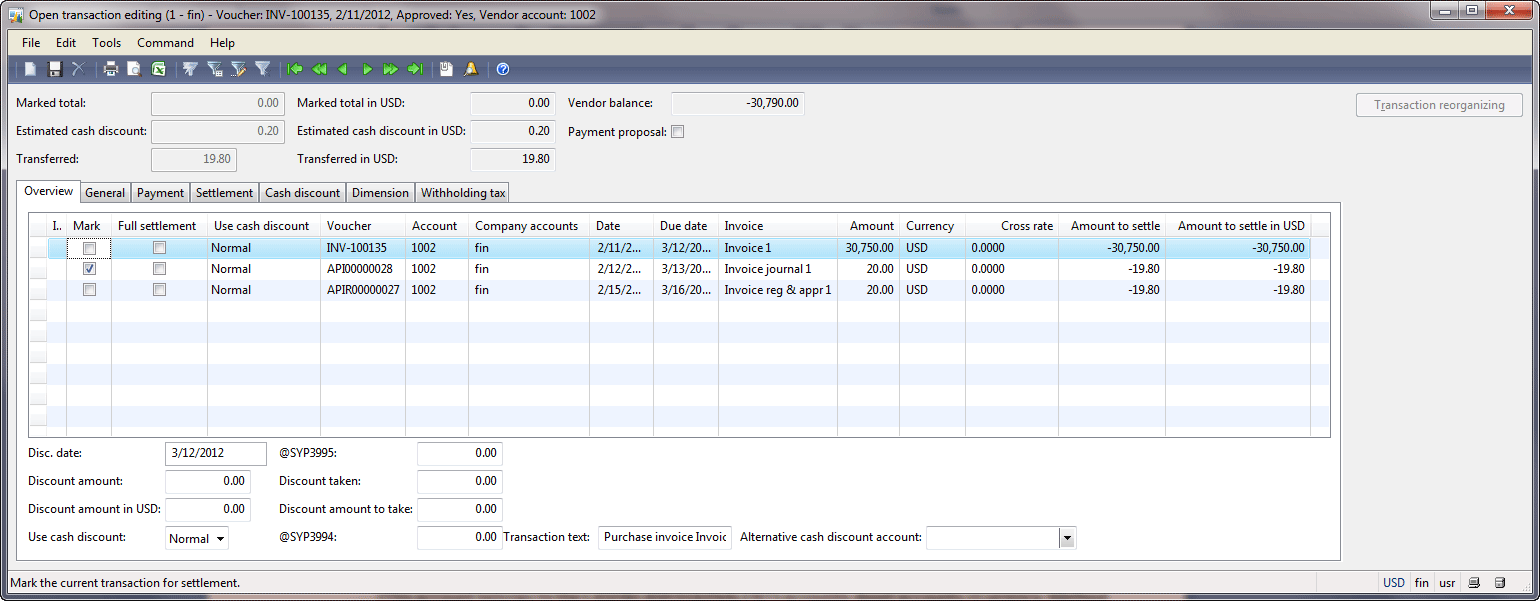
- When the payment proposal is used, Microsoft Dynamics AX automatically settles payments and invoices. This is required because the company should know what exactly invoices were paid. To view settlement, click the Function > Settlement button. The Cancel settlement box appears, click NO. The Open transaction editing form appears. This form contains all “open” invoices (i.e. unpaid invoices). We can see that the “Invoice journal 1” invoice is marked, i.e. settled with the payment line. Note that we could manually change the settlement.
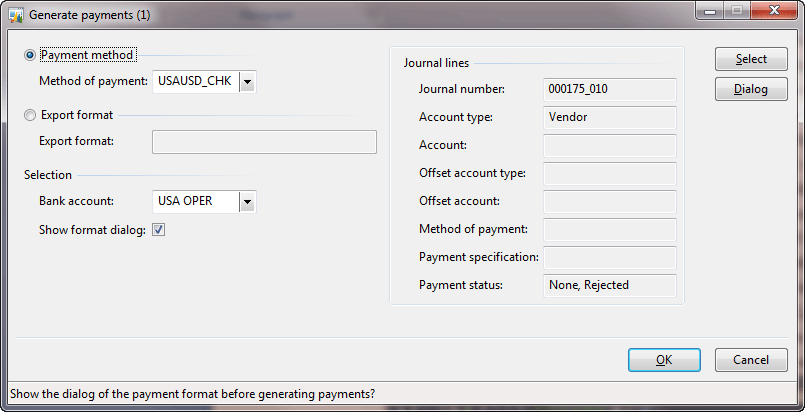
- The Payment Manager checks all payment details. Since all information is correct, a payment check can be generated. In the Journal voucher form, click the Functions > Generate payments button. The Generate payments form opens. Select “USAUSD_CHK” in the Method of payment field, “USA OPER” in the Bank account field, and then select the Show format dialog check box. Click OK.
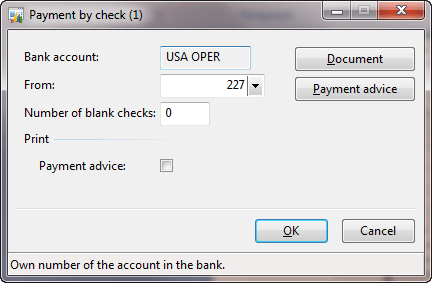
- The Payment by checkform opens.
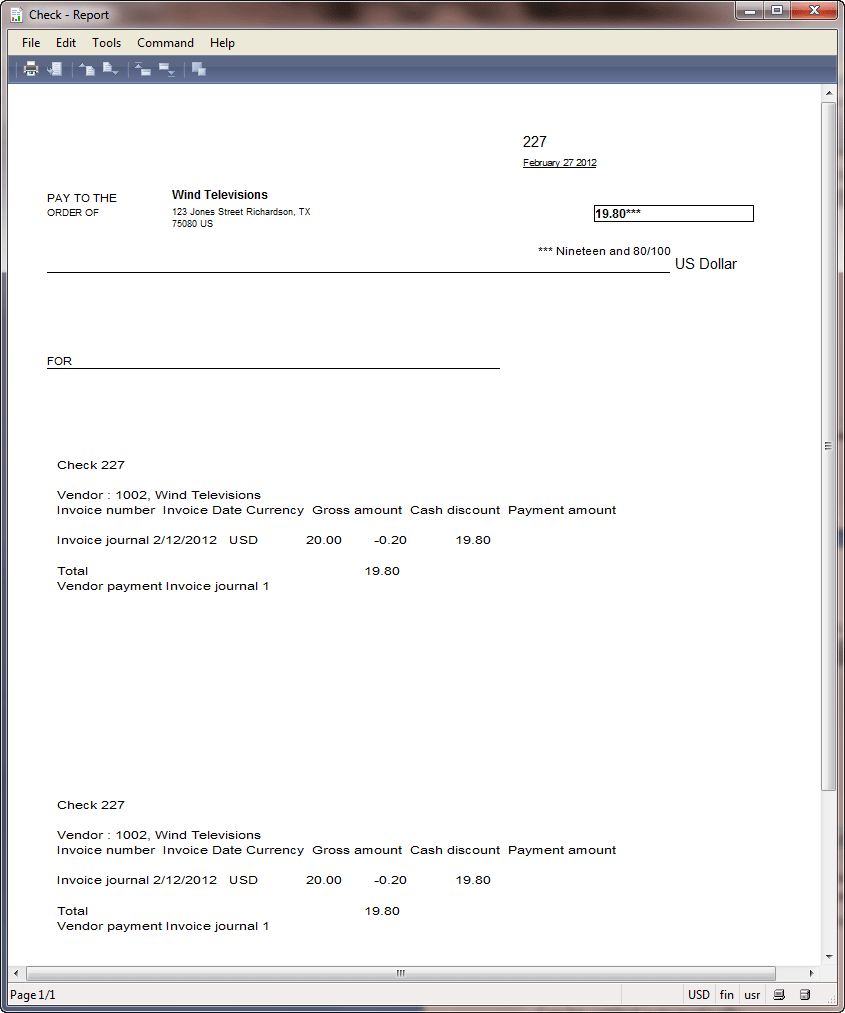
- Print the check to the screen. By default, checks are printed but we will change this setup to Screen by clicking the Document button. The Printer setup form opens. Select Screen and click OK. In the Payment by check form, click OK.
- The check will be shown.
- Return to the Journal voucher form. The value of the Payment status field is changed from None to Sent. It means that the payment is sent to the Vendor (checks, money, electronic transfer, etc.) but not yet received by the vendor.
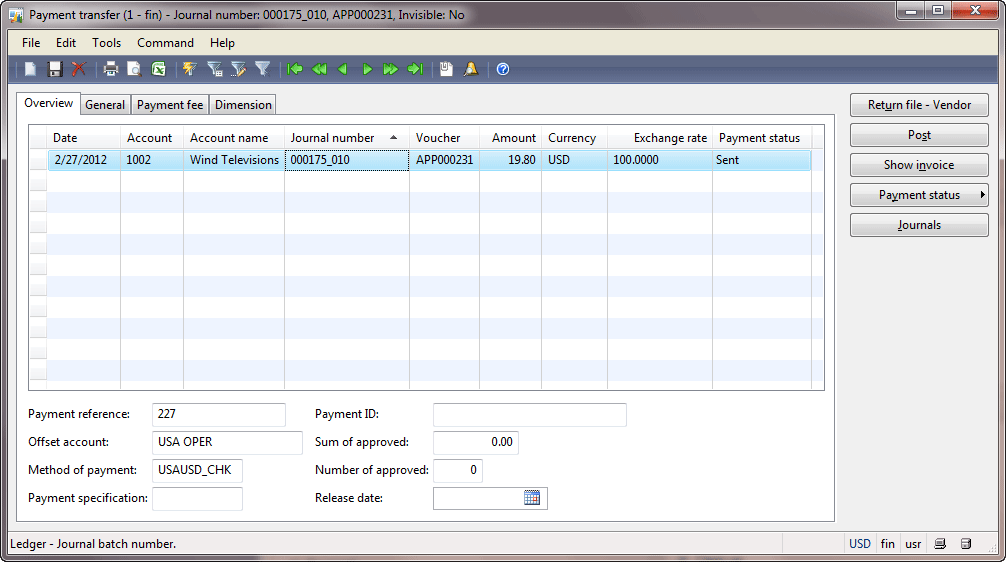
- For convenience, all sent payments are displayed in a separate journal under Accounts payable > Journals > Payments > Payment transfer. In this case, the Payment Manager can send all necessary payments during the day and then register the received status at the end of the day.
We assume that the Payment Manager calls the vendor to ensure that the check is received. If the electronic payment method is used, the return file is generated when the vendor receives the payment. In this case, the return file is loaded with the help of the Return file-Vendor button, validated, and the status is changed to Received automatically. In our case, we change the payment status from Sent to Received manually. Click the Payment status > Received button. The payment status is changed to Received. Note that this step is optional.
- Close the Payment transfer form and return to the Journal voucher form (click F5 to refresh data). Make sure that the payment status is Received. Since the payment is received, the Payment Manager posts the payment. Click the Post > Post button. The voucher is posted successfully.
Posting Results
Let’s analyze the posting results. The general ledger, vendor, and bank transactions should be created. In the previous paragraph, we have found out that the 1101100 ledger account is the controlling account for the USA OPER bank account and the 211100 ledger account is the controlling account for the 1002 vendor account. We assume to find the following transactions:
General ledger:
| 110110 (Bank) | 211100 (Accounts payable) | ||
| Debit | Credit | Debit | Credit |
| 19.80 | 19.80 | ||
Subledgers (the Vendor and the Bank ledgers):
| USA OPER (Bank account) | 1002 (Vendor) | ||
| Debit | Credit | Debit | Credit |
| 19.80 | 19.80 | ||
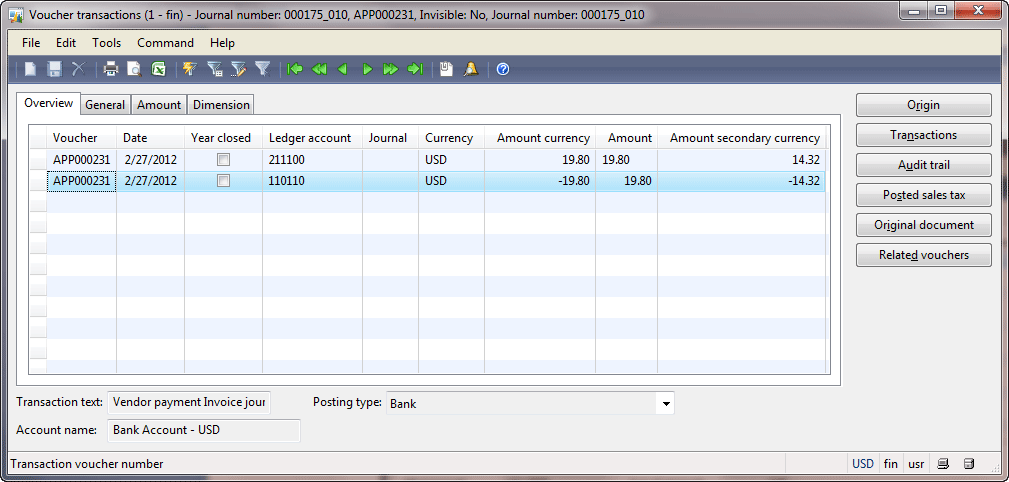
In the Journal voucher form, click the Inquiries > Voucher button. The Voucher transactions form opens. This form contains the general ledger transactions.
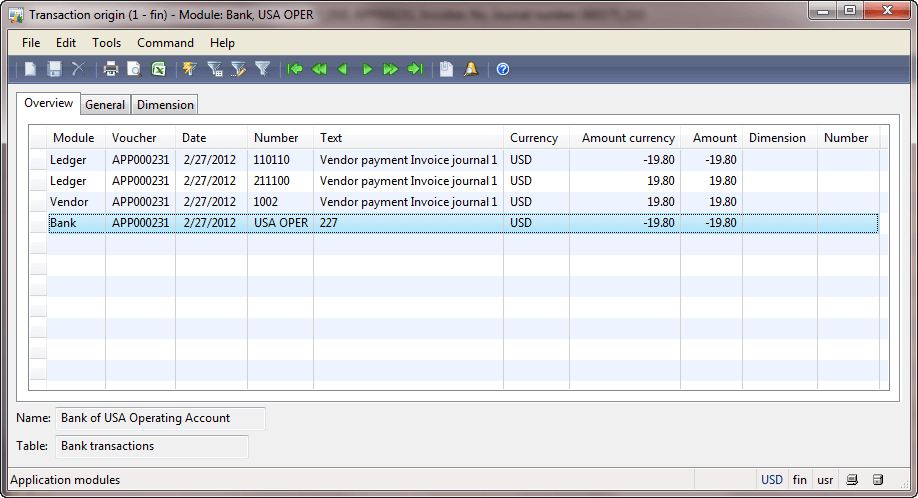
Click the Origin button to view all transactions for all ledgers. We can see that except ledger transactions one vendor and one bank transactions are generated.
Let’s analyze the general ledger transactions. Return to the Voucher transactions form. The 211100 account is the controlling account for the 1002 vendor. The 110110 account is the controlling account for the USA OPER bank account. We make sure that the general ledger transaction looks as follows:
| Cash & Cash equivalents (110110) | Accounts payable (211100) | ||
| Debit | Credit | Debit | Credit |
| $19.80 | $19.80 | ||
What about $0.2? If you remember when we have performed a purchase, the sum of $20 was recorded to the Credit part of the 211100 account, but after the payment, only $19.80 was recorded to the Debit part. So the balance for the 211100 account is $0.2. It means that the company owes $0.2 to the vendor. But this is not true because the company receives the cash discount. The cash discount should generate the following transaction:
| Sales | Accounts payable (211100) | ||
| Debit | Credit | Debit | Credit |
| $0.2 | $0.2 | ||
The Accounts payable account is decreased (since it is the Liabilities account, the Debit part is used). The Sales account is used because the company pays less for the purchased items. This item will be sold or used in production, as a result the company receives more profit, because the cost of item is less than it was assumed. The Sales account is increased, because company save money and their profit will increase. All the company’s profit should be returned to the Company Owners. The Sales account is like the Liabilities, so the Credit part is used.
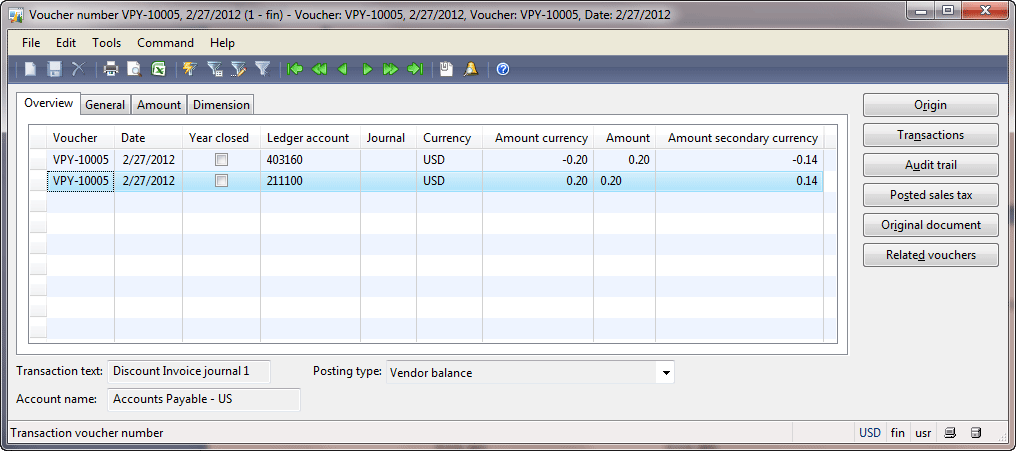
This transaction was generated. In the Voucher transactions form, click the Related voucher button. The Related ledger transaction voucher form opens. Click the Voucher button. The Voucher form opens.
We can see the following transaction:
| 403160 | 211100 | ||
| Debit | Credit | Debit | Credit |
| 0.2 | 0.2 | ||
The 211100 account is one of the accounts payable accounts. If we go to the Chart of accounts form, we find that the 403160 account has the “Purchase cash discount” name and belongs to the Sales accounts.
You can ask why the 403160 account was used as the Sales account. The ledger account for this operation is set up in the Cash discounts form located under Accounts payable > Setup > Payment > Cash discounts > find “1%D15” cash discount > Setup tab > Account received field.
With the help of these two vouchers, the 211100 ledger account will contain the correct value. In other words, the company does not owe to the vendor $0.2 for the “Invoice journal 1” invoice.
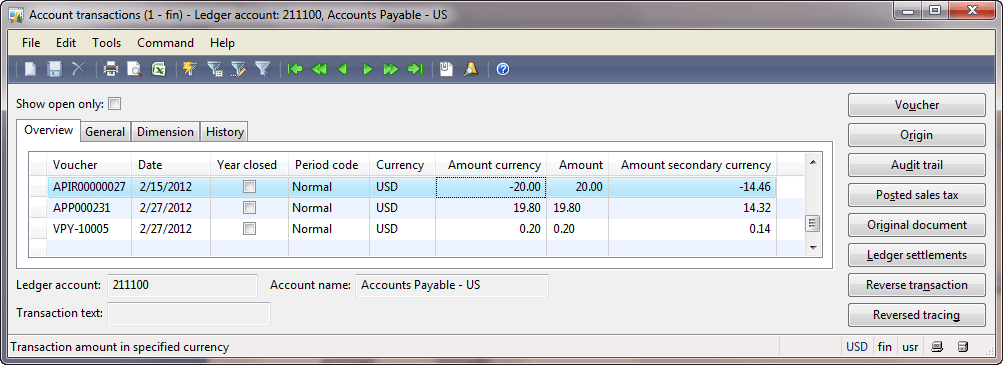
Check the 211100 account transactions under General ledger > Common Forms > Chart of Account Details > find 211100 ledger > Transactions button. On the screenshot, only the last 3 transactions are available.
So we make sure that the invoice for $20 will be paid with the cash discount ($19.8) and the accounts payable account contains the correct value.
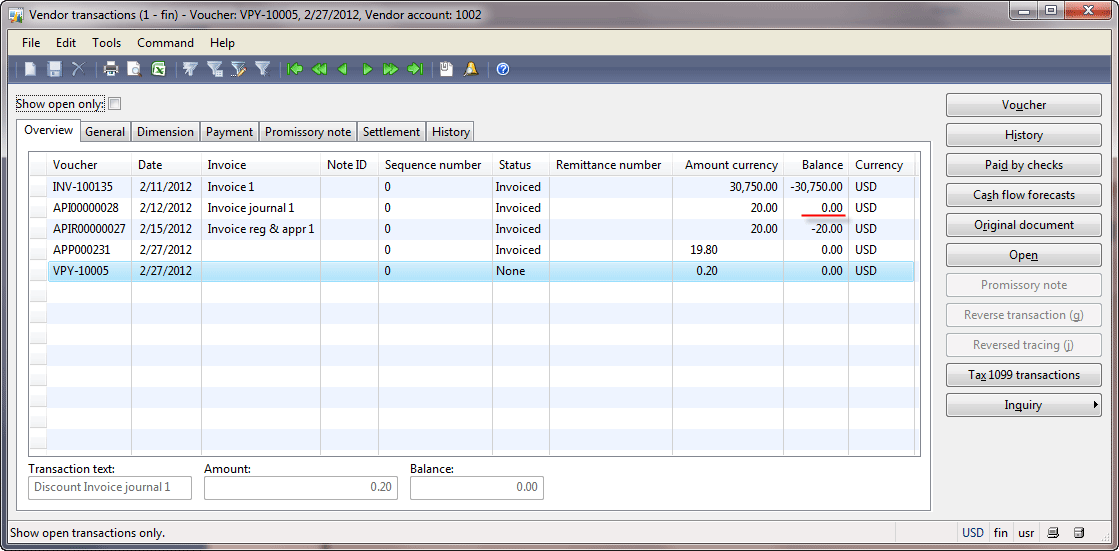
Now, we will check the vendor transactions to make sure that the company doesn’t owe for the “Invoice journal 1” invoice in the Vendor ledger. Go to Accounts payable > Common Forms > Vendor Details. The Vendors form opens. Find the 1002 vendor and click the Transactions button. The Vendor transactions form opens.
The first three transactions are generated from the purchase order, invoice journal, and invoice approval journal correspondingly. The transaction with the sum of $19.80 was generated when the payment journal was posted. The last transaction was generated for the cash discount. So we make sure that after the payment the vendor account was debited for $19.8+$0.2 = $20. In the Vendor transactions form, we can see that the “Invoice journal 1” transaction has the zero balance.
If we create the payment journal again and run the payment proposal, the “Invoice journal 1” invoice will not be shown. That is because this invoice was closed (i.e. paid). Microsoft Dynamics AX knows what invoice was paid based on the settlement.
If we click the Show open only check box in the Vendor transactions form, the “Invoice journal 1” and the payment with the discount lines disappear.
Settlement
The user can make the settlement manually. For example, the payment line can be created manually (without the payment proposal) and posted. In this case, the settlement is not created.
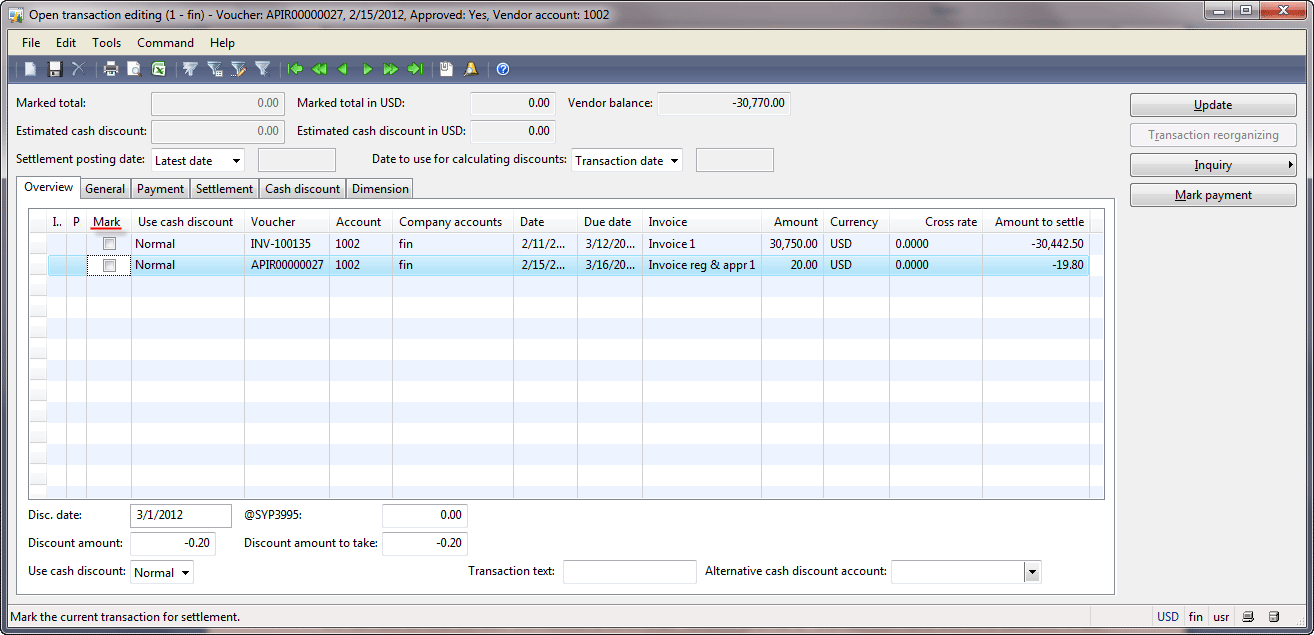
In the Vendors form, click the Function > Open transaction editing button. The Open transaction editing form opens. To settle the transactions, select the Mark check box. We can’t settle the invoice transactions because there have been no payments.
Let’s assume that the Payment Manager made a mistake and the payment was made for the “Invoice reg & appr 1” invoice. Since the Payment Manager settled the payment against the “Invoice journal 1” invoice, he or she should reverse this settlement and make a new one between the payment and the “Invoice reg & appr1” invoice. Let’s do this.
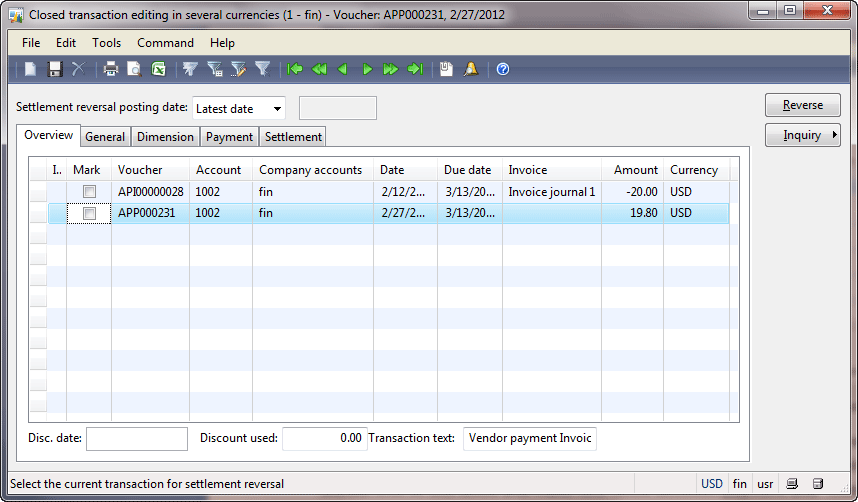
In the Vendors form, click the Functions > Closed transaction editing button. The Closed transaction editing in several currencies form opens.
Note that this form doesn’t contain the vendor transaction for $0.2 that was generated for the cash discount. Select the Mark check box for “Invoice journal 1”. The Mark check box for the payment will be selected automatically. Click the Reverse button. The settlement will be reversed and both transactions disappear from the form. Now, these transactions are open. Close the form.
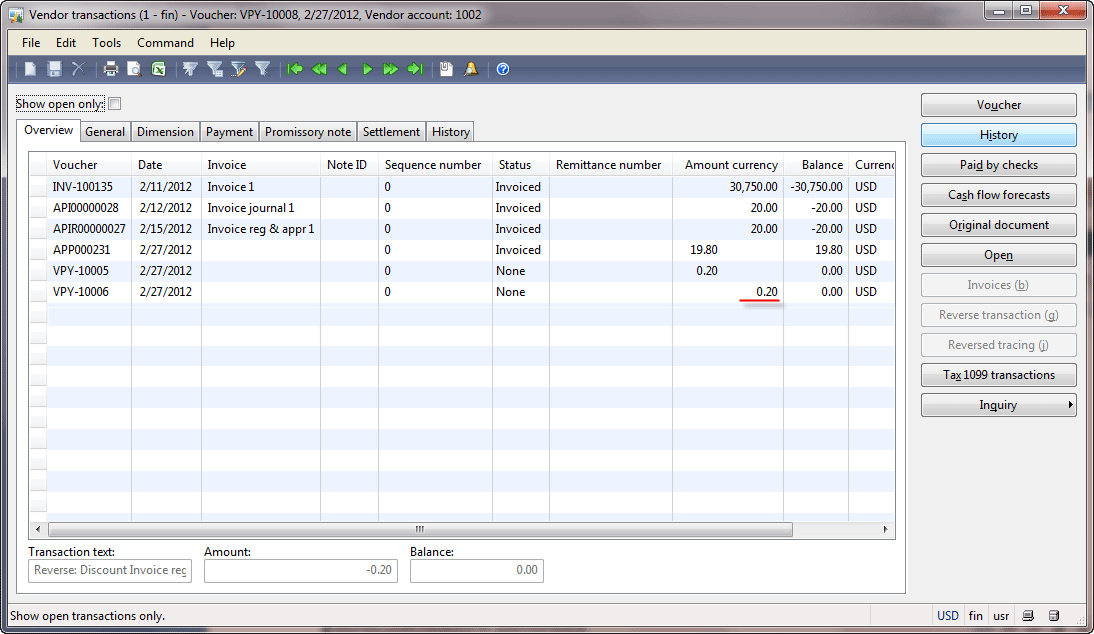
As a result, the transactions appeared in the Open transaction editing form and a new voucher with the reversed cash discount transactions was generated. In the Vendors form, click the Transactions button to make sure. The Vendor transactions form looks as follows:
It means that the system removes the cash discount, because Microsoft Dynamics AX doesn’t know for which invoice the payment is created. If the payment is created for the old invoice that was posted 1 month ago, then the cash discount is not applied. When we create a new settlement between the payment and the “Invoice reg & appr 1” invoice, the cash discount is applied again because the invoice and the payment date are in cash discount interval.
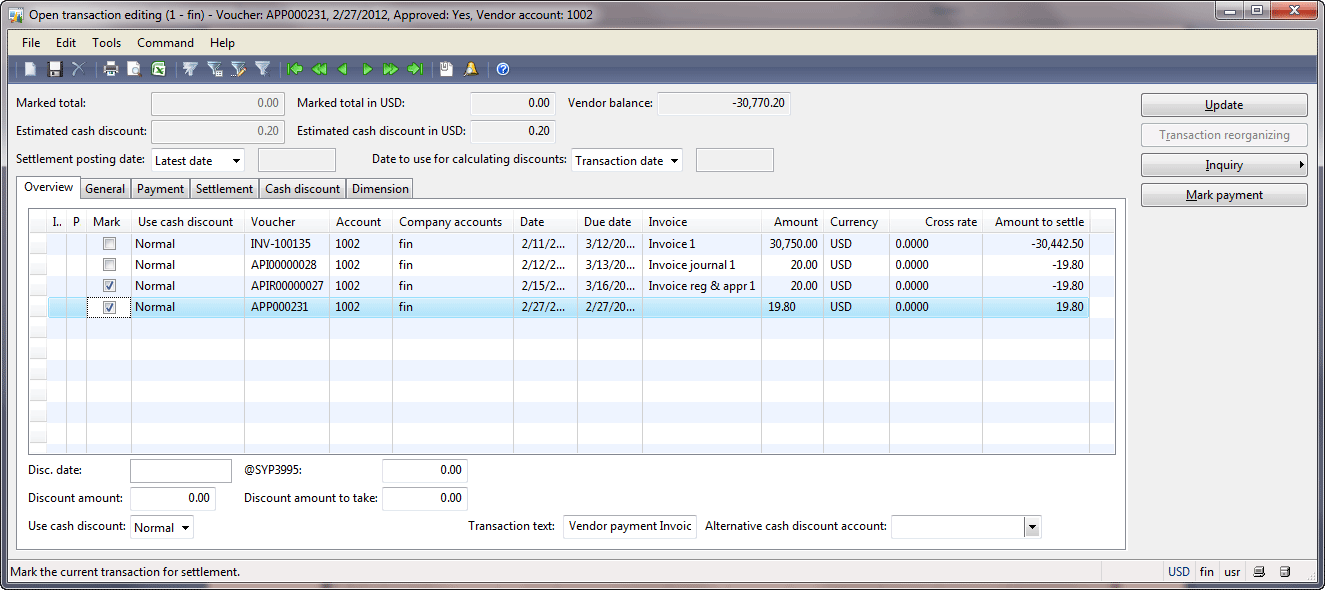
Make a new settlement. In the Vendors form, click the Function > Open transaction editing button. The Open transaction editing form opens. Make a new settlement – select the Mark check box in “Invoice reg & appr 1” and payment line.
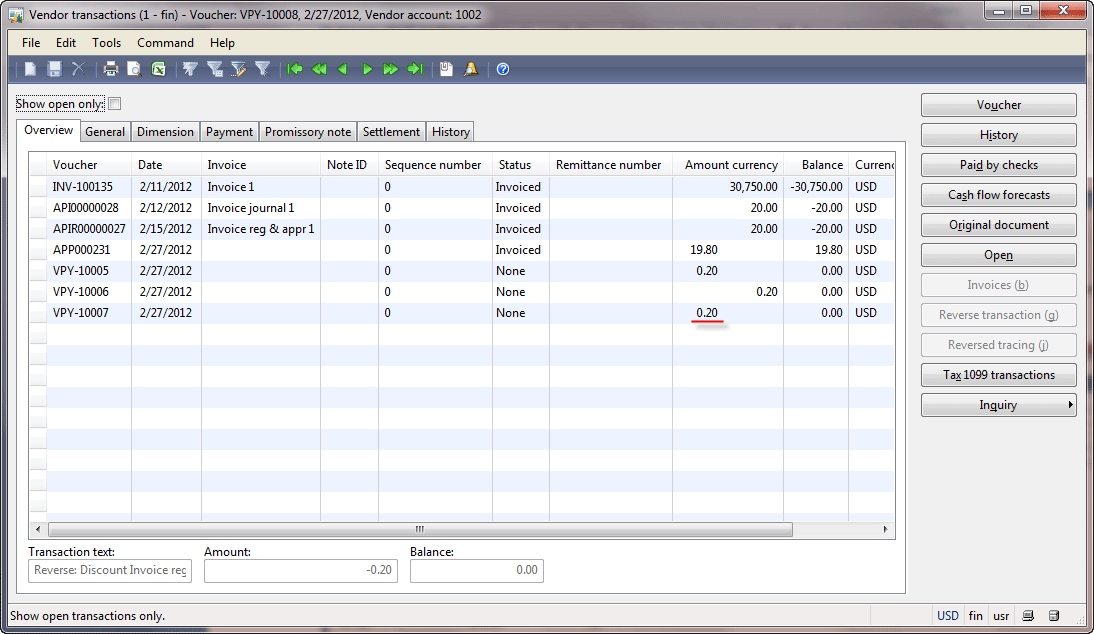
Note that Marked total amount is zero. Click the Update button. The new settlement will be created. As a result, the transactions disappear from the Open transaction editing form. Make sure that the transactions appear in the Closed transaction editing form. If we click the Transactions button in the Vendors form, the Vendor transaction form looks as follows:
When the discount amount is applied or reversed, the vendor transactions are generated. Note that the general ledger transaction is also generated. To view this transaction, select the VPY-10007 voucher and click the Voucher button in the Vendor transactions form.
When the payment is created manually and posted, Microsoft Dynamics AX automatically settles it to some invoice. If the invoice amount is greater than the payment amount, the vendor invoice transaction is split to the two parts. One of these parts becomes settled, the other does not. It means that the invoice is partially paid.
Try it yourself. We have an invoice for the sum of $30 750. Create the payment for $2 000 and make sure that the vendor invoice transaction is split to $28 750 and $2 000. And the last one is closed.
The automatic settlement can be disabled under Accounts payable > Setup > Parameters > Settlement tab > Settlement field group > Automatic settlement field.
Summary
In this training lesson, we have studied the following:
- The payment process which includes the following:
- Finding invoices.
- Creating payments.
- Sending the money or the money equivalent to the vendor.
- Receiving the notification from the vendor.
- Posting the payment.
- Analyses of how the payment is posted in the system (i.e. the payment results).
- The open and closed vendor transactions.
In the next training lesson, we will go through the sales process.
Financials training
The post Paying a Vendor first appeared on Dynamics AX Training.This was originally posted here.


 Like
Like Report
*This post is locked for comments