


 8,220
8,220 Like
Like Share
Share
 Report
 Mastering Combined Shipments on a Single Invoice in Business Central
Combining multiple shipments into a single invoice can significantly streamline your billing process, especially if you're dealing with numerous orders for the same customer that are shipped at different times but are meant to be invoiced together. Microsoft Dynamics 365 Business Central offers a feature that simplifies this task, allowing you to efficiently manage your sales orders and invoicing. Here’s how you can leverage this functionality to ensure a seamless invoicing process.
Combining multiple shipments into a single invoice can significantly streamline your billing process, especially if you're dealing with numerous orders for the same customer that are shipped at different times but are meant to be invoiced together. Microsoft Dynamics 365 Business Central offers a feature that simplifies this task, allowing you to efficiently manage your sales orders and invoicing. Here’s how you can leverage this functionality to ensure a seamless invoicing process.
Prerequisites for Combined Shipments
Before you can harness the power of combined shipments, ensure you have multiple sales shipments posted for the same customer and in the same currency. Essentially, this means you need to have created and shipped two or more sales orders, which are yet to be invoiced.
Before you can harness the power of combined shipments, ensure you have multiple sales shipments posted for the same customer and in the same currency. Essentially, this means you need to have created and shipped two or more sales orders, which are yet to be invoiced.
Enabling Combined Shipment Features
To utilize this feature effectively, you must first enable the 'Combine Shipments' toggle on the customer card and also within the sales orders. This setting is crucial as it signals Business Central to consider these orders for combined shipment when you proceed with the invoicing.
To utilize this feature effectively, you must first enable the 'Combine Shipments' toggle on the customer card and also within the sales orders. This setting is crucial as it signals Business Central to consider these orders for combined shipment when you proceed with the invoicing.
Manually Combining Shipments on a Single Invoice
1. Accessing Sales Invoices: Navigate to the sales invoices section by using the 'Tell Me' feature. Simply click the lightbulb icon, type 'Sales Invoices', and follow the related link.
2. Creating a New Invoice: Hit the 'New' action button and start the process of creating a new invoice, ensuring you input the correct 'Sell-to Customer No.' for whom the items were shipped.
3. Adding Shipment Lines: Within the 'Lines FastTab', utilize the 'Get Shipment Lines' action. You'll be able to choose either all the lines by selecting them and clicking 'OK', or specific lines by using the Ctrl key for multiple selections.
4. Finalizing the Invoice: After confirming the shipment lines, you can post the invoice directly.
Automatically Combining Shipments
For a more streamlined process, Business Central offers an automatic function to combine shipments:
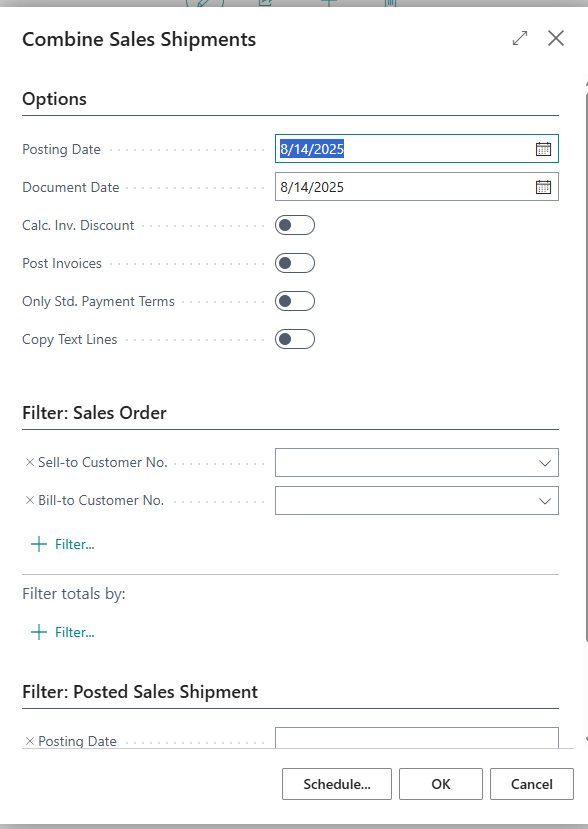
1. Initiating the Combine Shipments Batch Job: Use the 'Tell Me' feature, search for 'Combine Shipments', and select the appropriate link to begin.
2. Configuring the Batch Job: Set your preferences on the batch job request page, making sure to select the 'Post Invoices' checkbox if you wish for the system to post invoices automatically.
Cleaning Up After Combined Shipment Posting
Once you've combined and posted your shipments into an invoice, it’s wise to clean up your system by removing the now-invoiced sales orders. This can be done via the 'Delete Invoiced Sales Orders' option found through the 'Tell Me' feature, helping you maintain an organized and up-to-date sales order log.
For a more streamlined process, Business Central offers an automatic function to combine shipments:
1. Initiating the Combine Shipments Batch Job: Use the 'Tell Me' feature, search for 'Combine Shipments', and select the appropriate link to begin.
2. Configuring the Batch Job: Set your preferences on the batch job request page, making sure to select the 'Post Invoices' checkbox if you wish for the system to post invoices automatically.
Cleaning Up After Combined Shipment Posting
Once you've combined and posted your shipments into an invoice, it’s wise to clean up your system by removing the now-invoiced sales orders. This can be done via the 'Delete Invoiced Sales Orders' option found through the 'Tell Me' feature, helping you maintain an organized and up-to-date sales order log.
Leveraging the combined shipments functionality in Business Central not only optimizes your invoicing process but also enhances overall efficiency in managing customer orders. By following these steps, you can ensure that your invoicing reflects the actual shipment activity, thereby improving accuracy in your sales and financial reporting.
*This post is locked for comments