


 Like
Like Share
Share
 Report
With Spring 2018 release, Microsoft introduced several types of server-side logic including Business Process Flows, Workflows, Calculated & Rollup Fields and Business Rules which do not require any coding. Part 5 of this series covers Calculated & Rollup Fields. In this blog we will explore Business Rules.
Business Rules: Declarative logic comprises of conditions and actions for data accuracy and consistency across applications. Business Rules provide a nice graphical UI for defining these rules and actions that will be executed synchronously when a record is created/updated. These rules are created at entity level in common data services, hence you do not need to write separate logic for individual apps (canvas & model driven apps)
You can perform below actions using business rules:
- Set field values
- Clear field values
- Set field requirement levels
- Show or hide fields
- Enable or disable fields
- Validate data and show error messages
- Create business recommendations based on business intelligence
With Model Driven apps, all above actions are available. But with Canvas apps, below actions are not available.
- Show or hide fields
- Enable or disable fields
- Create business recommendations based on business intelligence
Demo:
We will explore “Expiration Date” field of Company Product entity created in Part 2 of series. We will create new field “Is Expired” which will be Two-Options field with values Yes/No. Using business rule we will set value and show/hide “Is Expired” field if “Expiration Date” field contains value.
- Login into PowerApp web portal
- Go to Data->Entities, select Company Product entity. Select Fields tab and click on + Add Field
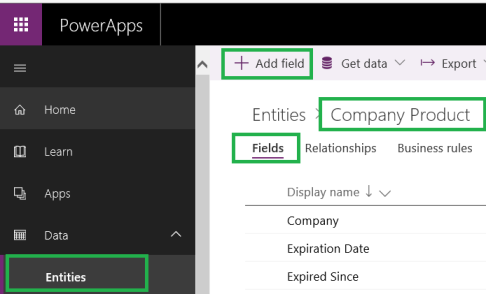
- Give a name to field “Is Expired”, choose Two-Options as data type and click on Done

- Once created new field “Is Expired” will appear in list of Fields. Click on Save Entity
- Select Business Rules tab now, Click on Add Business Rule which will open Dynamics 365 business rule designer.

- By default, new rule will have one condition. Give a name to your Business Rule. Click on Condition to set condition properties. In my case it would be “Expiration Date” contains data

- Click on Apply. You can also add more rules to your condition by clicking on + New in condition properties.

- You will observe as you will be adding conditions or actions to your business rule, text representation of same will added to Business Rules Text View

- You can also add more conditions or actions from Components tab on right or + Add button in top menu options.

- Every condition will have success (
 ) and failure (
 ) paths. Actions connected to success path will trigger when condition is true. Similarly, actions connected to failure path will trigger when condition is false.

- Let’s add action to our business rule. Drag and Drop Set Field Action from components and connect it with condition success. Give a name to your action, set action properties as “Is Expired as Yes”. Click on Apply

- Similarly drag and drop one more Set Field Action and this time connect it with condition failure. Give a name to your action and set action properties as “Is Expired as No” this time. Click on Apply
- We want to show Is Expired field only if it is set to Yes. Drag and Drop Set Visibility Action and connection with Action which sets “Is Expired” to Yes. Give a name to action and set properties as “Is Expired” visible as Yes. Click on Apply

- Click on Validate on top right to make sure everything is ok. Click on Save once validated. Once saved Click on Activate.
- Add “Is Expired” field on Company Product form and set default Visibility as No. Refer Add & Modify forms section in Part 3 of series on how to add fields on form in model driven app.
- Run your app. Open company product record with or without Expiration Date

*This post is locked for comments