


[How-To] Build Automated Testing for Microsoft D365 Business Central
Views (4707)

 Like
Like Share
Share
 Report
Let’s kick off with the Automated Testing on Microsoft D365 Business Central. If you are going to publish your app on Business Central, there are list of things you must complete before submitting it for validation. The checklist is available here (https://docs.microsoft.com/en-us/dynamics365/business-central/dev-itpro/developer/devenv-checklist-submission).
One of the requirement to submit an app on Extension is you must include a Visual Studio Code test package with your extension. The test package must include at least 90% code coverage.
Microsoft has published one example for the automated testing which you might find very complex to begin with. So I’m going to explain how it can be achieved with very simple example.
First create an app extending customer ledger entries to auto populate all 6 shortcut dimension when Sales Document is posted. Here is the snapshot of the tableextension for Cust. Ledger Entry.
 |
| Table Extension for Cust. Ledger Entry |
Following AL Code subscribes “OnAfterCopyCustLedgerEntryFromGenJnlLine” event exposed from Cust. Ledger Entry Table.
 |
| Subscribing the event |
And below is the procedure that transfers all shortcut dimension to the Cust. Ledger Entry table
 |
| Transferring Data to Customer Ledger Entry from Sales Document |
So, if you use above AL Code, we have an app ready. Now we can start up with the new project for the automated test functionality.
It is important that you must separate the extension and the tests into separate projects. Create new project in Visual Studio Code and define the dependencies in app.json file. Appid, name, publisher and version must match with your base application.
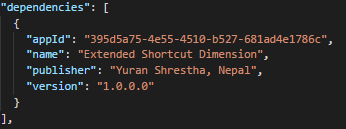 |
| Defining Dependencies in app.json |
After you setup the dependencies value, you will have to download the symbols from the base project. So this means you will have to publish your base app to the Business Central before you download symbols.
Also make sure that the idRange in your Automated test project does not conflict with your base application, otherwise you will not be able to publish it in D365BC.
When you download symbols, Visual Studio Code will populate all the required symbol files as follow.
 |
| Downloaded Symbols |
You will notice that your base app has been downloaded as symbols in .alpackages folder. Also you will see one new file called “Microsoft_Test_YourVersionNo.app”. This file is needed before you start writing AL Code for Automated testing. You will have to import the test toolkit for your version of Business Central either from Development Environment or import it using powershell command prompt.
Following is the powershell command that imports test toolkit into the application database.
Import-TestToolkitToNavContainer -containerName navserver
You can also use -includeTestToolkit parameter while creating container in docker. If you use this parameter, you won’t have to import the test toolkit later manually.
Make note that if you import the test toolkit later, you will have to generate the symbol reference first before downloading the symbol in visual studio code. Following is the command to generate the symbol reference.
finsql.exe Command=generatesymbolreference, Database=DatabaseNameHere, ServerName=ContaineNameHere\SQLEXPRESS
Now everything is ready, lets start creating a new codeunit for automated testing. We will call it “Extended Dimension Test” and the id for the codeunit will be 55201
 |
| Codeunit for automated testing |
The codeunit should of subtype Test. So this will help identify the business central application to include this on test tool.
If you see above figure, you will find the feature tag, this represents the name of the feature, application area, functional area or another aspect of the application. This list of tags must point to an area of your solution that is touched by the test.
I’ve defined few library variables that are required while testing this application. These library comes up with the test toolkit so in most cases you will not have to worry.
 |
| Defining procedure for automated testing |
So here you go, you will have to define your procedure as Test. This is the function type. If you forget to define the function type as Test, test tool will not include the function.
It’s good idea to write what the test function does as shown in above figure. For each test tool it is also recommended to have GIVEN-WHEN-THEN tags so that these tags provide a framework for the specific test criteria.
[GIVEN] : This tag is used for the lines of code that start setting up the different setups that are required before the application is tested. Its more like creating setup if does not exists, creating documents and fill up all requirements before processing ahead. There can be multiple GIVEN tag.
[WHEN] : This tag is used for the lines that describes the action under test. Example: Posting of Documents, Validations of something etc.. There should be only one WHEN tag, if there is multiple you must separate the test into two or more tests.
[THEN] : This tag is used for the lines that verifies the test results. You can add more than one THEN tag.
I’ll upload this automated test extension along with the base extension in github. All above procedures you will find in my repositories in github.
Now let’s start the business central web client and see how it look when you use Test Tool. Below is the screenshot.
 |
| Test Tool Dynamics 365 Business Central |
So, that’s it for today. When you run the test, the result is Success. You do not have to worry about the document it generates when you test the application because all it does during testing gets roll backed. So, this is how you can start up building automated testability in Dynamics 365 Business central. I’ll come up with more articles regarding Business Central.
Enjoy AL Programming & Keep in touch :)
This was originally posted here.
*This post is locked for comments