UPDATED 17th November 2021
UPDATED 3rd February 2022
NOTE: PLEASE USE A TEST ENVIRONMENT FIRST AND TAKE NOTE OF THE STEPS.
This is just a more articulated step by step description of what is reported in the official documentation Integrating with Dynamics 365 Sales - Business Central | Microsoft Docs considering an environment that is already working successfully with O365 legacy authentication (but it might also be applied to new deployments).
It applies to the following versions and minimum CUs:
IMPORTANT: BOTH application (objects) and platform need to be updated *** (see bottom of this blog)
IMPORTANT: If you have a different major version or a lower CU than the one highlighted stop reading. What will follow will not work for you.
IMPORTANT: With Dynamics NAV 2016, read Modifying Dynamics 365 Sales Code for Technical Upgrade to Dynamics NAV 2016 | Microsoft Docs
PRE-REQUISITES
Be sure to have deployed CRM Solution ZIP file from the DVD in Dynamics 365

1) Create an integration user in Microsoft 365 Admin Center
- Login to Microsoft 365 Admin Center as Global Administrator
- Go to Users > Active Users > Add a User
- Name the user like e.g. D365INTEGRATION and assign a strong password
- IMPORTANT: Assign the user a valid license for D365
2) Add the integration user to Dynamics 365 through Power Platform Admin Center
- Go to Power Platform Admin Center and choose the Dynamics 365 environment
- On the right side, click on User > See All
- Click on Add user
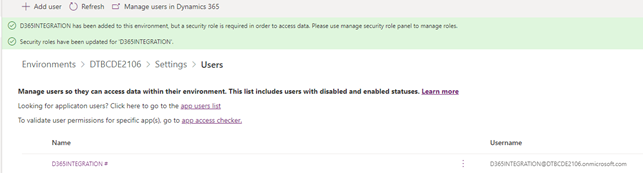
- On the right pane, type e.g. D365INTEGRATION (your integration user) and assign these 2 roles:
- Dynamics NAV Integration Administrator
- Dynamics NAV Integration User
Click Save (below how it should look like)
VERY IMPORTANT
3) Change integration user to be non-interactive in Dynamics 365
- Go to Dynamics 365 Advanced settings
- Select Settings > Security > Users and select D365INTEGRATION user
- Scroll down in the Administration tab and change Access Mode to Non-Interactive

4) Create an App Registration in Azure
- Login to Azure portal with Global Administrator credentials
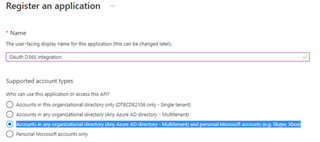
- Go to App Registration and click New registration
- Type a name like e.g. OAuth D365 Integration
- Choose Accounts in any organizational directory (Any Azure AD directory - Multitenant) and personal Microsoft accounts (e.g. Skype, Xbox)
- Click Register
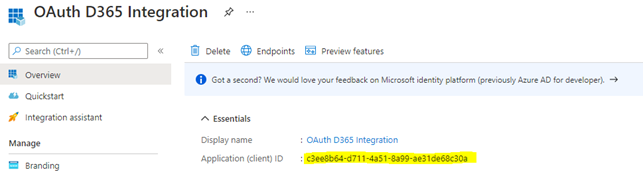
- IMPORTANT: When the application is registered, in the Overview tab, take note of the Application ID: this will be used in the OAuth connection string later on.
5) Assign API permissions to the registered App
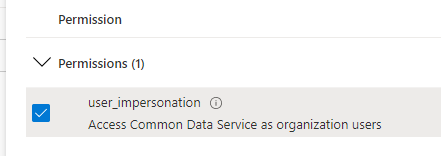
- Go to API Permission tab and click add a permission
- Select Dynamics CRM
- Select user_impersonation and click Add Permissions
6) Change app registration manifest to public
- Go to Manifest tab
- Modify this property as "allowPublicClient": true,
- IMPORTANT: click SAVE on top left of the manifest (or changes will not be saved)
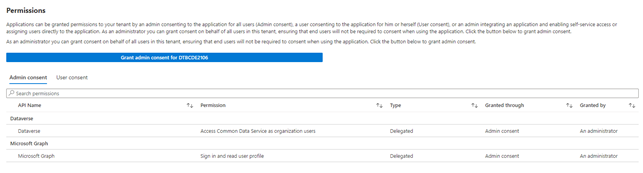
7) Add consent to App Registration from Global Administrator
- In the azure portal search for Enterprise applications
- Select your app registration (e.g. OAuth D365 Integration) and go to Permissions
- Click Grant admin consent for <TenantName>
- In the end, you should have Dataverse API granted through Admin consent and Granted by An Administrator (see image below)
8) Configure Dynamics NAV / 365 Business Central to connect using OAuth
- In Dynamics NAV / 365 Business Central, go to Microsoft Dynamics 365 For Sales Connection Setup page and add user id (e.g. D365INTEGRATION@domain.onmicrosoft.com) and password
- Change the connection string field with the one provided below.
IMPORTANT: Change the following parameters accordingly to your own
Username : Your username (e.g. d365integration@yourdomain.onmicrosoft.com)
Url : your Dynamics 365 Url (e.g. https://yourorganization.crm4.dynamics.com)
AppId : App registration application ID taken from the overview tab
RedirectUri : app://<AppId>
Dynamics NAV 2016, 2017 and 2018 :
AuthType=OAuth;Username=D365INTEGRATION@dtbcde21060.onmicrosoft.com;Password={PASSWORD};Url=https://dtbcde21060.crm4.dynamics.com;AppId=c3ee8b64-d711-4a51-8a99-ae31de68c30a;RedirectUri=app://c3ee8b64-d711-4a51-8a99-ae31de68c30a;TokenCacheStorePath=;LoginPrompt=Never
Dynamics 365 Business Central 14.x and 15.x:
IMPORTANT: you MUST choose Dynamics 365 SDK version 91 in the configuration page
AuthType=OAuth;Username=D365INTEGRATION@dtbcde2106.onmicrosoft.com;Password={PASSWORD};Url=https://dtbcde21060.crm4.dynamics.com;AppId=c3ee8b64-d711-4a51-8a99-ae31de68c30a;RedirectUri=app://c3ee8b64-d711-4a51-8a99-ae31de68c30a;ProxyVersion=91;TokenCacheStorePath=;LoginPrompt=Never
9) Test connection. It should be successful.
If you like, you could now remove the license in Microsoft 365 Admin Center for the Dynamics 365 integration user (this should not be needed for non-interactive users). IMPORTANT: leave this task as last one and only at the end of the configuration and when everything is setup and proof to be fully working.
*** (note related to application merge)
Microsoft position about deployment of updates is always to perform a full update of both platform and application (and not only platform side). This is proof to work and what has been fully tested by Microsoft.
Within this specific case, where OAuth (through ADAL libraries) has been introduced to handle the connection, API handling for authentication might have been changed, it is feasible that you also have to merge the application.
Considering the more exotic customization or extensions in place that partner might have thought of, the following generic approach could be considered.
1. Be sure to get used to OAuth integration by deploying a Cronus database and a sandbox Dynamics 365 environment and have them fully working. This will proof that you could master OAuth integration related to your own upgrade.
2. Test initially a platform (so called, technical) upgrade to the version that implement OAuth for Dynamics 365 integration.
If you succeed in having this connected with just the platform and (very important) you widely, carefully and fully test all the standard and non standard integration, then you might think of moving the application in a second time or, more preferrable, to plan a full upgrade to latest version, as soon as possible.
3. If tests are failing, merge all the objects related to Dynamics 365 integration (typically the ones that have ‘CRM’ in their name) and also the objects related to Job Queue and Task Scheduler (these are very important too, these have ‘job queue’ in their name, typically).
If you succeed in having this connected and (very important) you widely, carefully and fully test all the standard and non standard integration, then you might think of fully moving the application in a second time or, more preferrable, to plan a full upgrade to latest version, as soon as possible.
4. If tests are failing, then review the merge process and perform a fully merge of the objects as per Microsoft recommendation and support.


