Samantha,
First, if you are collecting Sales Tax for US and Canadian Tax (GST/PST/HST/QST) BC will work just need setups. If you have dozens of States (US) you might consider an APP (Wolters Kluwer or Avalara) to do all the work. If you want to setup, you can use the assisted setup, just search for Set Up Sales Tax. Below are the steps manually:
Sales and Use Tax setup in Microsoft Dynamics 365 Business Central consists of the following four components:
- Tax Groups
- Tax Jurisdictions
- Tax Details
- Tax Areas
After setting up each of the components, you then tie them all together via the Item card, Customer card and Customer Ship to Address card. Let’s start with the four components.
Tax Groups
Tax Groups are groups of inventory items that are subject to the same tax, or in other words, eligible for tax to be calculated if the customer is tax liable. To set up this component, type “tax group” in the search bar. You will see two options for Tax Groups — NONTAXABLE and TAXABLE.
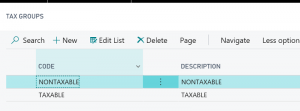
Click +New and set up your list of Tax Group Codes.
The Tax Group is then set on the individual Item card. Open an Item card and select the desired Tax Group Code. This can be found on the Costs & Posting tab of the Item card as shown below:
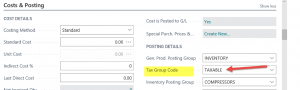
Choose the correct Tax Group Code for the item in question. You will need to do this for each item. This tells the system that the item will (or will not) participate in the tax calculation.
Tax Jurisdictions and Tax Details
Tax Jurisdictions are essentially the tax authorities of state, city or county. To set up this component, type “tax jurisdictions” in the search bar. On the first page you will see the list of all the jurisdictions that might have been set up already or were set up using the assisted setup feature in Dynamics 365 Business Central. The ones added by the assisted setup might not apply; if they don’t, you can delete them.
To add a new Tax Jurisdiction, click on +New and enter the information below:

Highlight a county. Select Details. Now you will see the list of Tax Details for the taxable and non-taxable groups. You will fill in the Tax Type, Effective Date and the Tax Below Minimum fields.
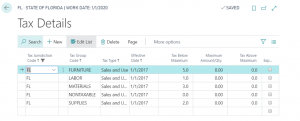
You can set up the Tax Type to indicate Sales and Use Tax, Sales Tax Only or Use Tax Only to meet different tax requirements.
Tax Areas
In Business Central there is only ONE field on the Customer card to enter a Tax Area. The Tax Area specifies tax areas for specific customers or vendors. This can be assigned to the Customer and/or Vendor card (which we will do in a later step).
Tax areas typically represent combinations of tax jurisdictions. Because most locations are taxed by more than one tax authority, this table lets you combine different authorities into a Tax Area that will include all the necessary tax authorities. Each Tax Area card has all of the jurisdictions listed. If a Tax Area has only one jurisdiction, that’s fine too. It just needs to be specified on the Tax Area card.
To set up this component, type “tax area” in the search bar. Then enter a code and a description. For example, a Tax Area could be a city such as Atlanta, Ga., as shown below:

Highlight the Tax Area and click Edit. The details page will appear. In our example, we highlighted the Tax Area of Atlanta, Ga.
In the Lines section of the page, you will now choose which Tax Jurisdictions should be included in that Tax Area code. You can also give the system a specific order in which to perform the tax calculation. For example, some Tax Areas require that a county tax, municipal tax and state tax all be charged on a sale — but in a specific order. This structure allows you to enter all those tax entities for the Tax Area to ensure you are charging the correct taxes at the correct time.

Taxing a Customer
Now that we’ve set up all four components, let’s tie them together for the customer. In order for a customer to be charged tax, two fields must be completed either on the Customer Card or on the Ship to Address card. Here are both of those options:
- Customer Card
On the Customer card, the two fields are Tax Liable and Tax Area Code (found on the Invoicing tab). The Tax Area Code reflects the tax that would be charged to this customer if you sold to the address in the Address and Contact tab on the Customer card.
- Ship to Address Card
In some cases the Customer is not taxable except when an item is being shipped to a certain location. In that instance you would set the Tax Liable and Tax Area Code fields on the Ship to Address.
From the Customer card, click Navigate and then Ship to Address. You might have multiple ship-to locations listed. Click on the desired Ship to Code to open the card. On the Ship To page you will see the fields Tax Area Code and Tax Liable.
Setting Up Use Tax
Use Tax is a United States sales tax that is paid on items that are purchased by a company and used by that company instead of being sold to a customer. The company must pay sales tax for those items to the government in the form of use tax. Use Tax is usually determined by the item being sold and is usually set on the Purchase Order.
Type “purchase orders” in the search bar and select the purchase order. On the Purchase Order Lines, you will see a number of tax-related fields. You might have to personalize the page to see the Use Tax button.
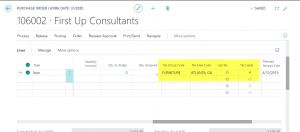
Having tax options at the line level allows you to set tax per item on the line. Some lines might have tax associated with them while others do not.
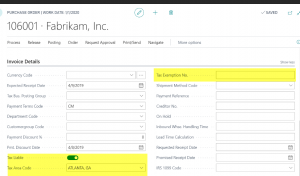
The tax fields are also visible on the Purchase Order Header in the Invoice Details section. Setting tax options here indicates that the entire purchase order is tax liable. Dynamics 365 Business Central also provides a place for a Tax Exemption No., if applicable.
Note: You can also set up a Purchase Tax for a Company, Location and a Provincial Tax Area Code as well as tax that is non-recoverable. Additional information can be found in the Help section of Business Central.
Hope this helps.
Thanks,
Steve


