


Predict lung cancer malignancy, using Azure AI ML studio, using Deep learning
Views (5)
 21
User Group Leader
21
User Group Leader
 Like
Like Share
Share
 Report
Amigos, in this blog, I will try to show how we can implement Azure ML Studio to predict complex forecasting answers, with the help of Azure Pipelines and ML jobs. I have covered how to setup Azure ML learning studio and pieplines, earlier in my blogposts:
https://subsd365.blogspot.com/2024/08/implement-no-code-predicitve-modelling.html
https://subsd365.blogspot.com/2024/09/step-by-step-azure-ml-job-to-predict.html
This post would give you an impression as to how leverage large datasets to evaluate a complex possibility (any patient having chances of relapses of a disease like Cancer/ its malignancy), by doing Classification based algorithm, without practically writing a single line of code.
Here goes the steps:
Step 1: Creating a data-ML job --
Once you have created An Azure ML Studio Workspace, you can crawl down to Automated ML Jobs section as shown below:

Click on Add and the following screen would come:

Fill it out, as shown. In the experiment, I have selected New experiment; Alternately, you can select an existing one.
Click Next.

Click on Create to proceed:

Fill out the screen as follows; do select Type as Tabular:

Select Source as web files in the next screen:

This will take you to the following screen:
I took the data from the following Github URL repo:
https://raw.githubusercontent.com/rohitinu6/Lung_Cancer_Prediction_Using_Machine_Learning/refs/heads/main/Dataset/survey%20lung%20cancer.csv
Hence I am pasting the same out here:

Clicking on Next would take some time to get things validated and take you to the next screen, giving you how the system has interpreted the data in a tabular format:


And in the next step, click on Create to create the data step:

Once the data gets created, you would come back to the screen, from where you started it all:

And in the following screen, we are selecting the column we need for prediction:


I have exluded them purposely, as they are not really related to classification algorithms. excluding them, would just save some cost.
Click on Save.
Click on Validation Type as: K-Cross validation, and test data as 30% of data, as a result 70% of the data would be kept for training and 30% as testing:

Click Next to continue. Here you can select Computer cluster (they are cheaper and quite cost saving: able to scale down when not in need). I created one before hand and am using the same here:

Once done, now you can put it for training job:

Here you need to wait, till the time the algo completes the training, by going through the model again and again (called as Epochs).
Step 2: Create and endpoint
Once the training is complete, it looks like:

Click on Model+Child Jobs, to see the list of associated jobs created along with.

Select the one with AUC weight that is close to 1 >> Click Deploy to continue:

Choose Real time time endpoint. The following scteen will appear:
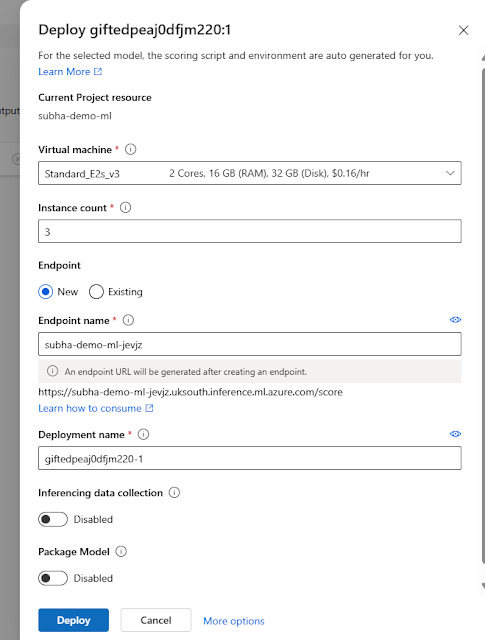
Choose the necessary Virtual machine and click on Deploy button to continue. This will initialise the deployment and will consequently turn you back to the following screen:


It will be shown as Creating state:

Once done, teh deployment looks like this:

Uh, now it's ready -- let us test it.
Step 3: testing the endpoint --
Click on Test tab:

I tested with the following JSON:
{
"input_data": {
"columns": [
"GENDER",
"AGE",
"SMOKING",
"YELLOW_FINGERS",
"ANXIETY",
"PEER_PRESSURE",
"CHRONIC DISEASE",
"FATIGUE",
"ALLERGY",
"WHEEZING",
"ALCOHOL CONSUMING",
"COUGHING",
"SHORTNESS OF BREATH",
"SWALLOWING DIFFICULTY",
"CHEST PAIN"
],
"index": [1],
"data": ["M",69,1,2,2,1,1,2,1,2,2,2,2,2,2]
}
}
And the answer came: YES
You can automate the testing by calling from a web service/API/Azure function directly -- like the example given in my previous post.
*This post is locked for comments