Execute Power Apps CLI in Azure DevOps
A few months ago I wrote a post about how to “Unpack Canvas Apps in a Pipeline“. The first function of the Power Apps CLI (PAC) was around PCF creation. Since then a lot was added to it and there is still more to come I do assume. Since a few weeks the Power Apps Solution Packager (PASopa) is included in the PAC, which means the approach I explained in the other post is not needed anylonger. In this Post you will learn how to execute Power Apps CLI in Azure DevOps.
Shout out to Natraj and Mike for giving me some hints on how to do it.
You can find a yaml file that includes the complete example in one of my GitHub repos.
To make the explanation more visual and easier to understand I will, as always, not use yaml in this blog post.
Situation
Unfortunately, neither the PAC nor the PASopa is currently included in the Power Platform Build Tools which are available for Azure DevOps. This means we have to run it in some other way.
The solution is to install the NuGet of the PAC manually in our pipeline. After that, we need to find the path to it so that we can use it in our script.
Implementation
Let’s see how to implement it. There are different things to do.
Pipeline steps
We will start by adding the necessary steps to the pipeline.
Use NuGet
First, we have to install the NuGet tooling to the Build Agent. This step can be used with the standard configuration.

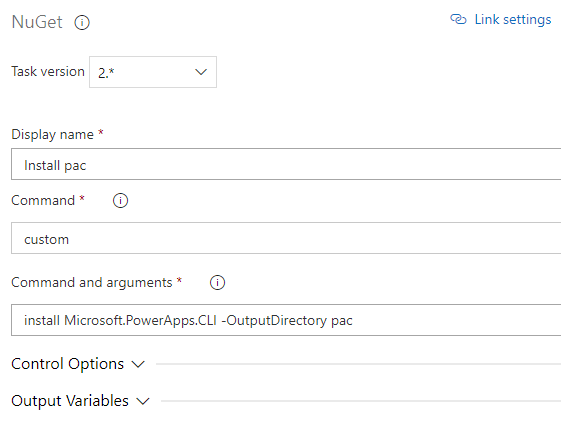
NuGet
The second step we need is called “NuGet”. As a command we use “custom” and add the following line to install the PAC and define pac as the output folder.
install Microsoft.PowerApps.CLI -OutputDirectory pac
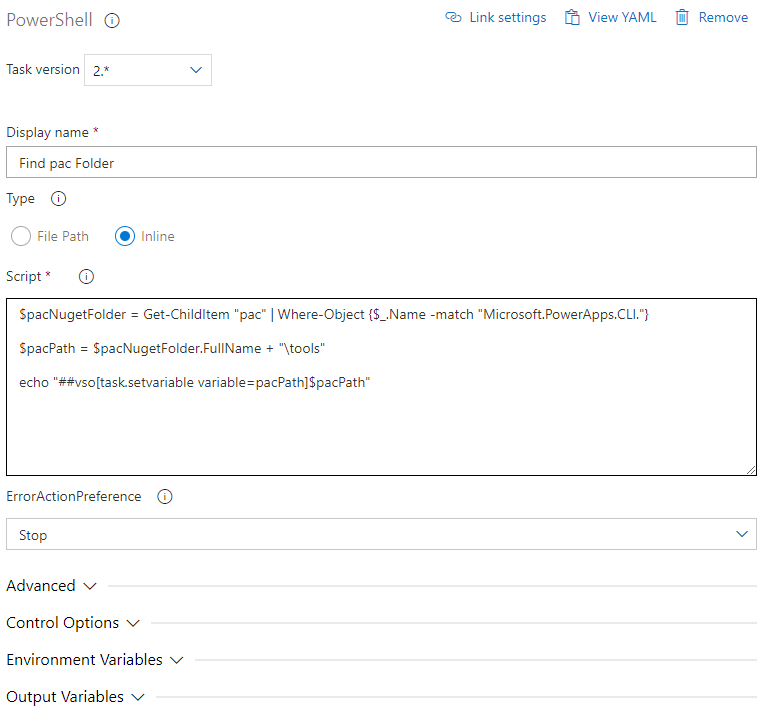
PowerShell – Find pac folder
After we have installed PACs NuGet we need to find the path to the exe file so we can execute it later.
To do so we use a “PowerShell” step with the following script.
The script will first get the children of the pac folder and then selects the one which contains “Microsoft.PowerApps.CLI.”
The second step is to add “\tools” to it.
The last step is then to output the generated path back to the pipeline so it can be used in the following steps.
$pacNugetFolder = Get-ChildItem "pac" | Where-Object {$_.Name -match "Microsoft.PowerApps.CLI."}

$pacPath = $pacNugetFolder.FullName + "\tools"

echo "##vso[task.setvariable variable=pacPath]$pacPath"
PowerShell – Execute PAC
This step will actually execute the PAC. Insert a second “PowerShell” step and add the following script to it.
First, we will add the outputted path of the previous step to the path environment variable.
Then we execute the pac to unpack a canvas app, which is our demo scenario.
$env:PATH = $env:PATH + ";" + "$(pacPath)"

pac canvas unpack --msapp $(Build.SourcesDirectory)\Solutions\$(SolutionName)\CanvasApps\bebe_almdemoapp_41ec7_DocumentUri.msapp
We could have done the last PowerShell scripts in one step. I tried to show an approach you could execute the pac several times. You only have to add it to the PATH variable in every step.
Change .gitignore
Since the install NuGet step installs the pac in a certain folder this would be added to the repository. So we have to add the folder to our .gitignore file. To achieve this we add “pac/” to our .gitignore file.
Conclusion
The approach explained in this post could be used in different ways. For example to unpack/pack a Canvas app as demonstrated in this post. But there are other areas, for example, administer environments (backups, deletion, reset, copy or restore), push a pcf, download or upload portal content or many more.
Now you know how to execute the Power Apps CLI in Azure DevOps. To find the path one needs some lines of code, but once the path is found it can easily be reused in the pipeline.
I hope this post helped you. Feel free to contact me if you have any questions or suggestions.
The post Execute Power Apps CLI in Azure DevOps appeared first on Benedikt's Power Platform Blog.
This was originally posted here.


 Like
Like Report


*This post is locked for comments