How to configure the Lookup views for a lookup field on a form
A Typical Layout in a Lookup Field
Below information is from Microsoft Doc, you can refer to below link to find it
https://docs.microsoft.com/en-us/powerapps/user/lookup-field
below is a screen shot of the layout from new Unified Interface

Legend
- Look for records: Select the textbox and type your search criteria to look for rows.
- Recent: Rows that were recently searched (new unified interface)
- Note: for the legacy web client, only the first three columns (from left to right) of the related entity Lookup View are displayed.
- New Record: Create a new row.
- Types of records: Select to filter by a table type such as Contact table or Account table. The number in front of type of records represents how many table are available to filter from.
- Browse in a lookup column: To browse a lookup, select the lookup icon (magnifying glass). A full list of items will be shown in the dropdown.
- Expand item: the first two columns are shown, and clicking on the dropdown will show all Lookup view columns. Some lookups such as Customer – which can be either Accounts or Contacts – display both to be selected as shown in the above screenshot. For more information on keyboard shortcuts, see Use keyboard shortcuts in Power Apps.
- Change View: by clicking on Change View – if the data filter applied to the Lookup View excludes the data being searched for. For example, the Account Lookup view filters on Active Accounts only by default, so selecting another view may be more appropriate. For more information on views, see Use grid filters.
In today’s post, we will use the the out of the box Primary Contact lookup field on the account form as a example,

Different Views that will be involved
Two views of the contact entity will be involved:
Lookup View:
A typical Lookup View of contact entity is shown as below -> the view you will see when select the textbox of the lookup field.
There is one lookup view per entity. Lookup views cannot be deleted or deactivated, but they can be edited. You are unable to create any additional lookup views at the moment.

Quick Find View
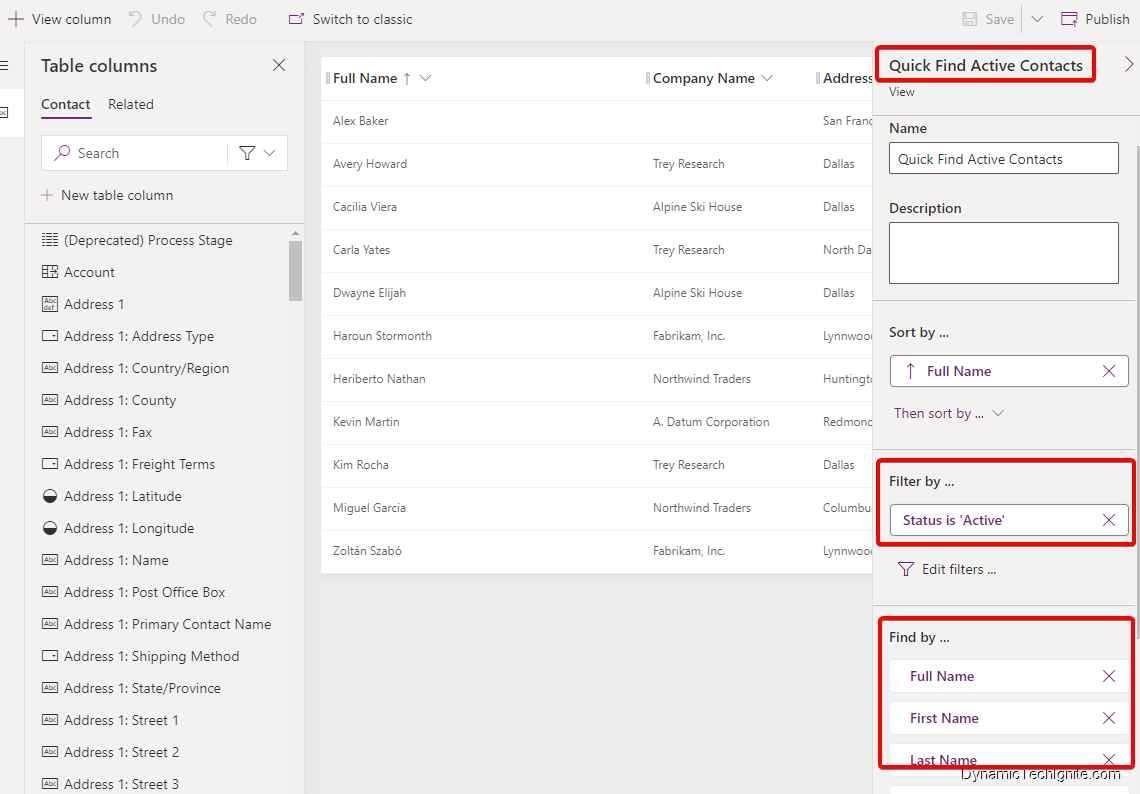
A typical Quick Find View of contact entity is shown as below, where you can also setup the Find by property that means based on which fields (columns) the search will be performed -> the view you will see after searching the results in the textbox of the lookup field.
When entering a value into a lookup field and the button or lookup icon is pressed, a search is carried out on the related item’s data using the Find columns defined in the related entity’s Quick Find View

Configure Lookup view for a lookup field on a form
we still use the Primary Contact lookup field on the account form as the example

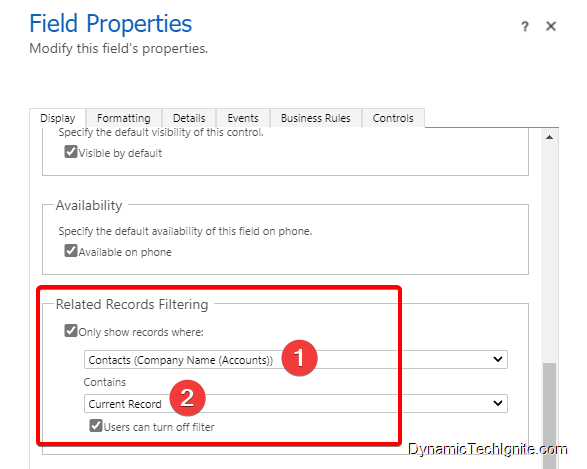
Go to the solution -> navigate to Account entity -> find the main account form and open the classic form designer -> find the Primary contact field and double click on it to open the Field Properties configuration window.
FILTERED LOOKUPS
Filtered lookups will display a subset of records when looking up to an entity.
For instance, Account entity has an out of the box lookup to Contact entity called ‘Primary Contact’. by default, this lookup is filtered to only show Contacts who have the current record (#2 indicated by below screen shot) as their Parent Account, which means that you can only enter someone as the Primary Contact for an Account if they work at that Account. This makes sense.

Default view in a lookup field
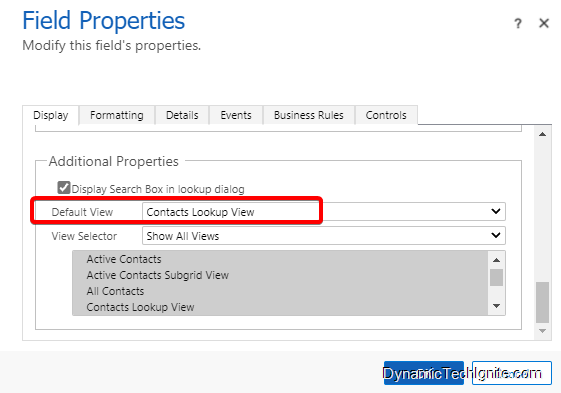
If you’d like to set up the default view in the textbox of a lookup field, when you select it, then you should configure in the Additional Properties section as below screen shot shown. You can switch to another view as well.
When configuring the lookup field on the forms, any other view could be chosen as well.
Additionally, View Selector can be locked and/or limited to user’s own records.

This was originally posted here.


 Like
Like Report
*This post is locked for comments