


Create a Docker for Business Central using BCContainerHelper
Views (1782)
 Olister Rumao
 4,009
4,009
 Like
Like Share
Share
 Report
Introduction:
In my earlier blog on Implementing extensions in NAV Development Preview using Docker there were a few complications for docker managing the container.
With the BCContainerHelper released, setting up Docker became easier. Check out the post below.
With the BCContainerHelper released, setting up Docker became easier. Check out the post below.

Pre-requisites:
- Understanding of Docker
- Understanding of BCContainerHelper
Demonstration:
1. Install BCContainerHelper:To install BCContainerHelper, you will need to install the Powershell Module.
Run Powershell as Administrator > Run the Powershell Script.
Run Powershell as Administrator > Run the Powershell Script.
Command: Install-Module BCContainerHelper -Force

2. Start BCContainerHelper Wizard:
i. Start BCContainerHelper:
To run the BCContainerHelperWizard, you will need to run the PowerShell Command.
Note that the Wizard is in CLI form.
Command: New-BcContainerWizard

ii. Accept EULA: To proceed you will need to accept the EULA.
i. Start BCContainerHelper:
To run the BCContainerHelperWizard, you will need to run the PowerShell Command.
Note that the Wizard is in CLI form.
Command: New-BcContainerWizard

ii. Accept EULA: To proceed you will need to accept the EULA.

iii. Local Container or Azure VM Deployment: This screen provides the deployment type. You can either choose Local Container or Azure VM.

iv. Authentication: Once the Container is created what is the Authentication Method. You can select Windows, UserName/Password.

v. ContainerName: You will need to add the Container Name.

vi. Versions: Select the Business Central Version for the Container. With different versions, there will be different images will be downloaded.

I have selected On-Prem Build (option g). Hence, I will need to provide Version No. as well.

vii. Select Country: You can select the Country for the Localization selection. With a different country, there will be different images.

viii. Test Toolkit: You can select whether you want to have the Test Toolkit installed.

ix. C/AL Development: You can select if you want the C/AL Development Environment present as part of Business Central Container.

x. Export C/AL BaseApp: Screen exports the C/AL Objects as a BaseApp. This BaseApp might be needed for Upgrade process or to run C/AL and AL side by side.

xi. License File: Provide the path for a License File if you have any. By default it will install the CRONUS License.

xii. Database: You can select Database SQL Server where you want to host the Database or connect from.

xiii. MultiTenant: You can choose if you have a MultiTenant Deployment. By default MultiTenant option is disabled.


xii. Database: You can select Database SQL Server where you want to host the Database or connect from.

xiii. MultiTenant: You can choose if you have a MultiTenant Deployment. By default MultiTenant option is disabled.

xiv. DNS: You can choose the DNS Name if you like to connect a specific URL.

xv. SSL: You can choose if you want to setup SSL or Self-Signed Certificate or no SSL.

xvi. Isolation: This option will let you select the Isolation for the container. Isolation lets you run the container in Hyper-V for new OS or process isolation for matching. I prefer to allow default.

xvii. MemoryLimit: You can choose to provide a MemoryLimit for the container. I chose 8GB for Business Central as it is recommended as per Hardware Requirements.

xviii. SaveImage: Lets you save the image that is downloaded during creation of BC Container. I prefer the default option.

xix. PowerShell Script: The BCContainerHelper Wizard will generated the PowerShell Script to run to create a Docker Container. Provide a filename to store your PowerShell Script.

3. Creation of Docker Container:
Once the Powershell script is run, you should have your BC Container created.
In case of a issue like the one in screenshot below, you will need to switch you container to Windows based container.
Once the Powershell script is run, you should have your BC Container created.
In case of a issue like the one in screenshot below, you will need to switch you container to Windows based container.

You can switch to Windows or Linux based container by right clicking on Docker in System Tray.

Once you switch to Windows based container, the Powershell will be executed.

The script might take longer than expect as the downloads the Docker Image.


You will be getting your Container configurations, User Credentials, WebClient URL etc. as verbose messaging from Powershell.

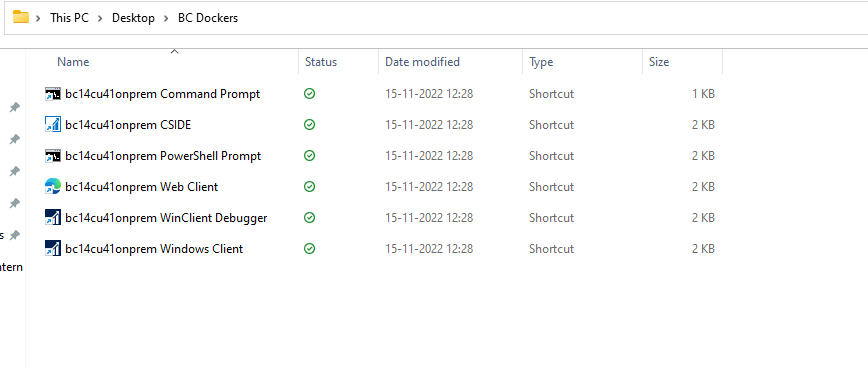
Also, on the Desktop, you will find the icons for your BC Container.
Conclusion:
I know very well that BCContainerHelper has been released sometime back. But just for the purpose of documentation.
If there are any questions, feel free to contact me at olisterr@outlook.com
If there are any questions, feel free to contact me at olisterr@outlook.com
This was originally posted here.
*This post is locked for comments