


 Like
Like Share
Share
 Report
Hi everyone,
In my previous posts:
we have learned how to customize, test locally, and deploy to your actual and LIVE environment.
We also learned how to declare and use variable then display it into your portal
Those links are the Dynamics Marketing Portal Customization and Extension Series.
Now, let’s continue our learning to deal with real field/attribute.
From your portal, you can see the Available Event List as shown below:

Now, it is only showing Event Name, Building Name, and Dates
What if you want to add new information, for example some fields from the form

In this example, we can use the standard available fields first, most important is you are able to get and display it.
Let’s just get the “Allow anonymous registrations” Boolean first
To understand what this field usage, you can refer to my previous blog: http://missdynamicscrm.blogspot.com/2020/05/Dynamics-365-Understand-theimpact-of-AllowAnonymousRegistration-field.html
Go back to your code and then you add following code (span) in the home.component.html
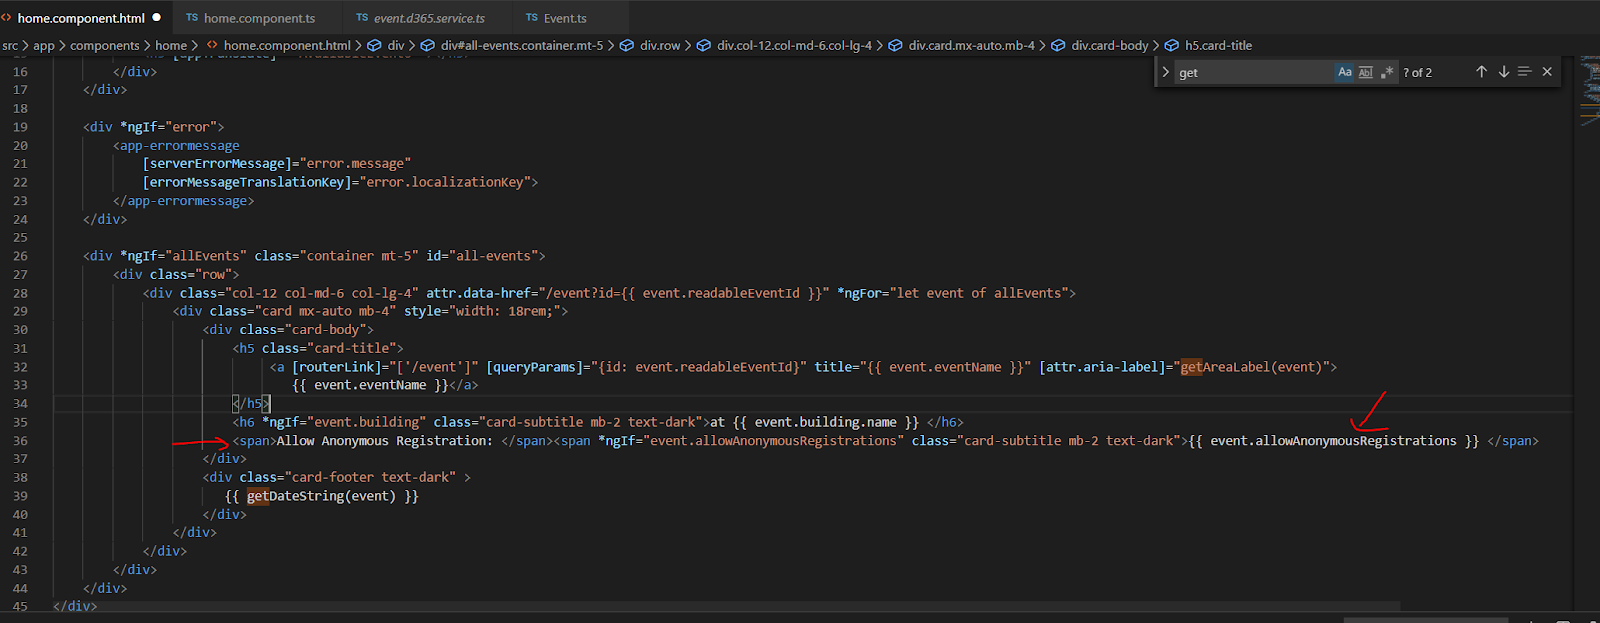
<div *ngIf="allEvents" class="container mt-5" id="all-events">
<div class="row">
<div class="col-12 col-md-6 col-lg-4" attr.data-href="/event?id={{ event.readableEventId }}" *ngFor="let event of allEvents">
<div class="card mx-auto mb-4" style="width: 18rem;">
<div class="card-body">
<h5 class="card-title">
<a [routerLink]="['/event']" [queryParams]="{id: event.readableEventId}" title="{{ event.eventName }}" [attr.aria-label]="getAreaLabel(event)">
{{ event.eventName }}</a>
</h5>
<h6 *ngIf="event.building" class="card-subtitle mb-2 text-dark">at {{ event.building.name }} </h6>
<span>Allow Anonymous Registration: </span><span *ngIf="event.allowAnonymousRegistrations" class="card-subtitle mb-2 text-dark">{{ event.allowAnonymousRegistrations }} </span>
</div>
<div class="card-footer text-dark" >
{{ getDateString(event) }}
</div>
</div>
</div>
</div>
</div>
And here is the result:

Now, you can see that the code is actually showing the value “true” but the Private Event “Allow Anonymous Registration” field value is actually NOT True, but it does not show as False, so how to show the either true or false?
You need to understand how it works in Angular.js in HTML, that is using *ngif syntax

<span>Allow Anonymous Registration: </span>
<span *ngIf="event.allowAnonymousRegistrations; else showFalse" class="card-subtitle mb-2 text-dark">{{ event.allowAnonymousRegistrations }} </span>
<ng-template #showFalse>
<span>false</span>
</ng-template>
Result:

Next, is to learn how to use .ts script instead of HTML. You can still use HTML method, however for complex scenario, I feel as developer, I love to do it using code behind approach.
Instead of showing “so-boolean value”, true or false, we want to show YES or NO
So, let’s add function that will handle the logic in your .ts script.
Where is it? As you are updating home HTML, then you should also update the ts that is the correspondence of home HTML, that is home.component.ts

Then do not forget to call it from your HTML
*I commented the previous code, instead I change it with simple line:
<span> {{ getAllowAnonymousRegistrationLabel(event) }}</span>
Since it has been handle by the .ts file.

Result:

Hope it helps!
*For custom field, we can discuss in the next post
Thank you so much.
Best regards,
Aileen
*This post is locked for comments