


 1,856
1,856 Like
Like Share
Share
 Report
If you’ve been following along in the mini-series about creating and managing a webinar using Dynamics 365, you will already have your Marketing Form, Event and Marketing Emails all created and ready to go. Now we just need to put all of it together and create a nice Customer Journey. In this post, I will walk through just one way in which you could build the journey. It’s by no means the RIGHT or ONLY way but is likely how I would approach it if I were still running a marketing department today. Let’s get started!
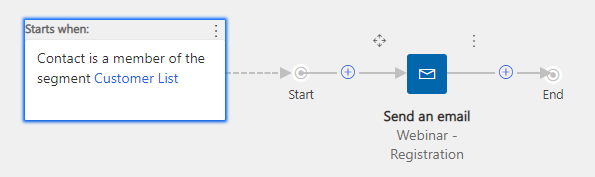
So first things first, I want to make sure all customers know about this webinar. Sure, we can share links on social media, but we can also incorporate multiple swim lanes for this Customer Journey. Start by creating a new Customer Journey. You can skip selecting a template, or just start from the Simple Email Journey option. We are going to start this when a Contact is a member of a specific segment. Then, we are going to pick our first Webinar Registration email that was created earlier on.
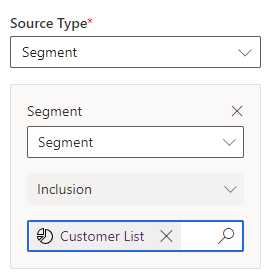
You can select to include your segment, really simple.
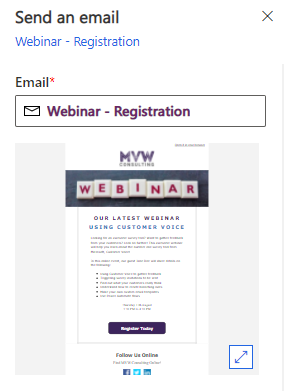
Then we click to select the specific email we want to send. We get a nice preview of it so we can be sure we have selected the correct one.
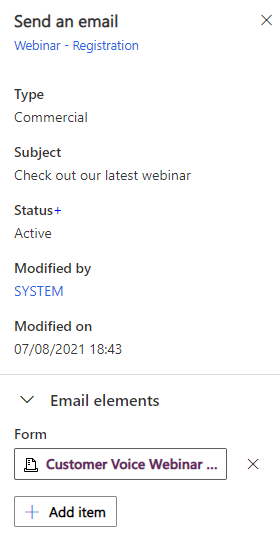
Once you have selected the email, scroll down to the Email elements section. Then add an item and pick Form. Then select the Marketing Form you are using for the Event Registration. This then allows us to use conditions tied to the event to determine what to do next.
After the Send an email tile, we can add in a wait tile for a few days. Then we can add in an If/then tile. Now we can set our conditions and select the Customer Voice Registration Marketing Form as the source (rather than only having the email option for the source). Now we can say, has been registered to check and see if the Contact has an Event Registration for the event.

Now we have two paths, we can take the Contact down the Yes path if they have registered, and one if they have not. Here we could decide to email them the Webinar Registration email again, or something different as a reminder to register for the webinar.
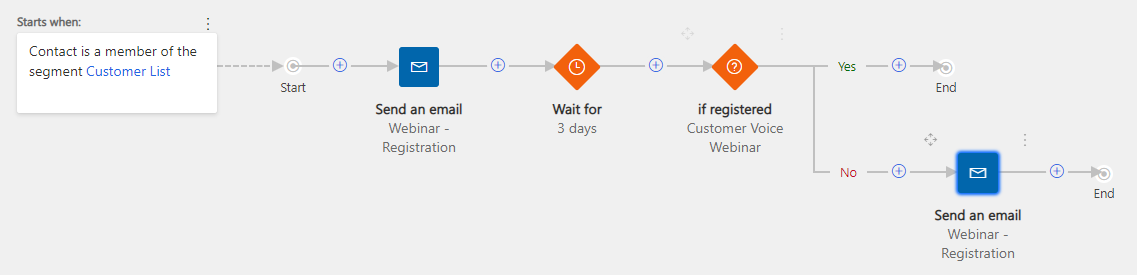
OK, so that path above will handle sending out an email to existing customers, people who we know and are already in our system as a Contact record. But what about people we do not know? And how do we handle also making sure that any of our Customers who register are then sent the correct emails thanking them for registering, and thanking them for attending, etc. For this, we can add another swim lane. You can do this by simply clicking on the Add swimlane button that will appear below the top one. Although a Contact can only go through a Customer Journey once (unless it’s recurring), if we add additional swim lanes, they can go through each swim lane once.
Why not do two Customer Journeys? Well, again, this is not necessarily the ONLY way to do things, but keeping it all in one means my analytics and details are all in one place for the Webinar. So instead of starting this swim lane based on someone being a member of a segment, this one will start when a Contact submits the Customer Voice Webinar Registration form, the one we created and added to our website. We will then send the Thanks For Registering email out. Make sure you add an Email element and link it to the Event so we can use it later on in a condition.

Next, we will add a Wait until tile. For this, you want to put a specific date, one that is a day or two before your event. This really depends on how many and how often you want to send reminders. You can then send another email with one of your reminder emails, then add another wait, send another reminder and so on.

Finally, add another wait, set it to after the time of the actual webinar, and then add an If/then tile. Now we can set it to a condition tied to the Event and set it as ‘has been attended’.
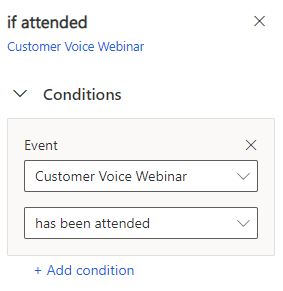
Now we have two paths. If the Contact did attend, they will go down the Yes path and be sent the Thanks For Attending email. If they go down the No path because they did not attend, they will be sent the Sorry You Missed Out email.

Make sure on the Thanks For Attending email tile that you also add an email element for the Customer Voice survey so it’s linked correctly.

Here is the full Customer Journey, showing all steps and both swim lanes. Once you are ready to go, set your start and end date on the Customer Journey and then make it live. Sit back and watch those registrations roll in. 

In the next post, we will review the Event Registration records so you know what to expect.
- Part One – Creating Your Registration Form
- Part Two – Adding Team Members & Speakers
- Part Three – Adding Your Webinar Event
- Part Four – Creating Your Marketing Emails
- Part Five – Building Your Webinar Customer Journey
*This post is locked for comments