


 Like
Like Share
Share
 Report
Introduction
In the ever-evolving landscape of marketing, forms have become a cornerstone of effective strategies. In real-time journeys, forms provide a valuable tool to generate leads, collect customer data, and register event attendees. Our new real-time journey form editor provides an intuitive user interface (UI) to make form creation a breeze.
This tool allows you to incorporate fields from contact or lead data tables onto the form canvas, and even new fields introduced to your data model will be readily available in the form editor. However, we acknowledge that sometimes you might need to include fields that are not part of the data model for subsequent stages of your marketing campaign. Although this isn't currently possible through the UI, we've found a way for you to add such fields in your forms. This article will guide you through the underlying processing of forms and explain how to add unmapped form fields. Whether you are working on regular marketing forms or event registration forms, this method will help you to:
This tool allows you to incorporate fields from contact or lead data tables onto the form canvas, and even new fields introduced to your data model will be readily available in the form editor. However, we acknowledge that sometimes you might need to include fields that are not part of the data model for subsequent stages of your marketing campaign. Although this isn't currently possible through the UI, we've found a way for you to add such fields in your forms. This article will guide you through the underlying processing of forms and explain how to add unmapped form fields. Whether you are working on regular marketing forms or event registration forms, this method will help you to:
- Make use of enhanced data collection: Custom fields allow you to collect specific information that may not be included in standard data models. This additional data can provide insights into customer preferences and behaviors, aiding in decision-making and strategy development.
- Increase your flexibility: By allowing the addition of fields that are not directly mapped to the existing data model, you can adapt your forms to meet varying needs, whether it's for specific marketing campaigns, events, or other business activities.
- Improve customer engagement: Custom form fields can facilitate more personalized and relevant interactions with customers. By capturing unique information, you can tailor your communications, offers, and services, enhancing the customer experience.
- Streamline your processes: Unmapped fields can be used for temporary data collection during specific campaigns or events, without altering the primary data structure. This enables a more efficient process, reducing the need for data clean-up or restructuring later.
To understand how to add unmapped form fields we will look at the underlying processing for forms.
How does real time journeys process form submissions?
In real time journeys, a form is always connected to either a lead or contact in Dynamics 365.When a lead or a contact, fill in the form and press “Submit” button is pressed, the data from the form are not directly stored in the corresponding table. The data are stored in a intermediate “Form Submission” table. Intermediate tables contains all the data from all form submissions.
Hereafter, backend processes start to execute depending on the form, for example
After the data has been processed the form submission data will not be deleted.
- plugins that are registered,
- captcha validation,
- creating or update a contact or a lead record
- create or update corresponding consent records
- create event registration records (for Event registration forms)
After the data has been processed the form submission data will not be deleted.
How to add unmapped form fields?
General concept
How can I add additional data to a form? Since the form itself is described with HTML, it is simply possible to edit the HTML and insert custom fields. The following picture shows a form built with the real-time journey form editor which contains 3 custom fields:
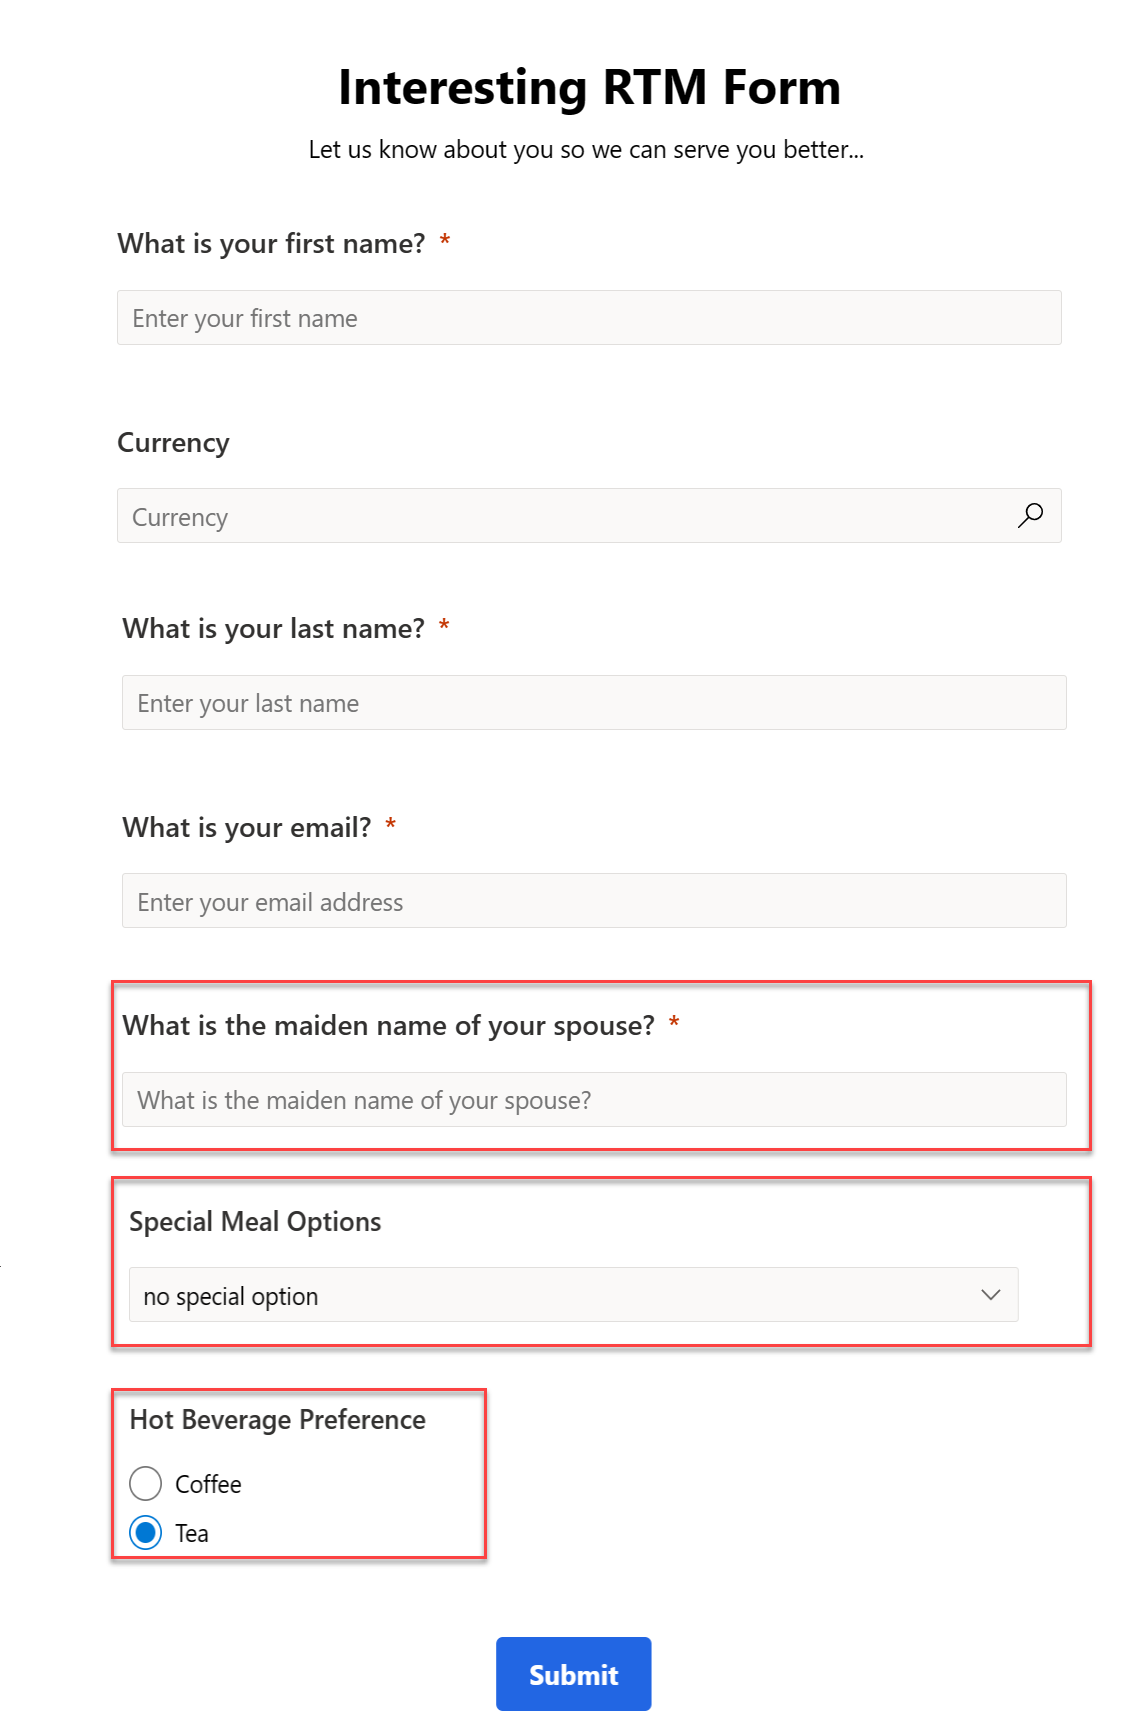
- “What is the maiden’s name of your spouse?”: text field which is required for input
- “Special meal options”: drop-down field to select a desired special meal
- “Hot Beverage Preference”: Boolean field displayed as radio buttons
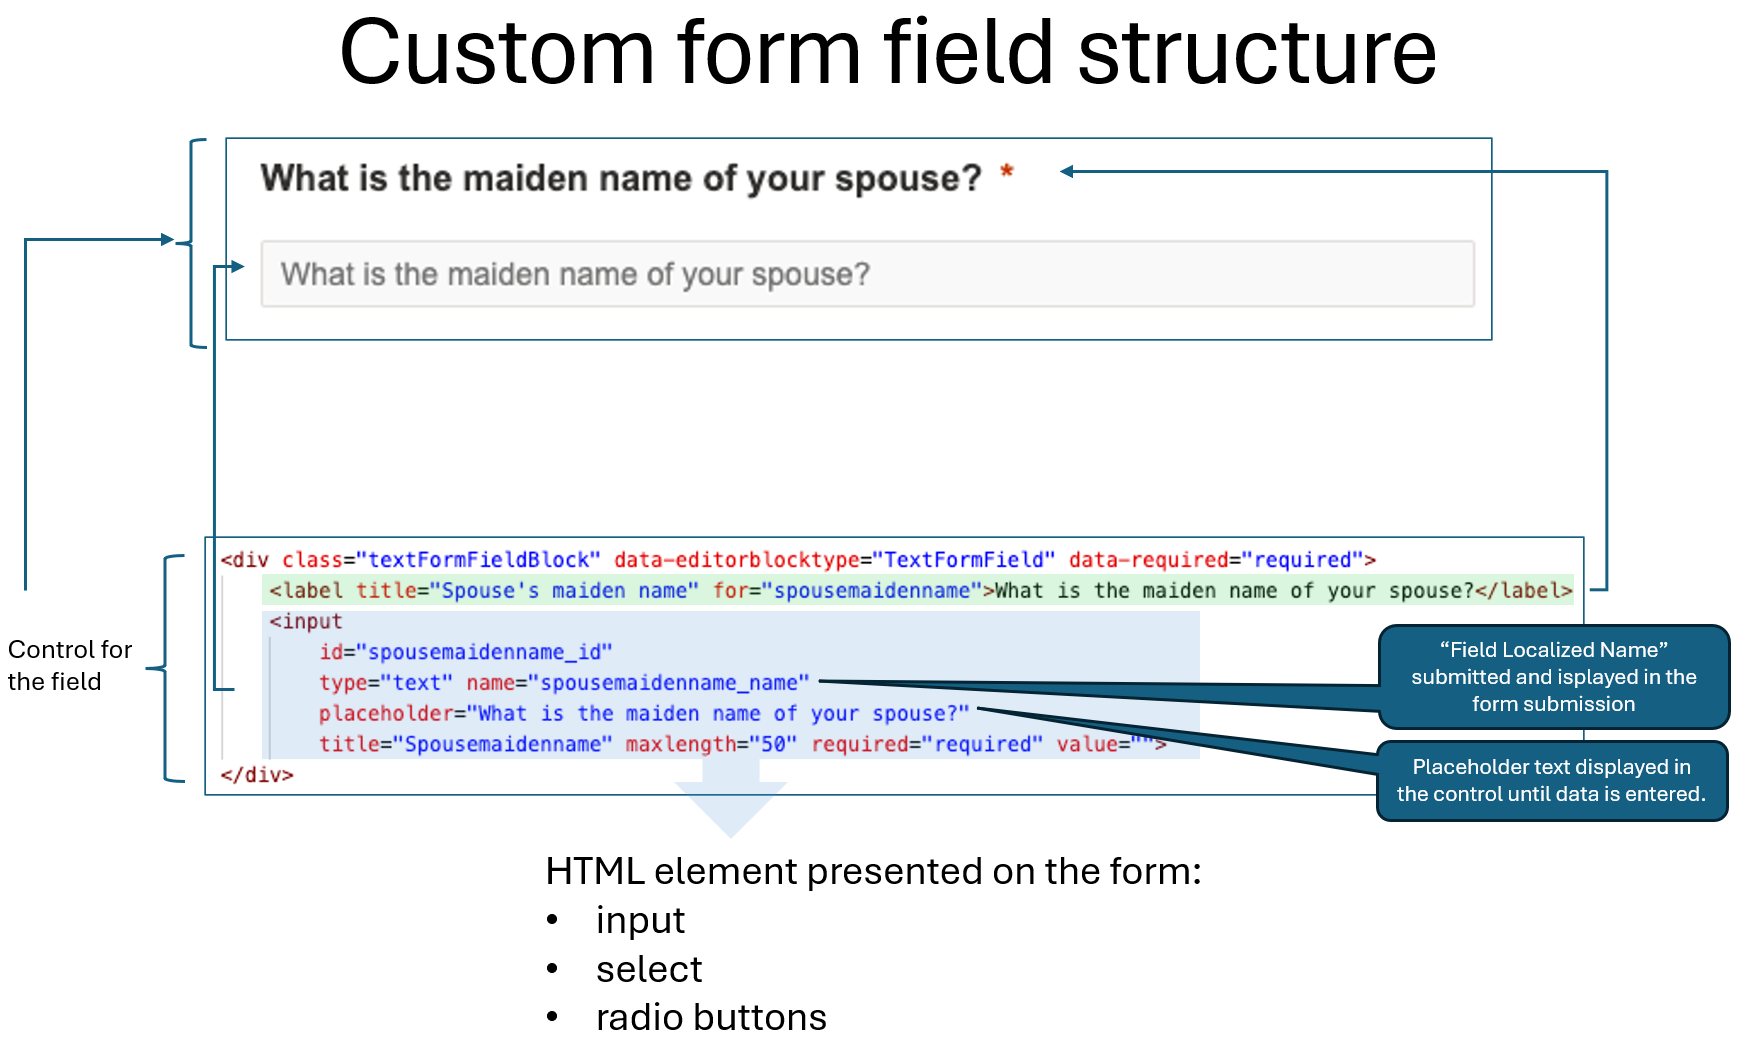
These fields are not present in Dataverse. The general structure of the HTML that is required is explained in the following picture.
A custom field is encapsulated in a surrounding <div> element that also contains a CSS class for the type of control to be displayed. The field control block itself is a <label> element followed by the HTML input control.
To insert these fields in the form, the built-in HTML editor can be used. When you open a form and use the “</>HTML>” button on the upper right, this editor opens.
Please note, that this is a fully fledged editor which also contains a command palette with a huge number of commands. With this editor open, do the following:
1. Use the “Format document” button on the top to get a nice formatting and easily identify the required sections. Scroll down in the editor until you see a <div> section of class “emptyContainer columns-equal-class wrap-section”.
2. Scroll down a bit more to get to a list of <div> elements that represent the fields on the form. There are different CSS classes for the different field types. For example, class="textFormFieldBlock" represents a regular text field, but there is also class="optionSetFormFieldBlock" for a drop-down field, class="twoOptionFormFieldBlock" for a checkbox or radio buttons and class="lookupFormFieldBlock" which also allows to include lookup values in the form.
3. Copy and paste one of the existing fields and edit all highlighted values of attributes as shown in the picture below. The “name” attribute in the input control contains the logical field name and needs to be used when querying for the value later (“Field Localized Name”).
<div class="textFormFieldBlock" data-editorblocktype="TextFormField" data-required="required">
<label title="Spouse's maiden name" for="spousemaidenname">What is the maiden name of your spouse?</label>
<input
id="spousemaidenname_id"
type="text" name="spousemaidenname_name"
placeholder="What is the maiden name of your spouse?"
title="Spousemaidenname" maxlength="50" required="required" value="">
</div>
4. When you are finished, publish the form.
5. The submitted values will be stored in the list of form submissions as part of the form submissions table record.
As stated already above, this also works for event registration forms. However, it is not possible now to also make use of the custom registration form fields that can be defined in the event management module.
How to add additional types of fields?
It is also possible to use different HTML elements for custom values. The general procedure is the same. Depending on the type of the field, some additional settings have to be made.The simplest way to insert a custom form field of any type is to find an existing field in the entity, drag it onto the form and then use the HTML editor to make modifications.
Working with custom fields
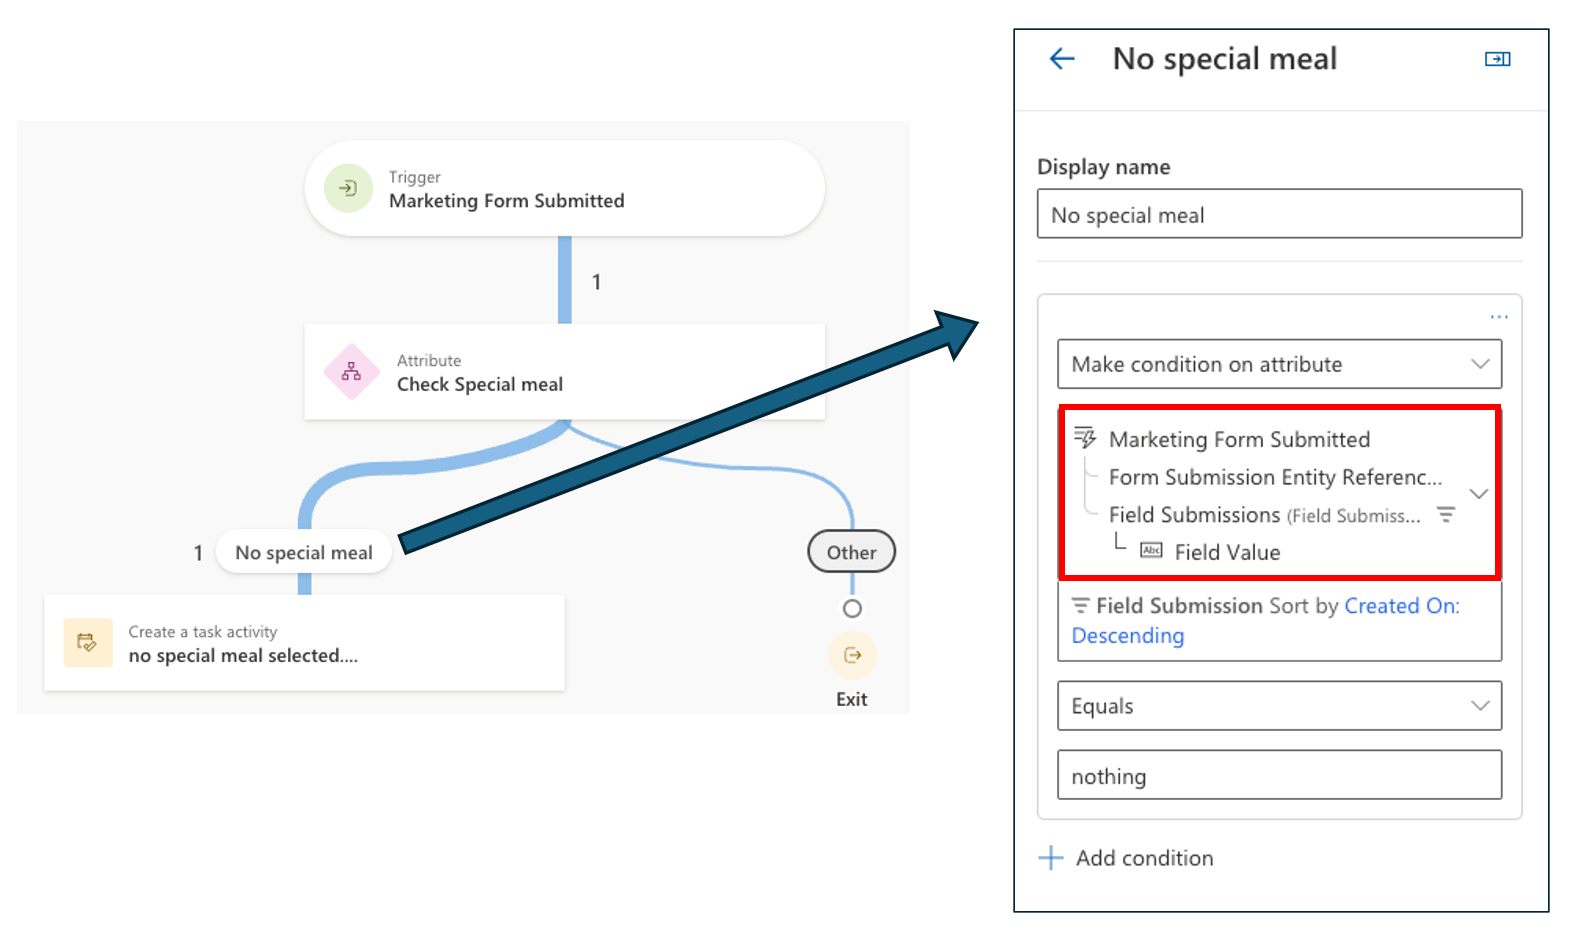
Once you’ve created custom form fields, the filled in data are submitted and stored in the form submission entities. The data can now be used in a journey, for example to branch to a specific execution based on a value.
To do this, the “Attribute branch” condition tile can be used, and the branch could be configured in the following way taken the custom form fields from above:
In this functionality can be implemented as follows:
- Insert an “Attribute branch” tile anywhere in the journey where you want to check the values and give it a meaningful name (for example “Check special meal option”)
- For the first branch (“Branch 1”), click on the “add conditions” link on the right side of the journey canvas to configure the branching statement
- provide a name for the branch (for example “no special meal selected”), choose “make condition on an attribute” and choose “Trigger Marketing Form Submitted Form Submission Field Snapshot”
- for the comparison operator, change the value from “Equals” to “Contains”
- in the “Value” textbox, enter the condition you want to check in this format:
<Field Value Localized Name>: <Value>, for example “specializedmeal_name: nothing”. It is important that this corresponds to the values that have been tracked in the field submission table.
Because all form fields and their values are stored in the Field submission snapshot as one string, real-time journeys now checks this string if there is the phase given in the last input box.
Another way to check the values of custom fields is by checking the field value directly. The field value is stored one level deeper in the entity structure in the “Field submissions” table.
Another way to check the values of custom fields is by checking the field value directly. The field value is stored one level deeper in the entity structure in the “Field submissions” table.
In this case, you could directly check the value of the field. However, if there are two fields which may have the same value, this would not work.
But in either case, it is possible to use the custom data from the form in a journey and work with it.
But in either case, it is possible to use the custom data from the form in a journey and work with it.
*This post is locked for comments