How to Schedule Reports with Job Queues in Microsoft Dynamics NAV 2016: Microsoft Dynamics Nav 2016 tutorial
Hello everyone, thanks for your time. My name is Christos Pittis, and I am a Microsoft Dynamics NAV/Dynamics 365 Business Central Consultant. In this episode, I am going to show you how to schedule reports with job queues in Microsoft Dynamics NAV 2016.
You can plan a report to keep running at a particular date and time. Booked reports are entered into the job queue and prepared at the expected time, like other jobs. You can save the prepared report to a file, for example, an Excel, Word, or PDF, print it to a chosen printer, or procedure the report as it were. If you spare the report to a document, then the handled report is sent to the Report Inbox, where you can see it.
You can plan a release from the job queue on your Role Center or the request page when you open a report.
Open your Microsoft Dynamics NAV 2016 Windows client and search for the Job Queues page. Click on it. You can just start the Default Job Queue and is good enough but in this example, I will create a new one so to complicate things J. Click on the New button at the top so to create a new Job. In my example I enter the following details:
Code = 119
Description = Customer Sales List
Hit the Start button at the top. Alternatively, you can have this Job started automatically from NAS. This option is useful when a job will need specific permissions, when a job has a heavy usage of resources, or when you want to separate of job queues. To do so, you specify startup parameters for NAS services.
Click OK to close the page. As you have noticed the Started field contains a check mark.
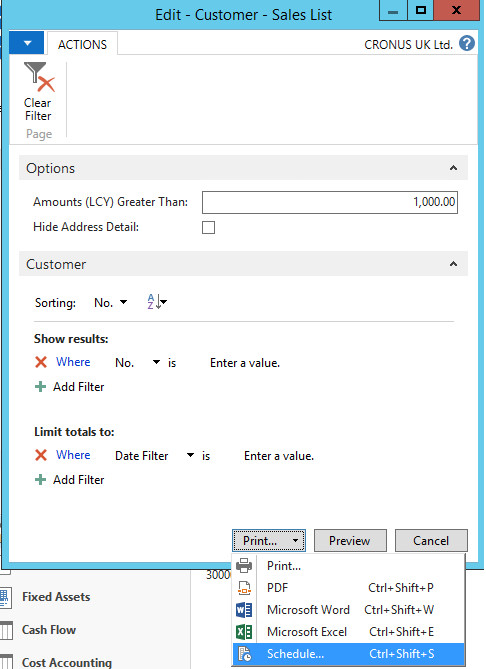
Now let’s schedule the report to run based on the preferred date parameters. In my example, I search for the report 119 Customers - Sales List. I set the “Amounts (LCY) Greater Than” to £1,000 and then we find and click on the Schedule option which can be found under the Print button.
*Hit the small down arrow*
The Edit – Schedule a Report – Customer – Sales List page pops up.
In the “Report Output Type” field I usually select PDF. You can utilize the following options as well:
- Word
- Excel
- None (Processing only)
In the “Earliest Start Date/Time” enter something like 26/08/2016 10:22
The “Earliest Start Date/Time” field Specifies the date and time on which you want to run the report.
If there are no other jobs in the job queue at the scheduled time, then the report will be processed. Otherwise, it will be processed when the job queue is available.
Click OK to close the page.
Now go to the HOME menu and check the Report Inbox section on your Role Centre. Refresh the page and the report will show up based on the “Earliest Start Date/Time” you’ve setup before. If you double-click on it, the PDF will open.
Let me schedule another report to see what happens. I am scheduling report Customer Item Sales and as you can see it comes sorted in the first line.
Thanks for reading this blog post and watching my YouTube video. You can connect with me on LinkedIn https://uk.linkedin.com/in/christospittis or 365 talent portal https://www.365talentportal.com/
Christos Pittis
Microsoft Dynamics NAV/Dynamics 365 Business Central Consultant


 Like
Like Report
*This post is locked for comments