


 1,947
1,947 Like
Like Share
Share
 Report
A few months back I wrote a post on how to implement simple PowerShell scripts to export, unpack and import solutions for Dynamics 365 and Power App projects. That post can be found here and is still relevant;
Simple ALM for Dynamics 365/CDS Projects
Summary
- All PowerApps/Dynamics 365/CDS projects, big or small should be using some form of source control for customization.
- You don’t necessarily need to build complicated build pipelines or continuous integrations to implement an ALM process.
- This edition walks through using Power Apps Build Tools to automate some tedious chores when working with Dynamics 365/Power Platform solutions.
PowerShell vs Azure Dev Ops Pipelines
After my post on using PowerShell for ALM tasks, I was approached by a couple folks in the community asking me why wouldn’t I use Build Pipelines in Azure Dev Ops, either the Microsoft Power Apps Build Tools or Wael Hamze’s Dynamics 365 Build Tools.
To be honest, I assembled the PowerShell scripts a few years back, prior to some of these tools being available. They work well for many of my smaller projects, the are extremely flexible and easily launched from shortcuts on my desktop. Like all things Power Platform, there are a number of ways to do things and sometimes its a matter of choosing what works best for you.
Many of the blog posts, documentation and presentations on the various pipeline tools reflected large development teams. Setting up large complex pipelines with automated builds, testing and deployment is many times overkill for small projects where there may be only one person configuring the solution.

That being said, I feel that no project is too small for some good habits. All configuration changes should always be done at very least on a sandbox environment and all configuration (entity, form, field, view, flows, apps, etc) changes as well as code should always be saved to some form of source control.
I decided to explore the Power Apps Build Tools to see if I could put together a fairly simple package that a “one person” project could use based on the following parameters;
- There is at least one Sandbox and Production Environment
- All configuration work is done on the sandbox
- All configuration is saved to source control
- The solutions are deployed to production, ideally as managed (but could be unmanaged if you haven’t seen the light yet.)
- The process is easily to setup and maintain
As you can see from the following post, I was successful in setting up some simple pipelines, which already have saved me a lot of time.
Credit where Credit is Due
I stole many of these steps from a set of hands on labs that can be found on Github by clicking here. These are an excellent resource and great way to get introduced to the Power Apps build tools.
The steps I have prepare here more recent screen shots and I took a different approach in which I simply exported a managed solution direct from the sandbox and deployed to the production, as opposed to assembling the managed solution in a temporary build environment.
I hope I add value by putting a simpler spin on it and provide some additional context.
Some Terminology
Pipeline
Think of a pipeline as a type of script or steps that you will define to do a series of tasks.
Repository
A repository is like a file folder that contains your source files (configuration, code, etc). However, it will keep track of the specific changes, who made them, and when.
Setup Azure DevOps
If you have not done so already, you will need an Azure DevOps environment. In most cases, you should be able to use the free account.
Navigate to https://azure.microsoft.com/en-us/services/devops/ and click on the Start free option.
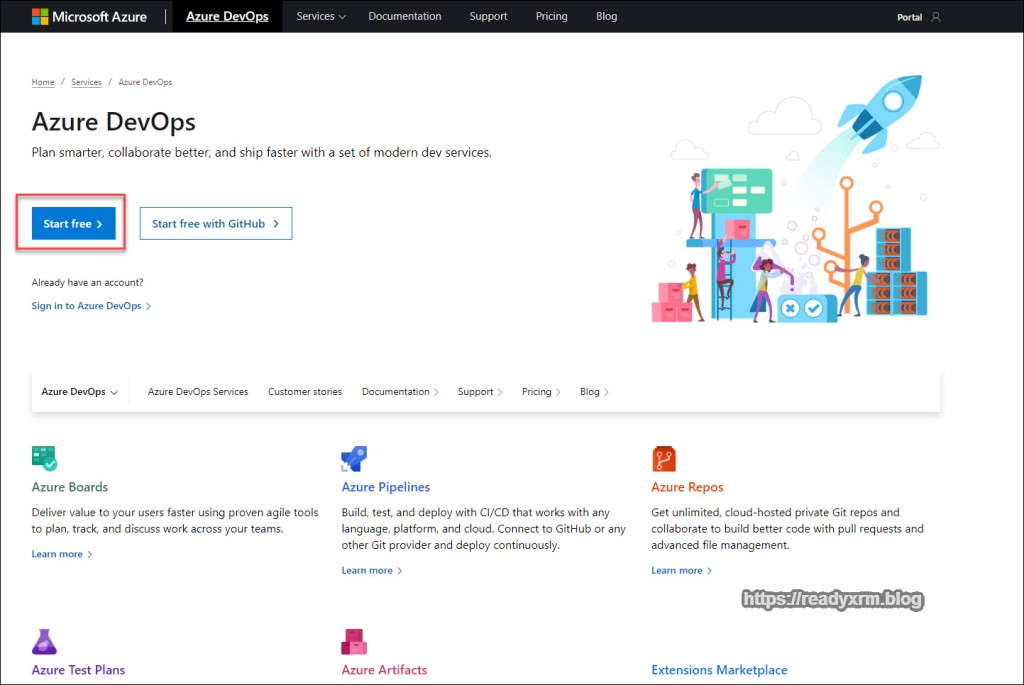
You will need to sign in with a Microsoft account if you have not already done so. Choose your country/region.

Start off by creating a new project in Azure DevOps. This will contain your pipeline and your source repository.

Your project will have a series of options on the left hand of the screen. We will be looking only at Repos (repositories) and Pipelines. However, Azure DevOps has a number of other very useful features for managing projects.

Install PowerApps BuildTools
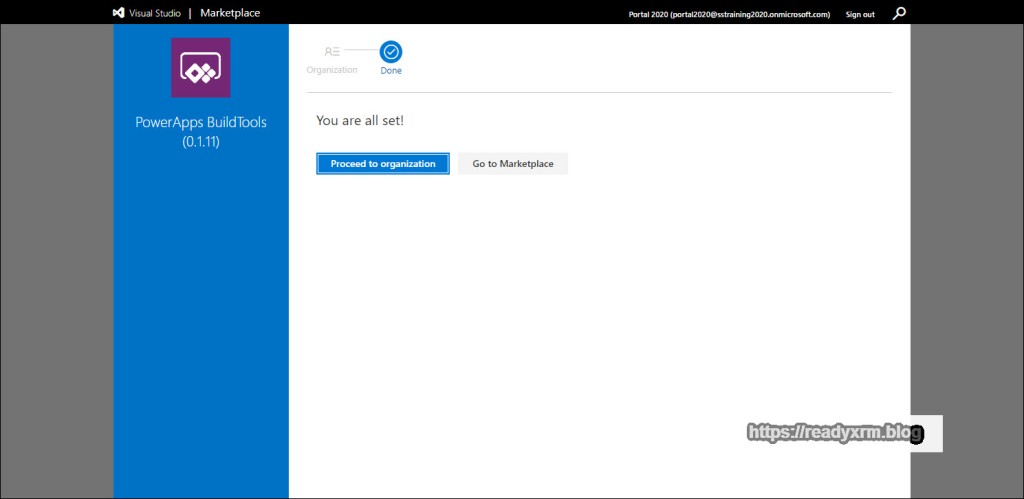
Azure DevOps is extensible, and the PowerApps Build Tools need to be installed. While logged into Azure DevOps, navigate to https://marketplace.visualstudio.com/items?itemName=microsoft-IsvExpTools.PowerApps-BuildTools Note these tools are still considered to be in preview, so all gotchas apply here. Click on “Get it free” to install the Power Apps build tools in your Azure DevOps environment.

Choose your specific Azure DevOps organization (in case you have many)

The install process should only take a few moments.
Setup Repository
We need to setup a repository (or what the cool kids call “Repos”) where we will store our source solution, which is all our configuration files like entities, forms, views, flows, apps, etc. Having a “dev” Power Platform environment (even that gets backed up) should NOT be considered your source control. Your files should be pushed to source regularly.

Initialize with a README file and get the repository created.
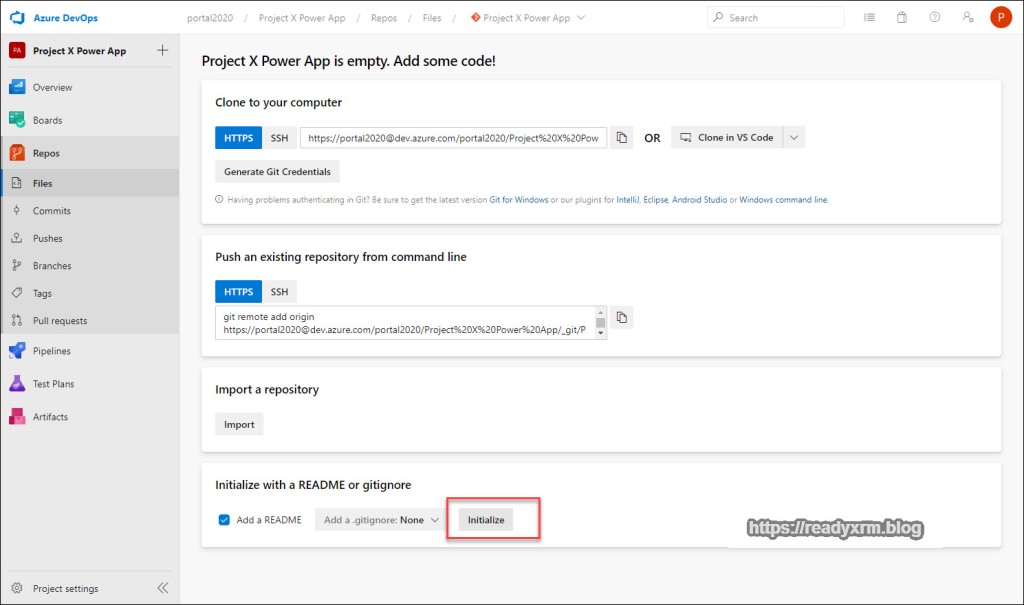
You will now have an empty repository with a README file that is formatted with markdown. Eventually, we will be pushing our source configuration files here. This should become your “source of truth” when it comes to configuration.

Allow Build Service to Access Repository
There is some security to setup to allow our pipeline to be able to upload the configuration to source control. We need to allow the Project Collection Build Service to have contribute access to the repository.
- Click the Gear Icon in the bottom left corner to get access to Project Settings
- Choose Repositories
- Locate Project Collection Build Service
- Add the Project Collection Build Service

Once you have added the Project Collection Build Service, choose “Allow” on the contribute permission.

Create A Pipeline to save a Power Platform solution to Source Control
Are you backing up your solution files somewhere? You should be! However it is tedious to download the unmanaged zip file and save it somewhere. Also, what happens if something breaks? Do you have any way of tracking changes made to your solution? This is where source control helps, and ideally, it should be automated. This is pipelines come into play.
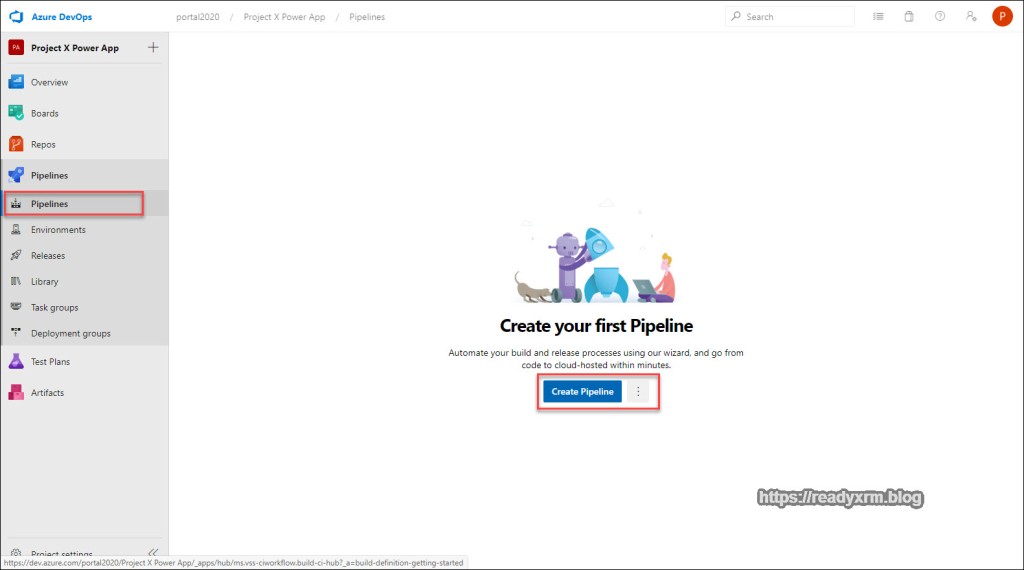
In Azure DevOps, click on the Pipelines link on the left side and create your first Pipeline.
For the Power Apps Build tasks, we will use the classic editor.

We will use Azure Repos Git (which is default) for our repository. Click continue. Other source control systems are available (I don’t see sourcesafe?) 

We will build our pipeline using an Empty job.

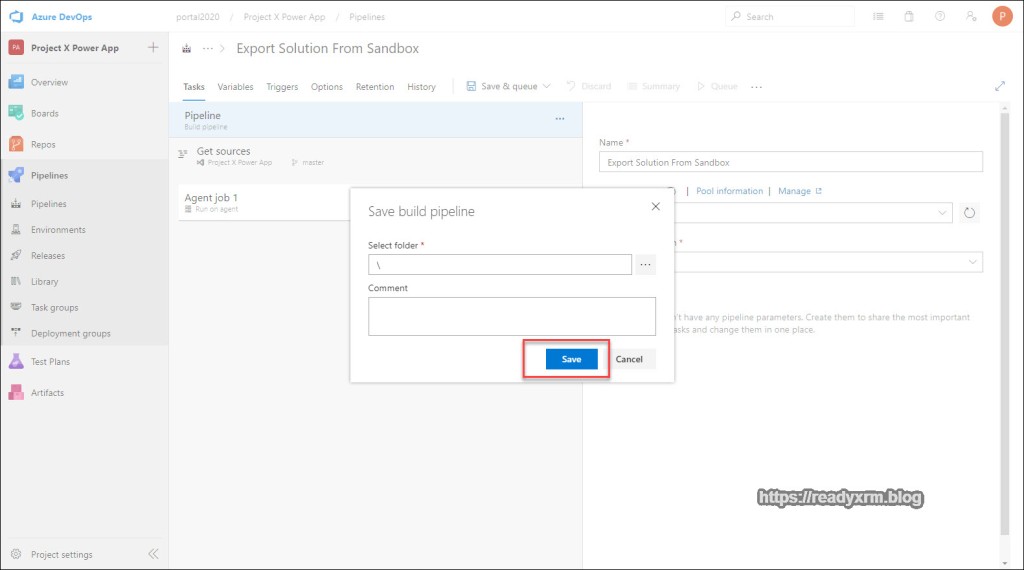
Give your pipeline an easily identifiable and recognizable name. Save your pipeline by choosing the “Save & queue” and then “Save”

Note that each time you save, you can log an comment to keep track of what you did. In most cases, you can leave this blank.
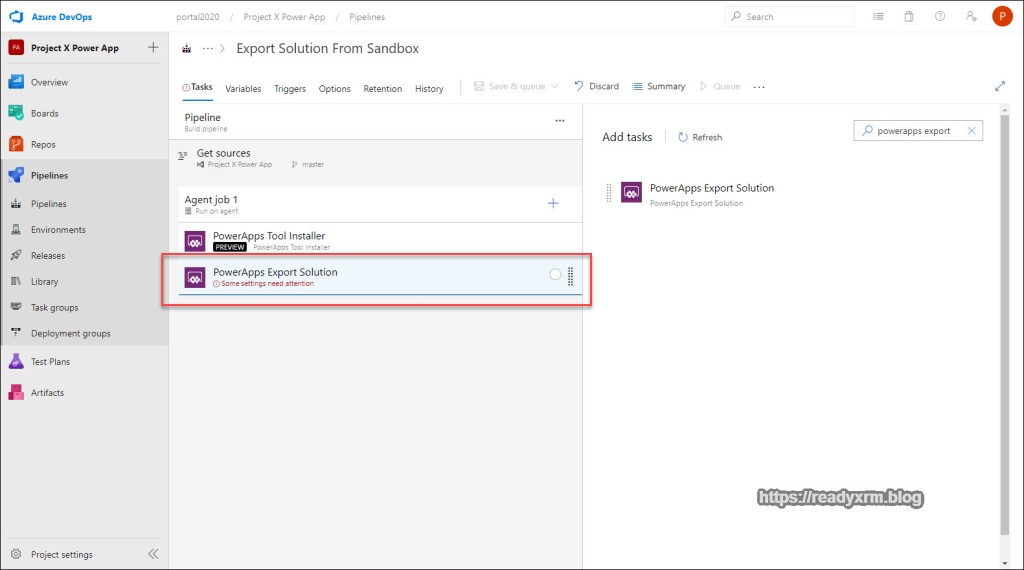
Now that our pipeline is created, lets start by adding some tasks. On the “Agent job 1” section, click the “+” button to add a new task.

On the left of the screen, search for “powerapps tools” and add the PowerApps Tool Installer.
What will happen is the build pipeline will spin up a temporary virtual machine on Azure to do our work. Since the machine is temporary, we will need to install the PowerApps Tools each time.

PowerApps Export Solution task
The next step is to add the PowerApps Export Solution task. This task (you guessed it!) exports solutions from the Power Platform. This step will export the solution to a folder on the temporary virtual machine.

Once you have added this task you will notice that you need to configure some additional settings. The tool needs to know what environment to export the solution from and also what solution!
The right hand properties window will show what settings need to be defined. Beside “PowerApps Environment URL” click on Manage.

Service Connections
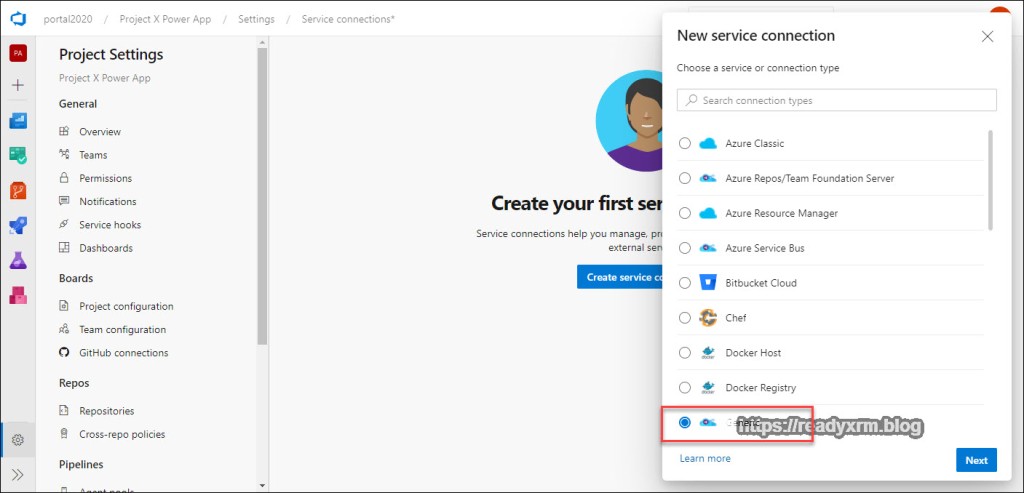
A service connection is a link to an application external to Azure DevOps. We will create a service connection to our Power Apps Environment that we can use for multiple tasks in our pipeline.
Click on “Create Service Connection”

In the list of Service Connection types, the Power Platform is conspicuously absent. We will the choose “generic” service connection type.
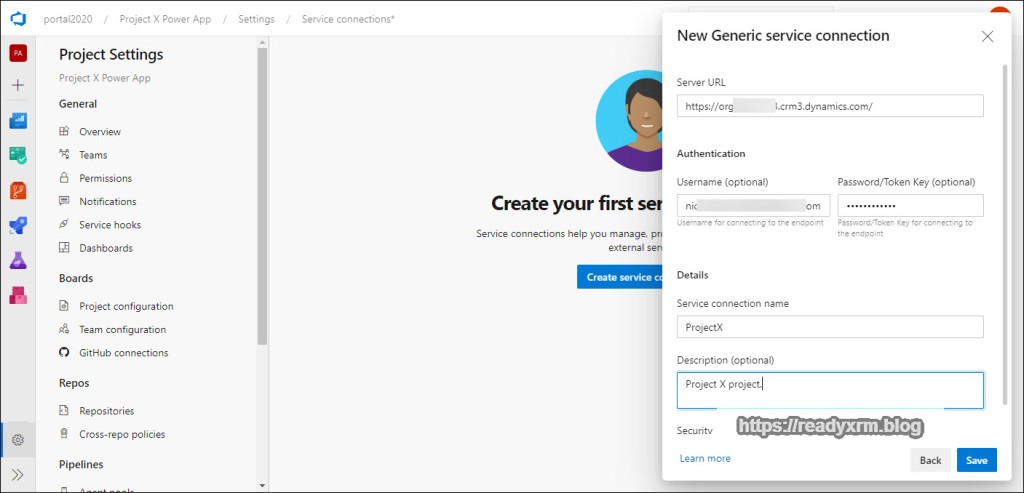
In the service connection settings, will get the URL from our Power Platform environment (You can find this in the Power Platform Admin Center) You will also need to specify a username and password. Also give the service connection a meaningful name.
NOTE: Multi-Factor is not yet available. Yes, this could be an issue. Yes, Microsoft is aware of it.
You will see your service connection in the list. You could add multiple other connections to various other environments.

Continuing PowerApps Export Solution Setup
Back on the PowerApps Export Solution step configuration, choose the service connection you just added as well the following;
Solution name
$(SolutionName)Solution Output File
$(Build.ArtifactStagingDirectory)\$(SolutionName).zipThe solution name is actually a variable that we will setup in a few steps below. We can then reuse that variable in multiple places.

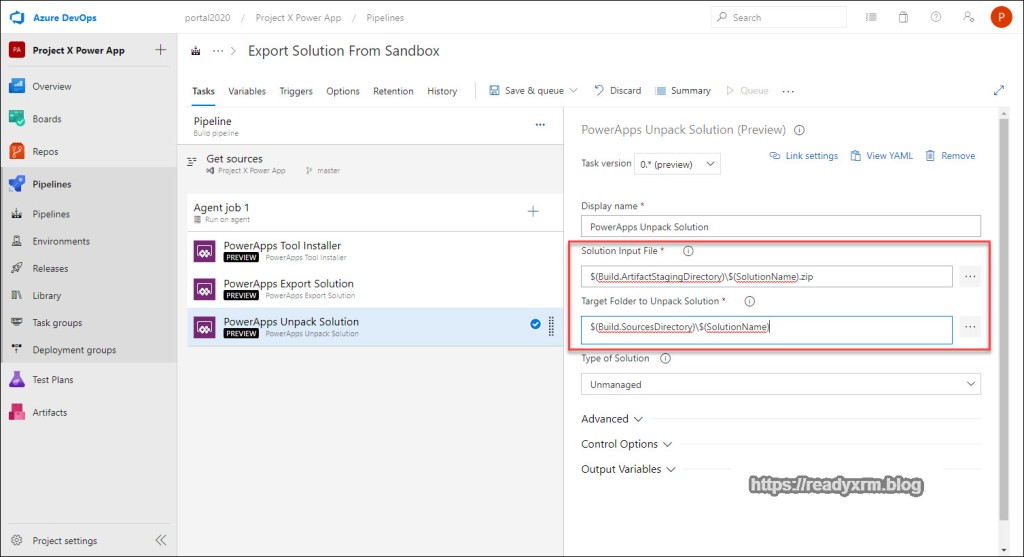
PowerApps Unpack Solution Step
Now that we have exported the solution from our source sandbox environment, before adding to source control, we will unpack it. The solution file is essentially a .zip file with the configuration files in mostly XML format. Pushing it to source control “unpack” means we can easily see the changes to the configuration and when they were done. In more advanced cases, changes from other developers can be merged into this code and re-packed, but lets keep things simple for now.
Add a new task and locate PowerApps Unpack Solution.

The PowerApps Unpack Solution step also requires some additional settings.
Solution Input File
$(Build.ArtifactStagingDirectory)\$(SolutionName).zipTarget Folder to Unpack Solution
$(Build.SourcesDirectory)\$(SolutionName)Type of Solution
UnmanagedWe will be unpacking the solution that we exported in the previous step.
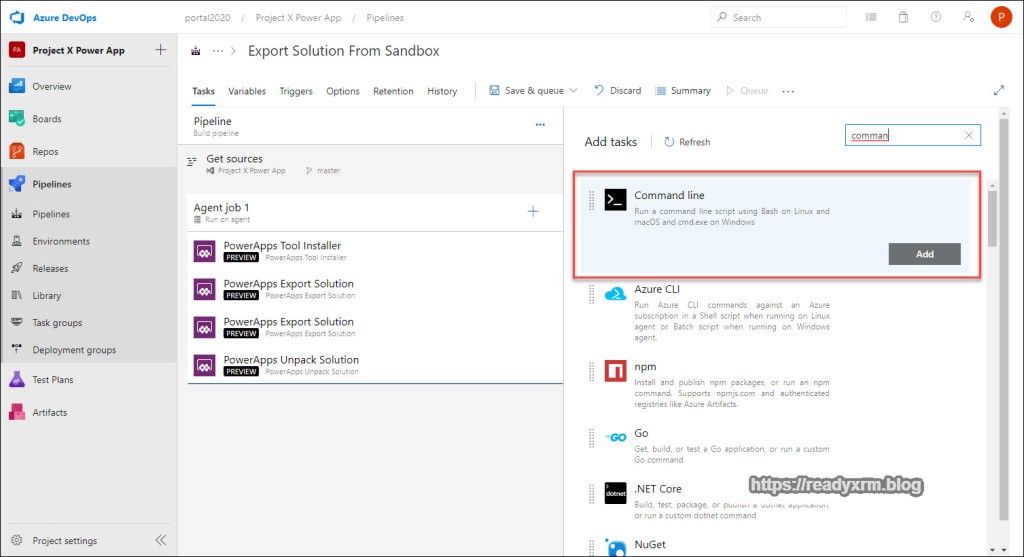
Pushing Unpacked Solution to Source Control Repository
The final task in our pipeline is to push the unpack solution files to source control. Git is a command line tool, so we need to add the Command Line Script task to our pipeline.
Add a new task, search for Command line and add it to the pipeline.
We will need to add the script that will run the Git commands (add, commit, push) to push the unpacked files to source control. You can cut and paste it from here, you will need to specify your Azure DevOps login (replace userXXX@something.onmicrosoft.com in the script.)
echo commit all changes
git config user.email "userXXX@something.onmicrosoft.com"
git config user.name "Automatic Build"
git checkout master
git add --all
git commit -m "solution init"
echo push code to new repo
git -c http.extraheader="AUTHORIZATION: bearer $(System.AccessToken)" push origin master
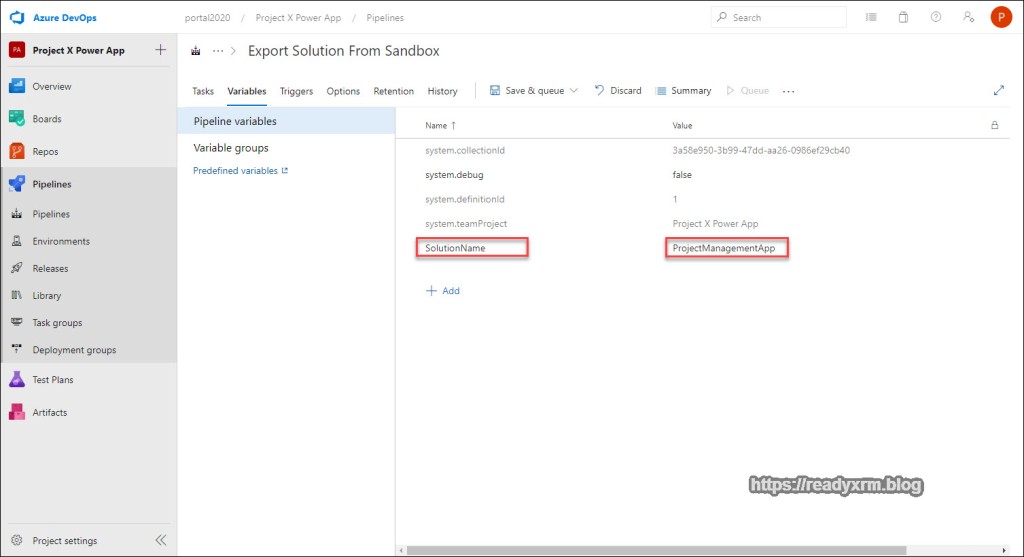
Set Variables
Before we attempt to run our script, we need to define our $solution variable that used in our Export and Unpack solution steps earlier.
Choose “Variables” tab in the pipeline editor, and then “+Add”

Key in your solution name. You are adding all your Power Apps configurations using solutions, right?
Export Solution Pipeline
The pipeline should look something similar to the following screenshot:

First Attempt to run Pipeline
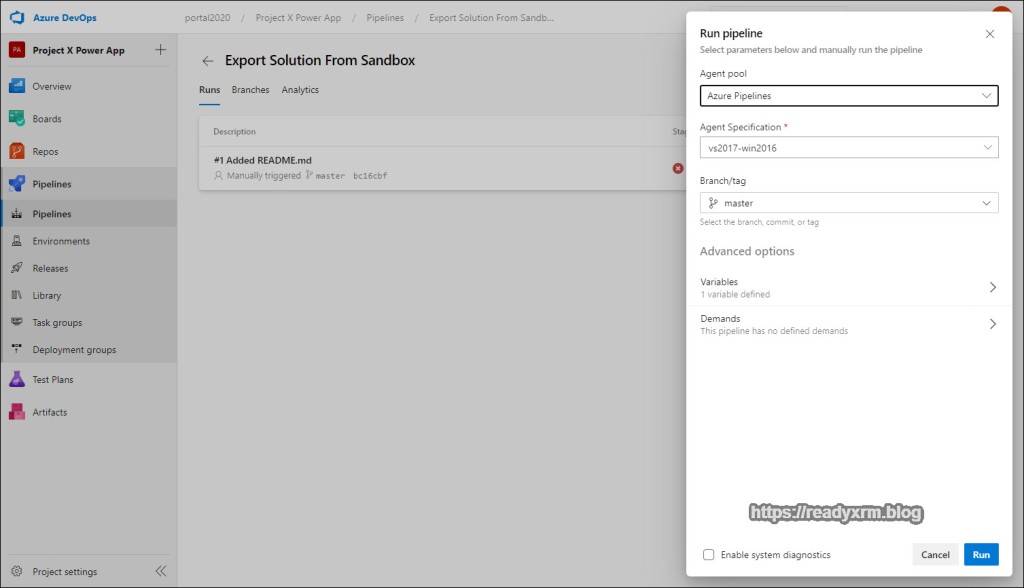
For the next step, we need to do a “2 steps forward, one step back” maneuver. Choose the option to run your Pipeline.

Leave the defaults and run the pipeline.

The pipeline will begin to run. Click on the Agent job to see the details.

The first time you run this particular job, you most likely will get an error (128). This is because the job creates a new Build Service user when it runs the first time, but we need to step back and give it contribute permissions. Unfortunately, we can set this up prior to running the job (or at least I don’t know how… if you do, please comment below!)

To fix:
- Click on the Project settings gear icon
- Choose Repositories
- Choose the new Build Service user (Pipeline name + “Build Service”)
- Change Contribute to “Allow”

Run Export Solution Pipeline (for real this time)
Once the build service user has permissions, run the pipeline again.
Click on the Agent job to view progress. After a few minutes, the pipeline should be complete and the solution should be in the source repo.

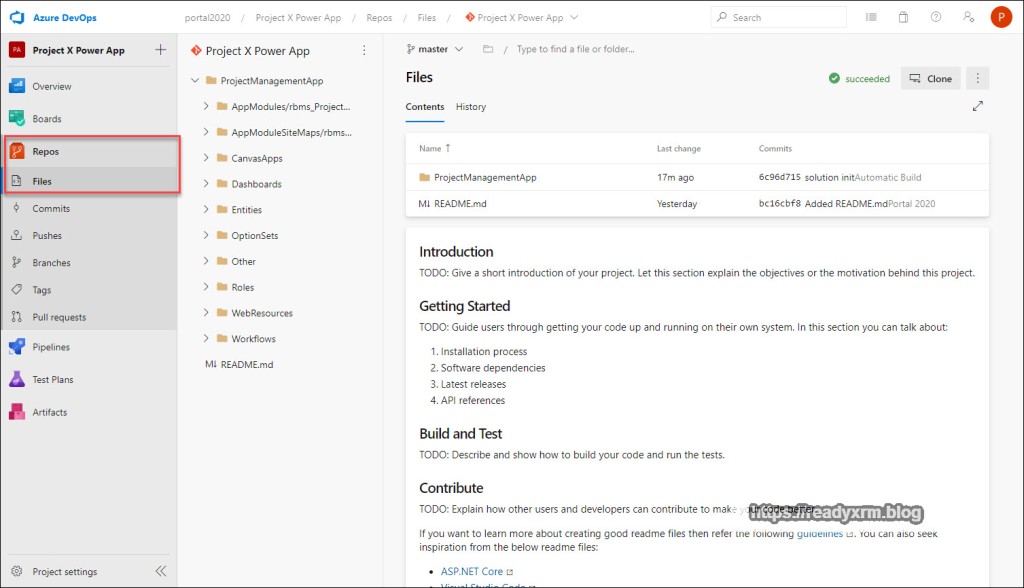
Click on the Repos and you should see your unpacked solution files. Each time your run this pipeline, you should be able to see your changes to your configuration in the various files.
Updating Production from Sandbox
If you follow the labs on github that inspired this post, you will see that they step through a process of setting a temporary Power Platform build environment to assemble and repack the solution and then deploy to production. As your team expands and you need to consolidate code and solutions, and run automated testing, then that is the approach you should consider.
In the meantime, our “simple” process is getting your solution from your sandbox to your production, without having to save the solution, wait for it to download, copy the solution zip file, then import the solution to your production, and then publish if you are still transporting changes unmanaged (going forward you should be considering managed).
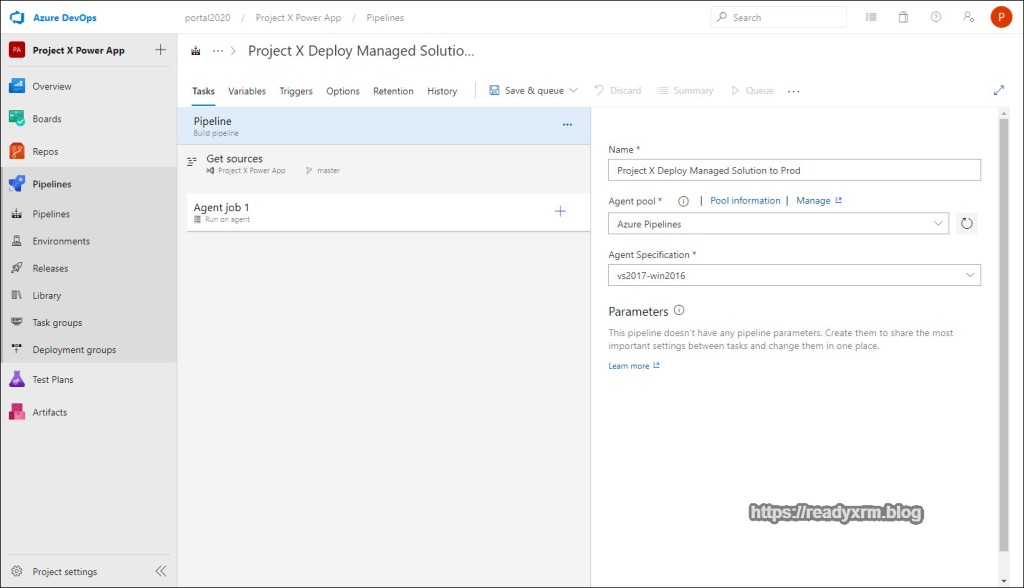
The first step is to create a new pipeline. While we could run all steps in one pipeline, I prefer to break out the saving to source control, as you will likely be doing that on a regular basis (at least daily, if not more) and deploying to production on a less regular basis.
Create Solution Deployment Pipeline
Click on New pipeline

As before, you the classic editor.

In these steps we won’t be using the repository, so keep all the defaults.

There are no templates, so choose “Empty Job”

Give the pipeline a meaningful name. As you create a series of pipelines, you will want to be able to easily identify them.
PowerApps Tool Installer
Again, the pipeline will spin up a temporary virtual machine. Add the PowerApps Tool Installer task to install the tools.

PowerApps Export Solution
We need to export the solution from our sandbox environment. We could instead repack the solution from our source control, but since we are not currently merging or adding anything to that solution (and its stored in source as unmanaged) we will instead just grab it directly from the sandbox.
Add the PowerApps Export Solution task to the pipeline.

As before we will need to configure specific properties of the export solution step.
We already have our source environment service connection configured from our first pipeline, so we can re-use that for our environment URL.
We will again specify our solution name variable, export it as managed to a temporary folder.
Solution Name
$(SolutionName)Solution Output File
$(Build.ArtifactStagingDirectory)\$(SolutionName)_managed.zip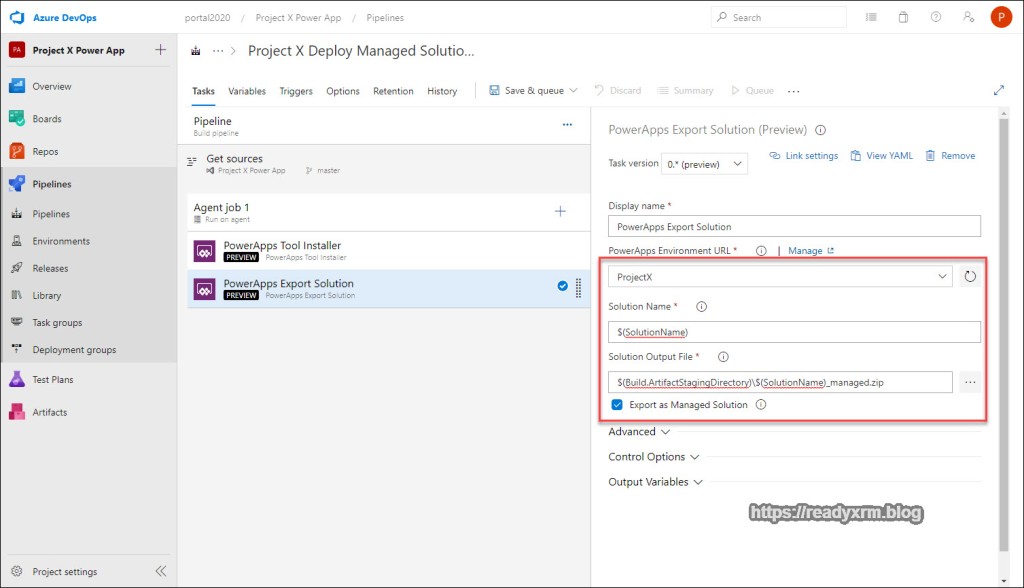
Now that we have the exported managed solution, we need to import it to our destination (production) environment.
Add the PowerApps Import Solution step to the pipeline. Enter in the following properties;
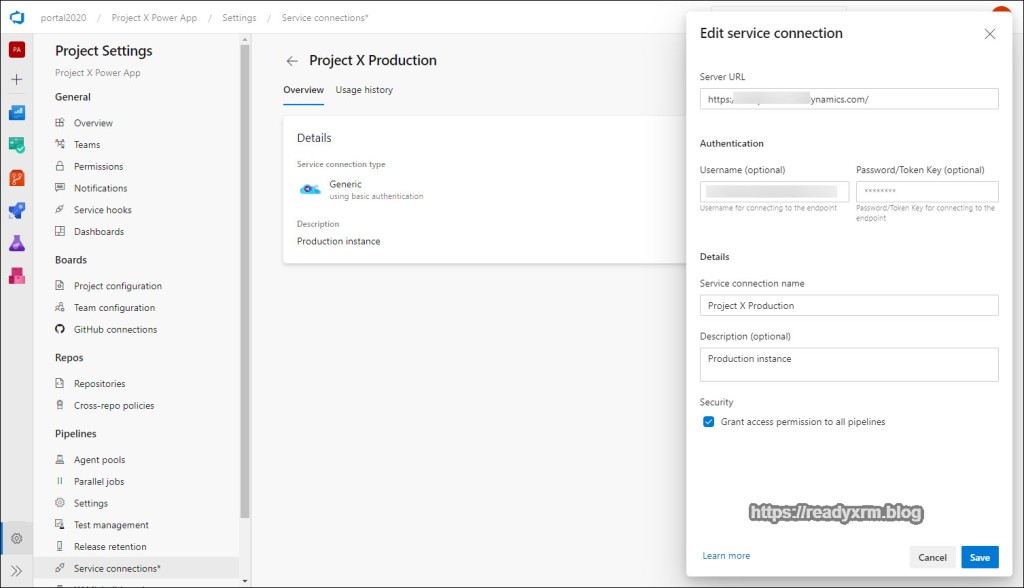
PowerApps Environment URL – you will need to add a new service connection to your project. See below for a refresher on the steps.
Solution Input File
$(Build.ArtifactStagingDirectory)\$(SolutionName)_managed.zip
Production Service Connection
We need to have a service connection for the PowerApps Import Solution step. Click on “Manage” and add a new service connection (the sandbox connection should already be in the list) Choose “generic” service connection type and click Next

Next, fill in the URL and connection details (again, no support for MFA)
Solution name variable
You will need to add the solution name variable that is referenced in the steps above. Click on the variables tab and then add SolutionName variable and the actual name of the solution you want to export and import.

Run the Pipeline
The pipeline should look similar to the following screenshot. Note, if you are still deploying unmanaged solutions to production (and not going to get into that debate here), you can add an additional step to publish your solution after import (not needed for managed).

Finally, launch your pipeline.

Leave the various defaults and run the pipeline. You can click on the agent so view the steps in progress. If everything runs correctly, your solution should be successfully deployed to production.

Now that you have the pipelines set up, you can run these quickly and consistently every time without a lot of tedious importing/exporting.
Now that the basics are setup, you can experiment and add additional tasks/pipelines such as;
- Pipeline to repack unmanaged solution from source and deploy to a new development environment.
- Add steps to run the solution checker.
- Add steps to update the solution version number.
- Incorporate automated testing
- Integrate with Power Automate (e.g. deploy solutions from buttons)
Conclusion
Despite the size of your project, there are now tools available (various build tools, PowerShell, etc) to make your life easier as a Power Apps/Dynamics 365 builder, maker, developer, no matter how big or small your project. The time invested to setup even very simple pipelines will save many hours/days/weeks of time in a project.
I am amazed to see and hear folks still manually importing and exporting solutions and NOT saving solution files to source control (even on enterprise projects!) I am hoping this post removes some of the mystery and sets you down a path of good solution deployment habits.
Pipeline Photo by Mike Benna on Unsplash
Project Team Photo by Annie Spratt on Unsplash
Nick Doelman is a Microsoft Business Applications MVP and is always open to learning new things and really likes to learn techniques that removes tedious work like exporting and importing solutions. Follow Nick on twitter @readyxrm
Interesting in learning about Power Apps Portals? Check out my new Power Apps Portals Fundamentals self-paced learning class by clicking here.
*This post is locked for comments