How to create Sales Order in Business Central using Power Virtual Agent?
 Aleksandar Totovic
Now, when chatbots are becoming a more and more popular way of communicating with customers, all users would like to do more via chatbots. As Microsoft’s response to tools that can make chatbots, there is Power Virtual Agents, and the real power of Power Virtual Agent (PVA) is enormous.
But as business application specialists, we always try to think about how to connect it to some of our Business Applications. This time we plan to connect PVA to Business Central (BC). More precisely, we want to create New Sales Order from PVA and directly in BC.
How we can achieve that, and not to say it is easy, but it is not so complicated. In a concise explanation, we will create PVA with typical questions, and then we will ask some specific questions to our users so that they can give us order-specific data. After collecting data, we will use Power Automate to connect all.
But let’s stop talking hypothetically and start creating our PVA connected to BC.
The critical thing to mention is that I will not explain how to create PVA nor suggest which questions to use to trigger it and which flow you will make. I will focus only on the essential steps you must implement to create a Sales Order in BC using PVA. You can start as you like and do it in the best possible way so that it fulfills all of your requirements.
So, let’s start.
First, you will have to get three essential pieces of information from your PVA users:
- Account/Customer No.
- Item No.
- Quantity of Item which customer wants to buy
You can work with Item Name and Customer Name, but be aware that this can make your process more complicated because we have a few things to take into consideration before using this approach:
- Human error
- Similar names
- Many more questions for users
- Many more variables to consider
- Etc.
If you want to try this approach, consider this problem, and you can do it. The process is similar, only with some more steps.
But with our approach, let’s create three questions in Power Virtual Agent and define Variables for them:
- Choose Add Node
- Choose Ask a Question
- In Question, define:
- What is your company account number with us?
- Identify the User’s entire response
- Save response as
- Click on the Pen icon and name it VarCustomerID
- choose Add Node
- Choose Ask a Question
- In Question, define:
- What Product No. are you looking to purchase?
- Identify the User’s entire response
- Save response as
- Click on the Pen icon and name it as VarItemNo
- Choose Add Node
- Choose Ask a Question
- In Question, define:
- Can you tell us which Quantity you would like to order?
- Identify Number
- Save response as
- Click on the Pen icon and name it as VarItemNo
And now we have our questions and variables. What we have to do from here is to add a new action in our PVA, but this time is going to be active for triggering Power Automate.
To do this, you will have to:
- Navigate to Add node in a Topic editor in Power Virtual Agent
- Choose to Call an action
- Choose to Create a flow
And from here, you will be redirected to the Power Automate editor, and you should start creating a new Power Automate.
You will see immediately that you already have trigger and Output predefined for PVA. Just keep it, and we will use it in the process.
From here, you will have to create some Variables and, most important Sales Order Header and Line.
As you probably know, in BC, Sales order contains two tables:
- Sales Order Header
- Sales Order Line
We will have to use both. First, we will create Header, and later we will use the Find Record action to find our Item, and then, in the end, we will fulfill Sales Order Line.
Don’t worry. I will now list all actions one by one and in the order in which you will have to create them so that you’re Power Automate works at the end.
Before you start with Sales Order Header and Lines, as I sed, you will need to do some setup in Trigger and initialize some variables.
For the trigger, what you would need to do is to add you’re Inputs. You will probably understand now whose inputs are values we will get from Questions we have asked users in our PVA.
So let’s create three inputs:
- Text: CompanyName
- Text: Item
- Number: Quantity
And after inputs, I will list all variables you have to Initialize, and all of them will be STRING. Just create them, don’t assign any values. We will do that later in the Power Automate.
- Order ID
- Currency Code
- Item No
- Quantity
- UOM
- Total Price
Now that we have created Variables, we can continue creating records in BC. For better understanding, our Variables are here so that we can collect output at the end and show Sales Order info in PVA so that users can understand what they have created and get some information about orders they had made automatically.
If you want to create Sales Order and not use data back in PVA, you don’t need all these Variables. But when making PVA, it is always lovely to show values at the end to users of PVA.
Now let’s continue with Power Automate, and finally, let’s create a record in BC.
We will now perform three actions; you must do this in this order.
- Create Record V3 (Business Central)
- Environment Name: SANDBOX (if you are working with a PRODUCTION environment, choose PRODUCTION)
- Company Name: CRONUS USA, Inc.
- API Category: v2.0
- Table name: salesOrders
- customerNumber: CompanyName (from trigger)
- Find Records V3 (Business Central)
- Environment Name: SANDBOX (if you are working with a PRODUCTION environment, choose PRODUCTION)
- Company Name: CRONUS USA, Inc.
- API Category: v2.0
- Table name: items
- Filter Query: number eq ‘ItemNo’ (ItemNo Variable form dynamic value)
- Create Record V3 (Business Central) (Apply to Each will be created automatically)
- Environment Name: SANDBOX (if you are working with a PRODUCTION environment, choose PRODUCTION)
- Company Name: CRONUS USA, Inc.
- API Category: v2.0
- Table name: salesOrderLines
- documentId: id (from Create Record (Header) dynamics value)
- itemId: id (from Find Records (Item) dynamics value)
- quantity: Quantity (from the trigger, dynamics value)
And now, after we have created Sales Order in BC, we need to get data and show them back in PVA so that users can see what they have done.
We will do this by assigning values to our Variables. For this scenario, it is best to use Append to string variable action.
Again let’s see what we have to do here.
- Append to a string variable (in Apply to Each)
- Name: ItemNo
- Value: description (from Create Record line)
- Append to a string variable (in Apply to Each)
- Name: Quantity
- Value: Quantity (from Create Record line)
- Append to a string variable (in Apply to Each)
- Name: UOM
- Value: UniteOfMesureCode (from Create Record Line)
- Append to a string variable (in Apply to Each)
- Name: Order ID
- Value: number (from Create Record Header)
- Append to a string variable (in Apply to Each)
- Name: Total Price
- Value: amountIncludingTax (from Create Record Line)
- Append to a string variable (in Apply to Each)
- Name: Currency Code
- Value: currencyCode (from Create Record Line)
When we have assigned values to Variables, we are only left with a few steps till the end of this scenario.
Now we must create one more Variable and append value to it.
This time we are doing this to format our Output result in the best possible way because formatting output values from Power Automate in the PVA is not the best, so we want now to do it in Power Automate and later show this value in our PVA.
To do this, we will create the following Variable:
- Initialize variable (Out of Apply to Each)
- Name: Order
- Type: String
- Value: (none)
- Append variable
- Name: Order
- Value:
You have created a sales Order with ID: Order ID (Variable dynamics value)
With Item: ItemNo (Variable dynamics value)
Quantity: Quantity (Variable dynamics value) UOM (Variable dynamics value)
With total price: Total Price (Variable dynamics value) Currency Code (Variable dynamics value)
And now, we are just two more steps to the end in Power Automate.
This time we must use two actions and keep in mind that one of them is already there, so in reality, we must create one more cation (COMPOSE) and, in the end, assign that value to our PVA output.
- Compose
- Inputs: Order (Variable dynamics value)
- Return value(s) to Power Virtual Agents
- Inputs
- Text: Item
- Outputs
- Text: Item
- Inputs
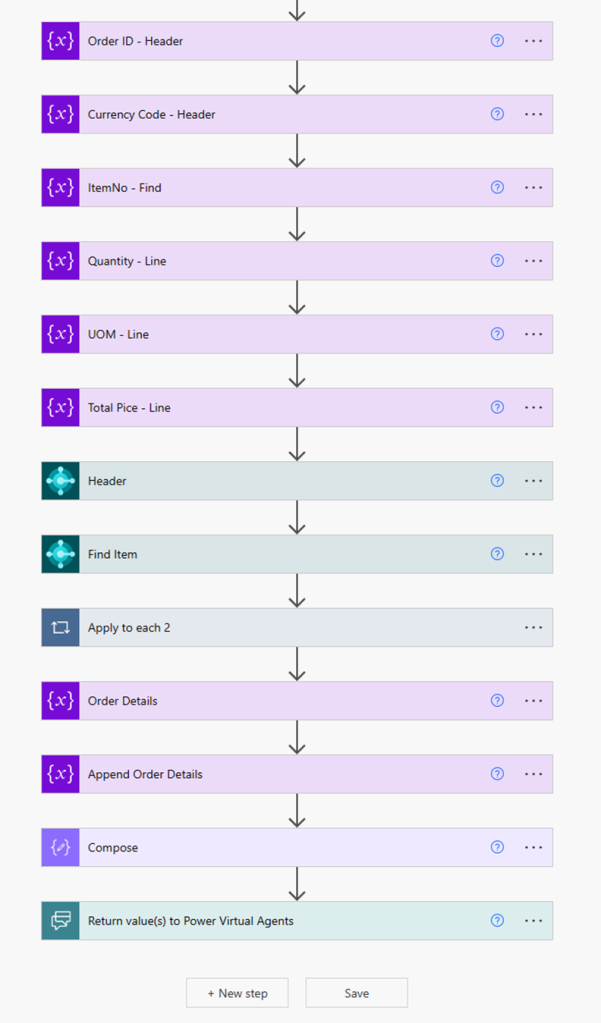
And now we are finished with Power Automate. All that is left here is to Save it, jump back to PVA, and map Variables in PVA so that our inputs in Power Automate can work. Your Power Automate would look like the one on the Screenshot if you created it with the exact steps I described.

To do this, you will have to go back to your PVA and inaction, which you have called Power Automate. You have to choose one which we have created just now.
- Choose Power Automate, Which you have created
- Setup Variables
- CompanyName (text) -> VarCustomerId
- Item -> VarItemNo
- Quantity -> VarQuantity
- Add Node
- Show a message
- Dear customer VarCustomerID (add a variable from the list),
- Show a message
Your order has been created with the following details:
Item (variable from the list)
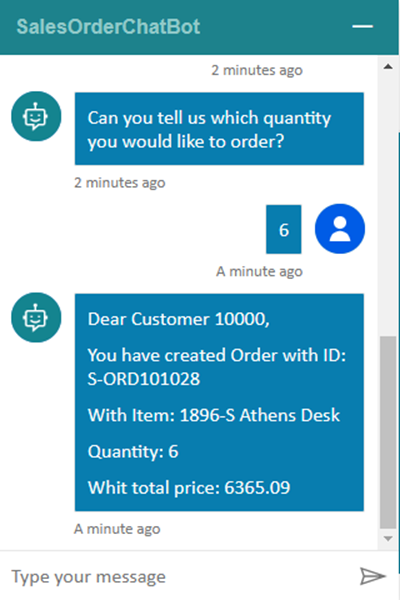
Now you can Save your PVA and Test it to see if it works. If everything is fine, the result will look something like this.

This is not the end. You can continue playing with this PVA and add one new branch where you will create one more Power Automate for users who are not Customers in BC and first create them so that they can make an order. But this is the end for this scenario, How to create a Sales Order from PVA in BC.
In conclusion, when we can use Power Automate with some other tool natively, SKY IS THE LIMIT in what we can do.
I know that this scenario has a bigger number of steps, but in total, it is not so complicated. Still, it gives an excellent perspective on what you can do and gives you an idea of what some other Power Automates should look like if you are using them from PVA. Enjoy creating this Power automate and Power Virtual Agent.
This was originally posted here.


 Like
Like Report
*This post is locked for comments