


 190
190 Like
Like Share
Share
 Report
I recently had the challenge of exporting Dataverse data to an SQL Database. I ended up using an Azure Data Lake Gen2 in combination with an Azure Data Factory (ADF). Throughout the process of setting it up, I faced some issues. We will discuss those in this blog post.
Parts of the shown implementation are in preview as of writing this article.
Background
One of my customers still uses the deprecated Data Export Service (DES) to dump all rows from specific tables into an Azure SQL database. This information is then used by both integrations and reporting tools. The idea of such a setup rather than both requesting Dataverse directly is to decrease the number of requests against the Dataverse APIs to both increase performance for the users as well as respecting the Throttling and API limits of Dataverse.
Since DES is deprecated and will reach “end of life” as well as “end of support” in the last half of November 2022 (see MS announcement) we had the need to replace this setup with something else.
Target Solution
Microsoft is recommending using Azure Synapse Analytics and feeding data to it from Dataverse using the Azure Synapse Link for Dataverse. There even is a playbook describing exactly how to move from DES to Synapse.
The downside of this is the cost of Azure Synapse Analytics as well as the recommendation is to “end” at Synapse. This would mean that a lot of integrations would have to change in a short timeframe.
As you can see on the page of the Azure Synapse Link for Dataverse this is either exporting to Azure Synapse or just to a Data Lake Gen2. That’s what our solution is aiming for. When the data is in the Data Lake we will move it to the already existing Azure SQL Database (currently used by DES) using ADF.
This means that we just change how data is stored in the Database but the structure as well as the Database itself will be exactly the same. This also means no integration has to change at the current time.
The long-term idea is to move all integrations to use the Data Lake directly and skip the SQL.
Problems
Throughout the implementation, I had the following problems which were not covered by the documentation.
Collation
Our Azure Database server was set up with one collation whereas the Database we used had a different collation. A part of the new process is to sync changes in the Dataverse table structure to the export database. To do this the template compares the incoming model with the system table “INFORMATION_SCHEMA.COLUMNS”. If the mentioned system table and the database we use have different collations any equal comparison will fail. This is more a problem we created ourselves, but still, I had to handle it in the new setup.
Table Prefix
While configuring DES one had the opportunity to define a table prefix. If you for example chose “sales” as the prefix and sync the contact table from Dataverse to the SQL using DES the table in the export database will be called “dbo.sales_contact” instead of “dbo.contact”.
The ADF template from MS is not taking prefixes into consideration.
Trigger
I had massive problems with my ADF pipeline getting triggered over 50 times every 15 minutes. This was basically me not reading the documentation carefully enough. So make sure you do!
The solutions to those are included in the Setup part of this article.
Setup
Let’s dive into the setup and see what we have to do.
The documentation from Microsoft on this topic is actually quite good. I will therefore link to the articles explaining the setup in question and only add my additions to it to the post.
Create Data Lake Gen2
Important! Make sure you create your Data Lake Gen2 in the same Azure Tenant and Azure region as your Dataverse is installed in. Otherwise, you won’t be able to create the link between those two. If you go into the maker portal and try to create a new Link (Dataverse -> Azure Synapse Link) it will show you where your Dataverse environment is located.

Other than the mentioned region it is straightforward to create such Data Lake. The documentation is pretty clear on it. Either you create a new storage account directly with the Data Lake Gen2 capabilities or you upgrade an existing storage account.
The first storage account I created for this implementation I wrongly created without the Data Lake Gen2 capabilities which meant I had to upgrade it even though I just created it. Which were a few additional steps, but just took around 5 mins extra.
Link DL using Azure Synapse Link for Dataverse
For this part, there are different documentation created. There is general documentation on how to link Dataverse to a Data Lake using the Azure Synapse Link for Dataverse. From this documentation the Prerequisites are important!
For our ADF pipeline to work, you have to follow this documentation exactly (including the hacky addition to the URL in the middle of creating the link).
The documentation you should have to follow suggests you need to have an Azure Synapse Workspace. It works just fine by only using a Data Lake. Just don’t check the first checkbox when creating the link. It might be that you have to press enter (which reloads the site) when you add the additional parameter to the URL as written in the documentation.
There is the option to include your Azure Synapse Link for Dataverse configuration in your Solution. This allows you to deploy it as part of your usual deployment. Read more.
Create ADF
To begin with, you should follow the documentation on how to set up the template for this scenario.
Don’t make the same mistake as I did and forget to add “/model.json” to the “Blob path ends with” field in the ADF pipeline Trigger.
Now here is where the fun begins and I actually had to fix some stuff!
Collation
The first problem I had was the collation. To fix this I had to alter the script which gets executed in the “CreateTable” step of the ADF Pipeline. To do so you just click the “CreateTable” step within the “ForEach” when you are on your pipeline in the DataFactory studio. At the bottom, you will have some tabs where you go to “Settings”. By clicking into the script a editor will open.
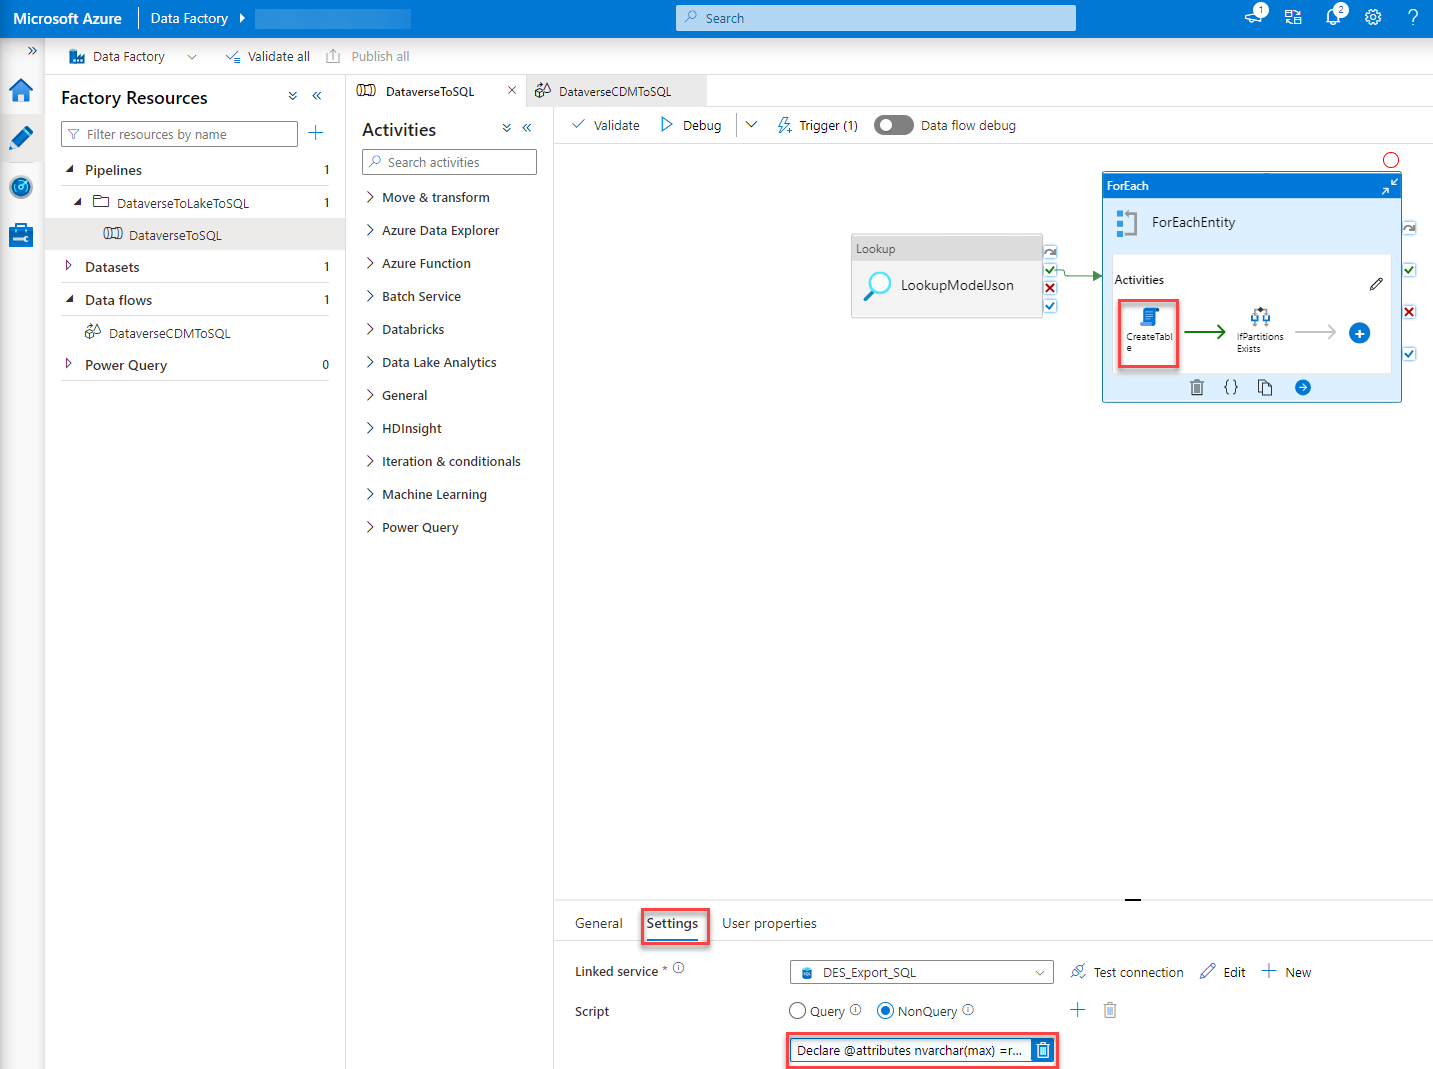
“Pro tip”: Copy the script to an editor of your choice, do your changes there and copy the changed scripted back into the ADF portal. This makes editing much easier than in the portal editor.
You basically have to add “COLLATE <Collation you’ll need>”, in our case it was “COLLATE Finnish_Swedish_CI_AS”, whenever a temp table is created or an equal operation is executed on a field of INFORMATION_SCHEMA.COLUMNS.
This basically ends in the following code/script:
Declare @attributes nvarchar(max) =replace(replace('@{item().attributes}', '\',''), 'cdm:traits', 'traits') ;
declare @entity nvarchar(200) = '@{item().name}';

declare @metadata table (
Name nvarchar(200) COLLATE Finnish_Swedish_CI_AS,
datatype NVARCHAR(50) COLLATE Finnish_Swedish_CI_AS,
maxLength int,
precision int,
scale int,
datatypeSQL nvarchar(100) COLLATE Finnish_Swedish_CI_AS
);

insert into @metadata
select
 x.Name,  x.dataType,  x.maxLength,  x.precision,  x.scale,
 case
 when x.dataType = 'nvarchar' and x.maxLength < 0 then 'nvarchar(max)'
 when x.datatype = 'nvarchar' and x.maxLength > 0 then 'nvarchar(' + convert(nvarchar(10), x.maxLength) + ')'
 when x.datatype = 'decimal' then 'decimal(' + convert(nvarchar(10), x.precision) + ',' + convert(nvarchar(10), x.scale)+ ')'
 else x.datatype end as datatypeSQL
 from (
 select Name,
 case datatype
 when 'guid' then 'UNIQUEIDENTIFIER'
 when 'string' then 'nvarchar'
 when 'int64' then 'bigInt'
 when 'boolean' then 'bit'
 when 'double' then 'real'
 else datatype end as dataType,
 case    when datatype = 'string' and  maxLength > 4000 then -1
 when datatype = 'string'  then maxLength end as maxLength,
 case  when datatype = 'decimal' then precision end as precision,
 case  when datatype = 'decimal' then scale end as scale
 FROM OPENJSON(@attributes)  WITH (  name nvarchar(200) '$.name',  datatype NVARCHAR(50) '$.dataType' , maxLength int '$.maxLength' ,precision int '$.traits[0].arguments[0].value' ,scale int '$.traits[0].arguments[1].value')  )x ;


Declare @CreateTableDDL nvarchar(max) = (SELECT
'IF OBJECT_ID(''dbo.' + @entity + ''',''U'') IS NULL
create table ' + @entity + '(' + STRING_AGG(CONVERT(NVARCHAR(max), + '[' + name + '] ' +  datatypeSQL) , ',') + '
, CONSTRAINT ' + @entity + '_ID PRIMARY KEY CLUSTERED (Id)' + ')'
from @metadata);

 execute sp_executesql  @CreateTableDDL;

  -- add Columns
Declare @AlterTableAddColumnDDL nvarchar(max) = (SELECT
'alter table ' + @entity + ' ADD ' + STRING_AGG(CONVERT(NVARCHAR(max), + '[' + name + '] ' +  datatypeSQL), ',')
from @metadata m
left join INFORMATION_SCHEMA.COLUMNS c on
c.TABLE_NAME COLLATE Finnish_Swedish_CI_AS = @entity and TABLE_SCHEMA = 'dbo'
and c.COLUMN_NAME COLLATE Finnish_Swedish_CI_AS = m.Name
where c.COLUMN_NAME COLLATE Finnish_Swedish_CI_AS is null);

execute sp_executesql @AlterTableAddColumnDDL;

--select @AlterTableAddColumnDDL;

Declare @AlterTableAlterColumnDDL nvarchar(max) = (SELECT
  STRING_AGG(CONVERT(NVARCHAR(max), + 'alter table ' + @entity + ' ALTER COLUMN ' + '[' + name + '] ' +  datatypeSQL), ';')
from @metadata m
left join  INFORMATION_SCHEMA.COLUMNS c on
c.TABLE_NAME COLLATE Finnish_Swedish_CI_AS = @entity and TABLE_SCHEMA = 'dbo'
and c.COLUMN_NAME COLLATE Finnish_Swedish_CI_AS = name
where c.COLUMN_NAME is not null and (c.Data_type COLLATE Finnish_Swedish_CI_AS != datatype or c.CHARACTER_MAXIMUM_LENGTH != maxLength or NUMERIC_PRECISION != precision or NUMERIC_SCALE != scale));

execute sp_executesql @AlterTableAlterColumnDDL;

--select @AlterTableAlterColumnDDL;

Declare @CreateLogTableDDL nvarchar(max) =
'IF OBJECT_ID(''dbo.DeleteLog'',''U'') IS NULL
CREATE TABLE [dbo].[DeleteLog](
	[Id] [bigint] IDENTITY(1,1) NOT NULL,
	[EntityName] [nvarchar](64) NOT NULL,
	[RecordId] [nvarchar](64) NOT NULL,
	[SinkDeleteTime] [datetime] NOT NULL,
	[VersionNumber] [bigint] NOT NULL,
PRIMARY KEY CLUSTERED
(
	[Id] ASC
)
) ON [PRIMARY]';

execute sp_executesql  @CreateLogTableDDL;
Prefix
A bit more work was it to fix the prefix problem. In our case, we used “sales” as a prefix in DES. Since we wanted to have our DES database exactly as is this needed to be handled.
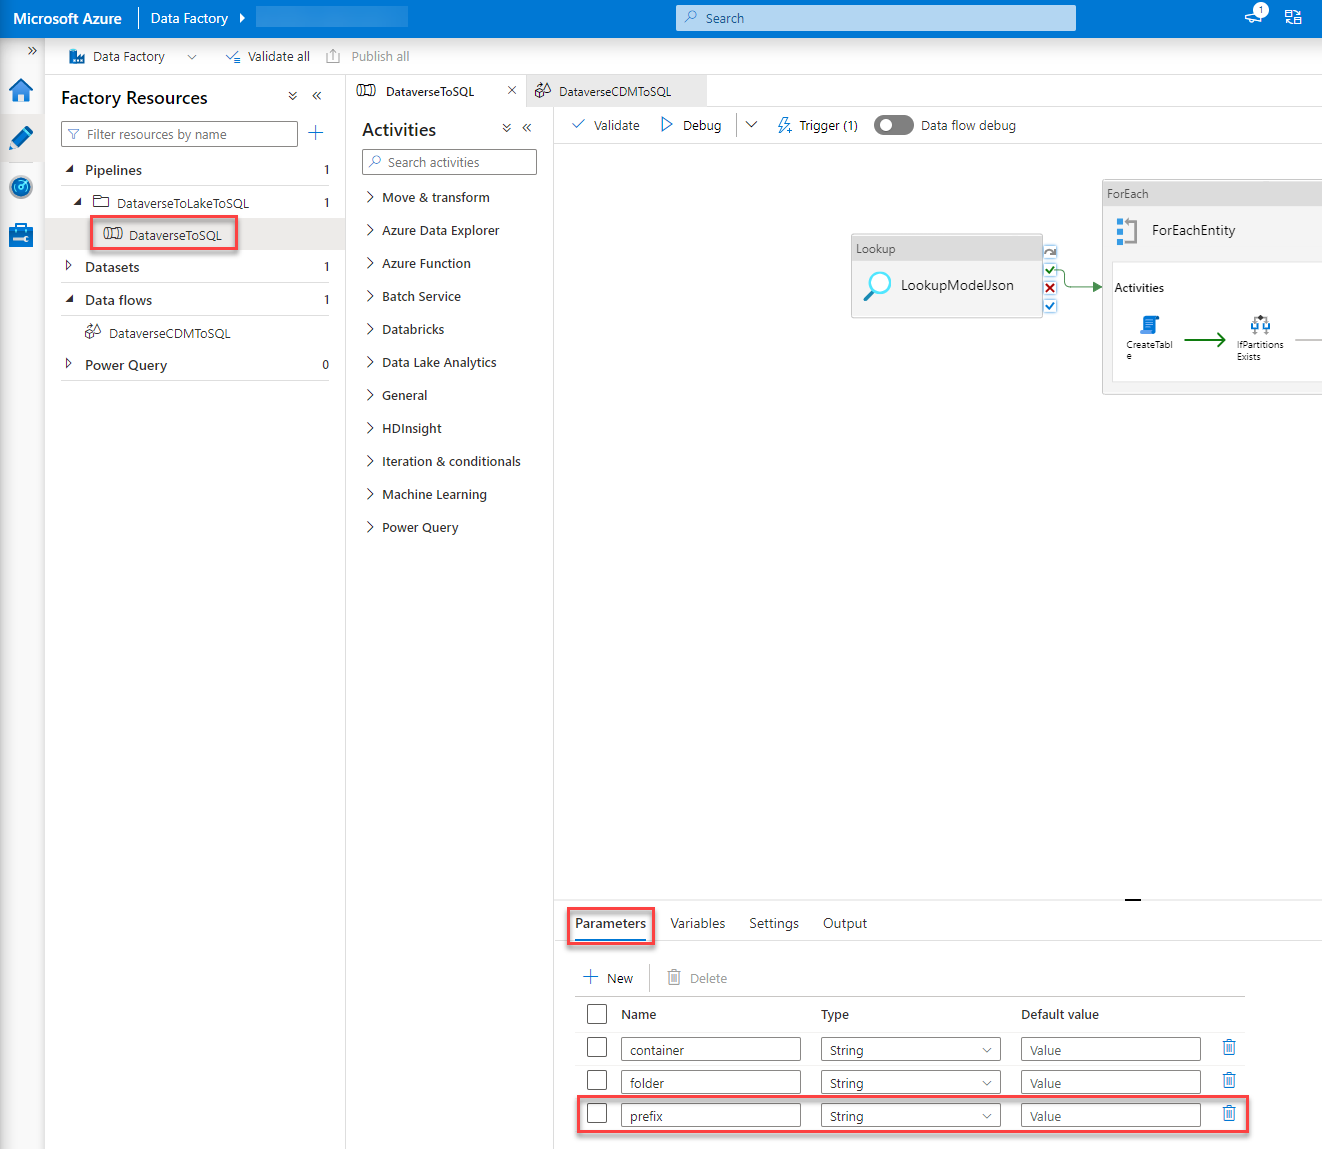
Parameter
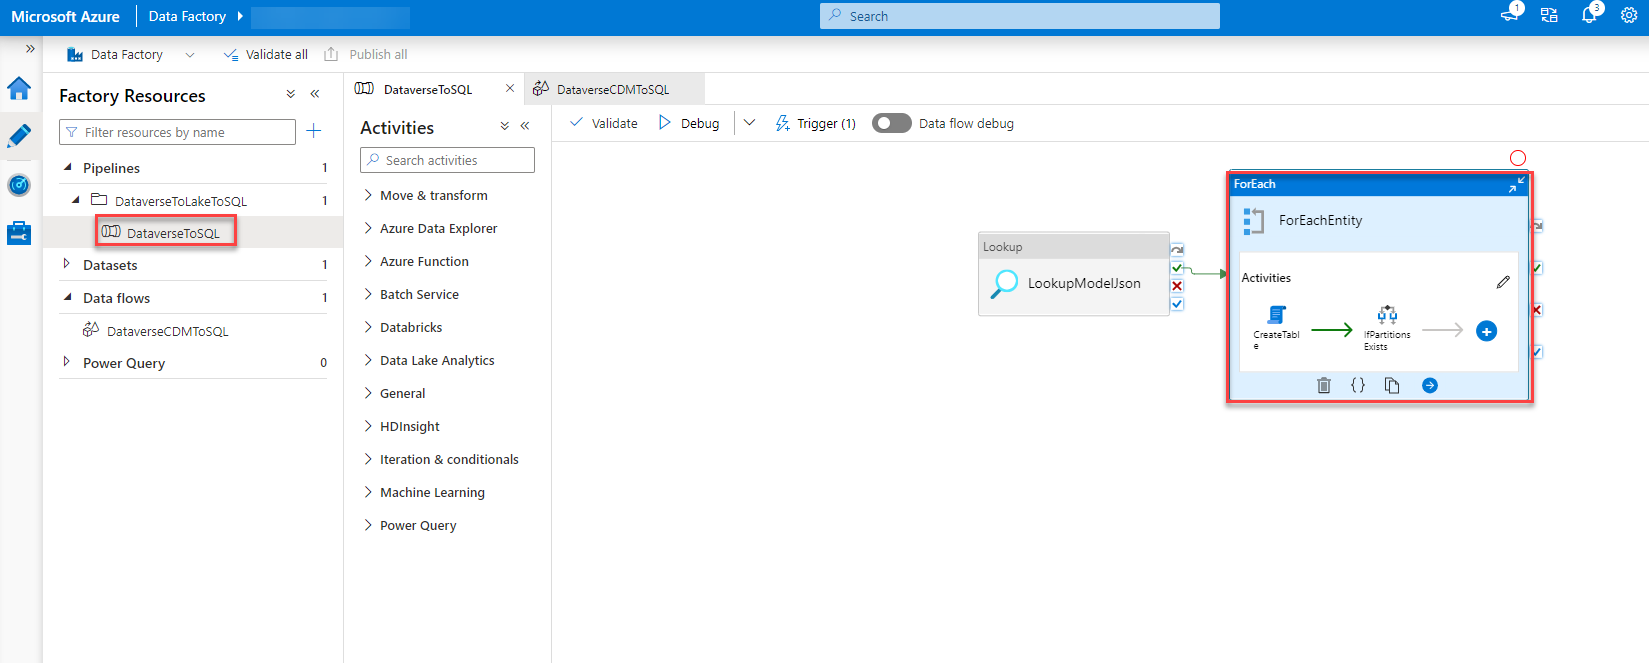
The first thing I did was add an additional Parameter, prefix, to the pipeline.
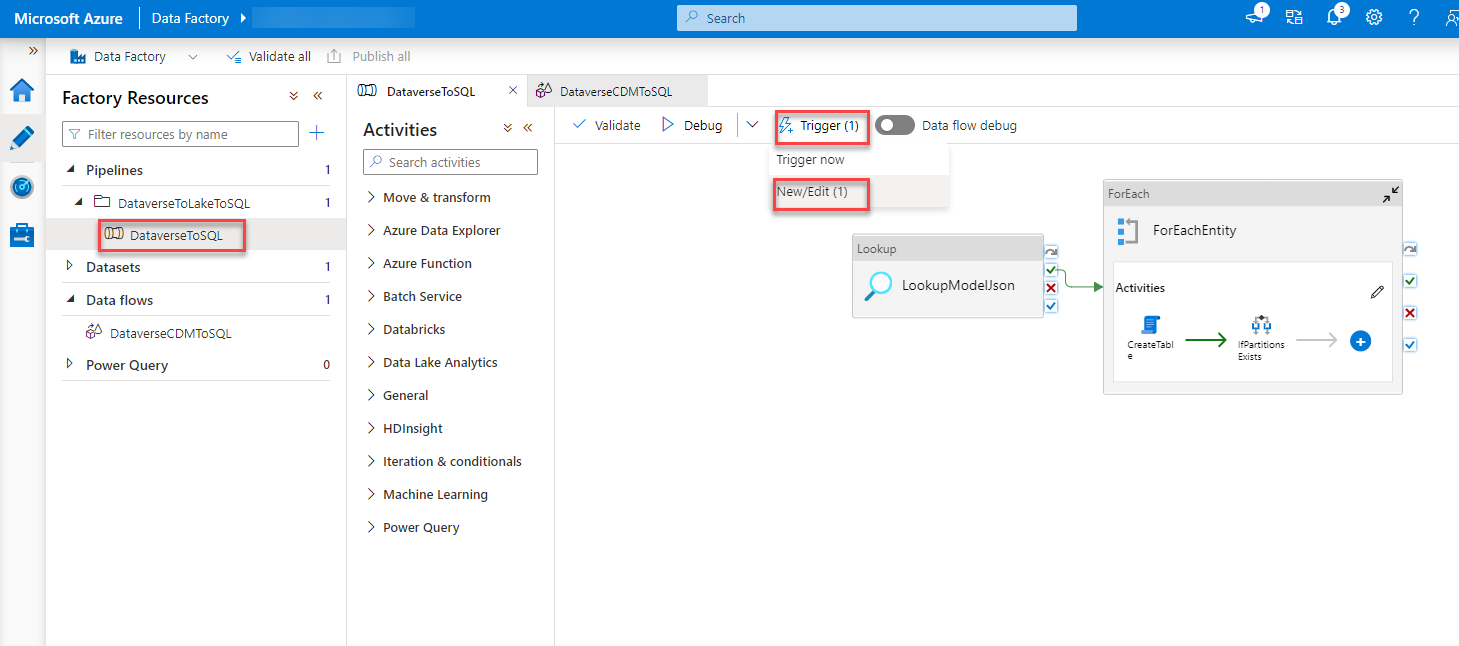
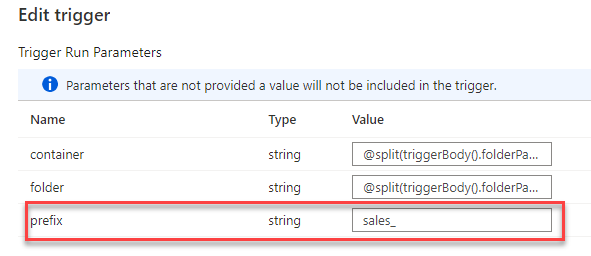
Trigger
Next, I would use the new parameter in the trigger and set it statically to “sales_”.
CreateTable script
The third thing I changed is the CreateTable script we discussed while fixing the collation. I changed the second row to include the prefix
declare @entity nvarchar(200) = '@{pipeline().parameters.prefix}' + '@{item().name}';
Data flow
The last part to change was the data flow. This part consists of different steps.
First, we have to add an additional parameter, prefix, to the Data flow as well.
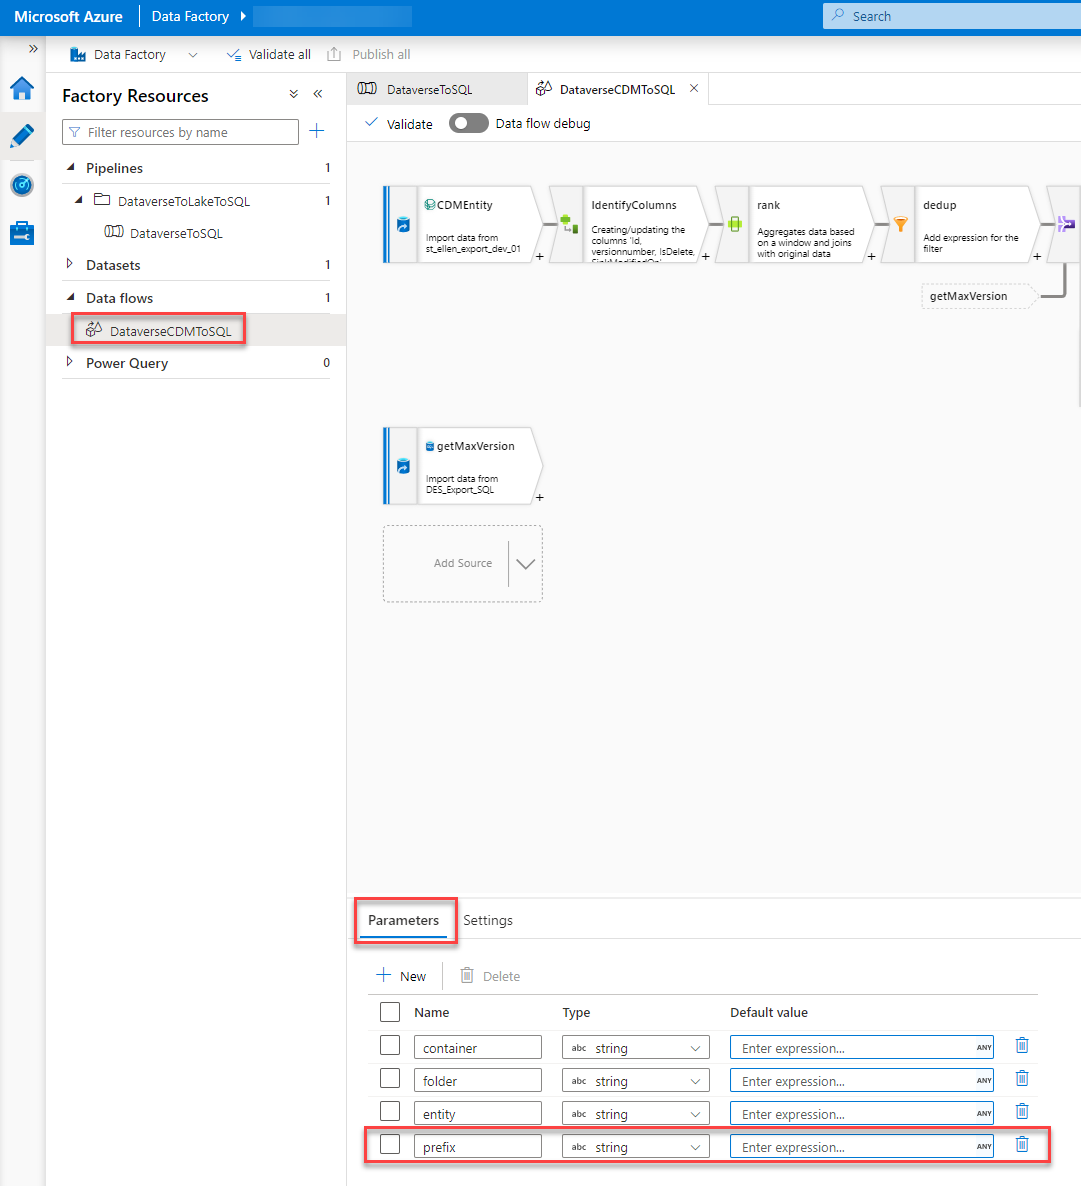
This parameter has to be used in two different steps within the Data Flow.
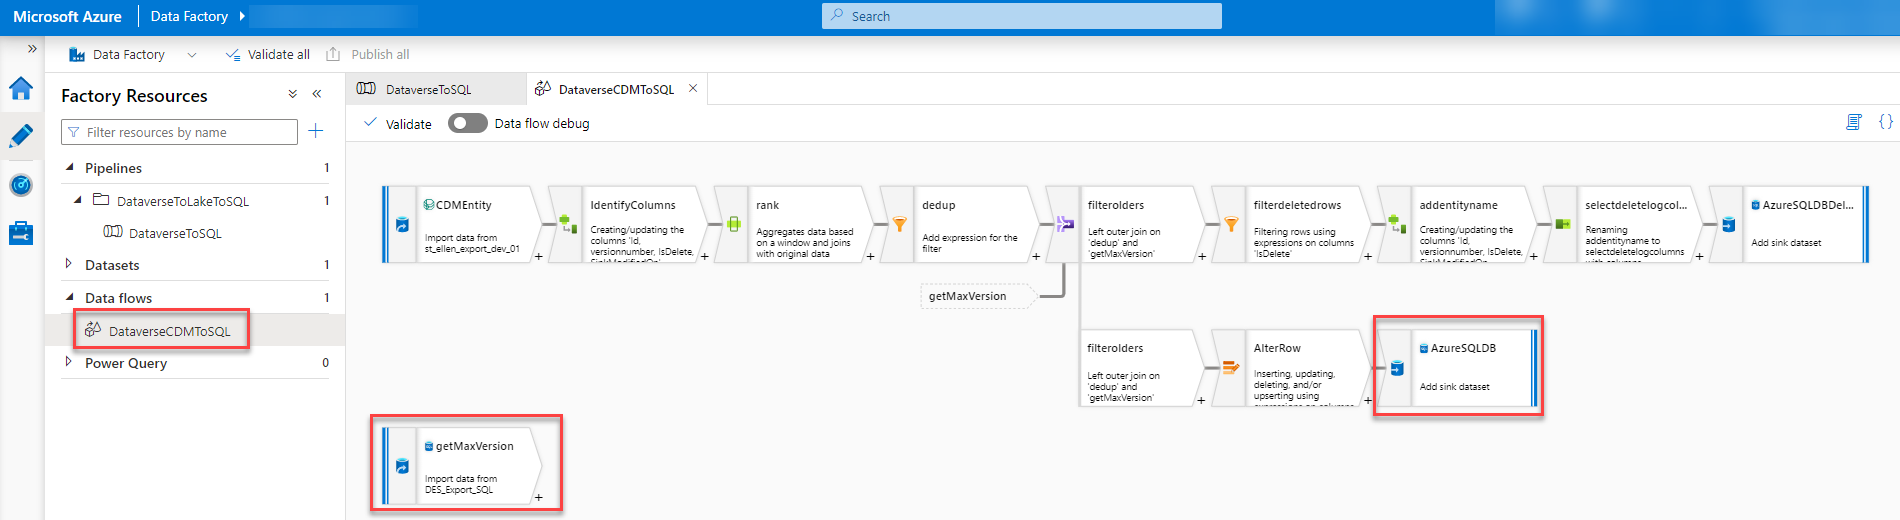
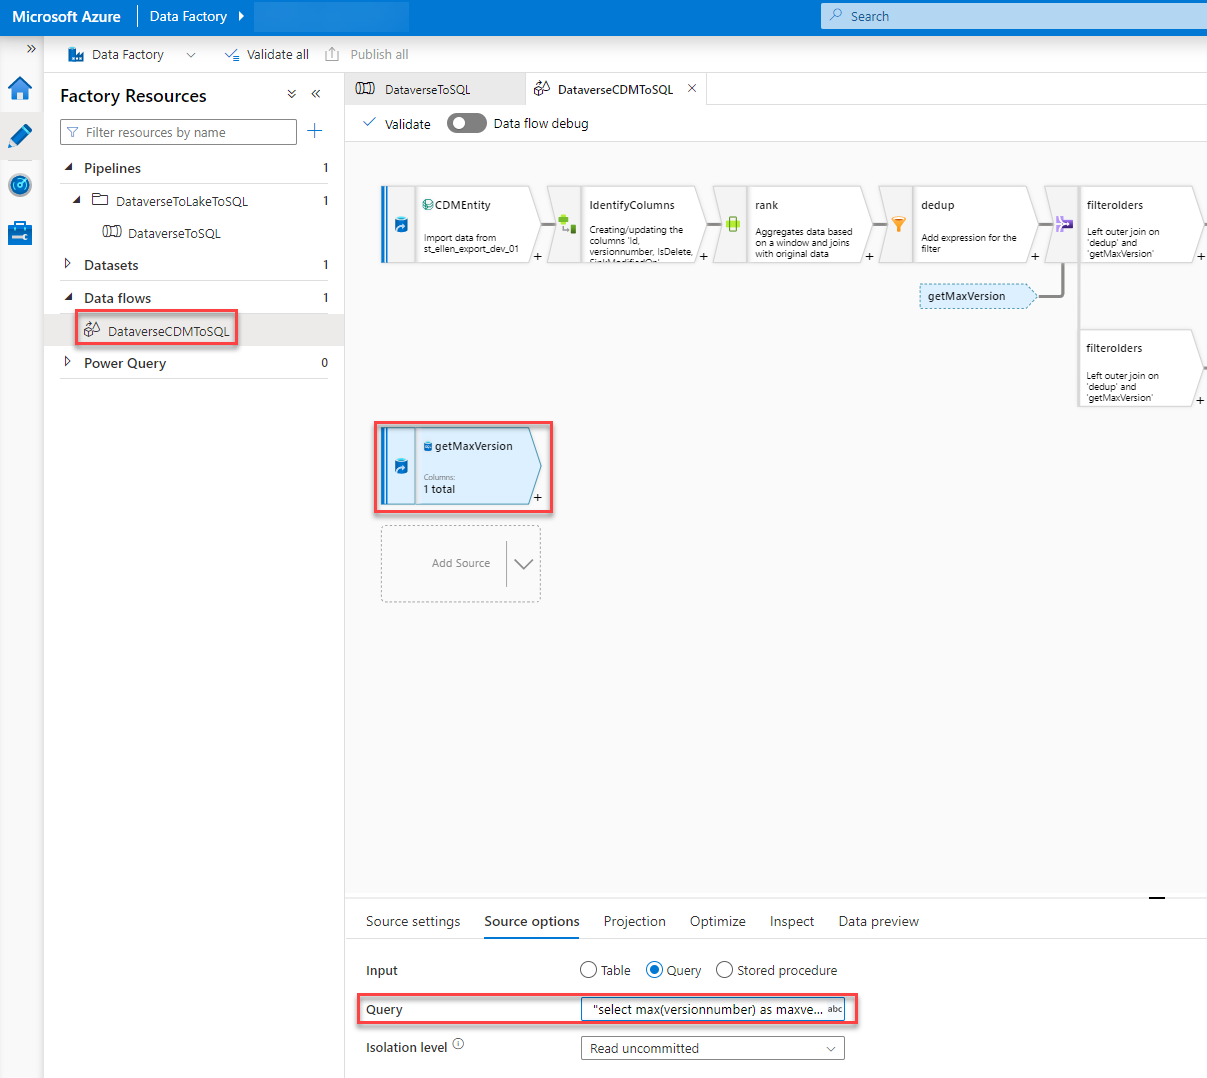
In the getMaxVersion step, we have to add the prefix at the end of the query so that the table we query on gets the correct name.
The Query should be like this.
"select max(versionnumber) as maxversion from dbo." + $prefix + $entity
In the step called “AzureSQLDB” we have to add “$prefix + ” at the beginning of the “Table name” field under the Settings tab. This will, again, give the script the correct table name and honor the prefix we already have in the SQL.
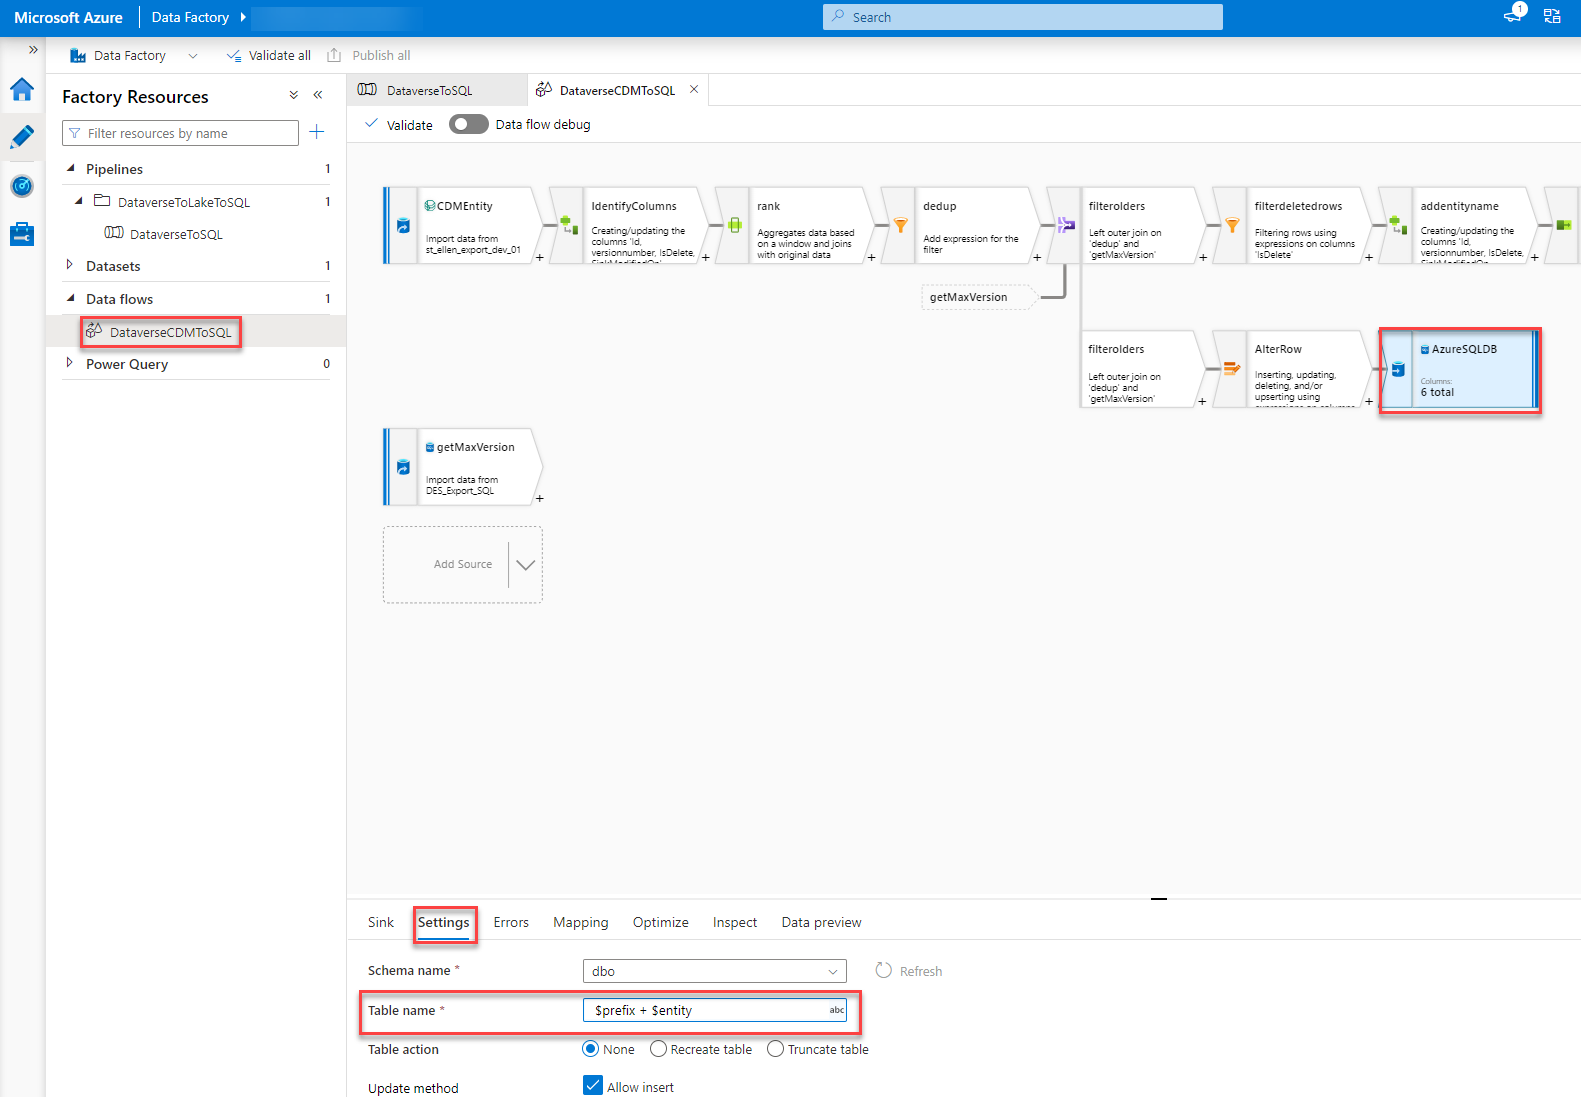
Last but not least we have to set the parameter of the Data flow with the value of the parameter of the pipeline when the data flow is called.
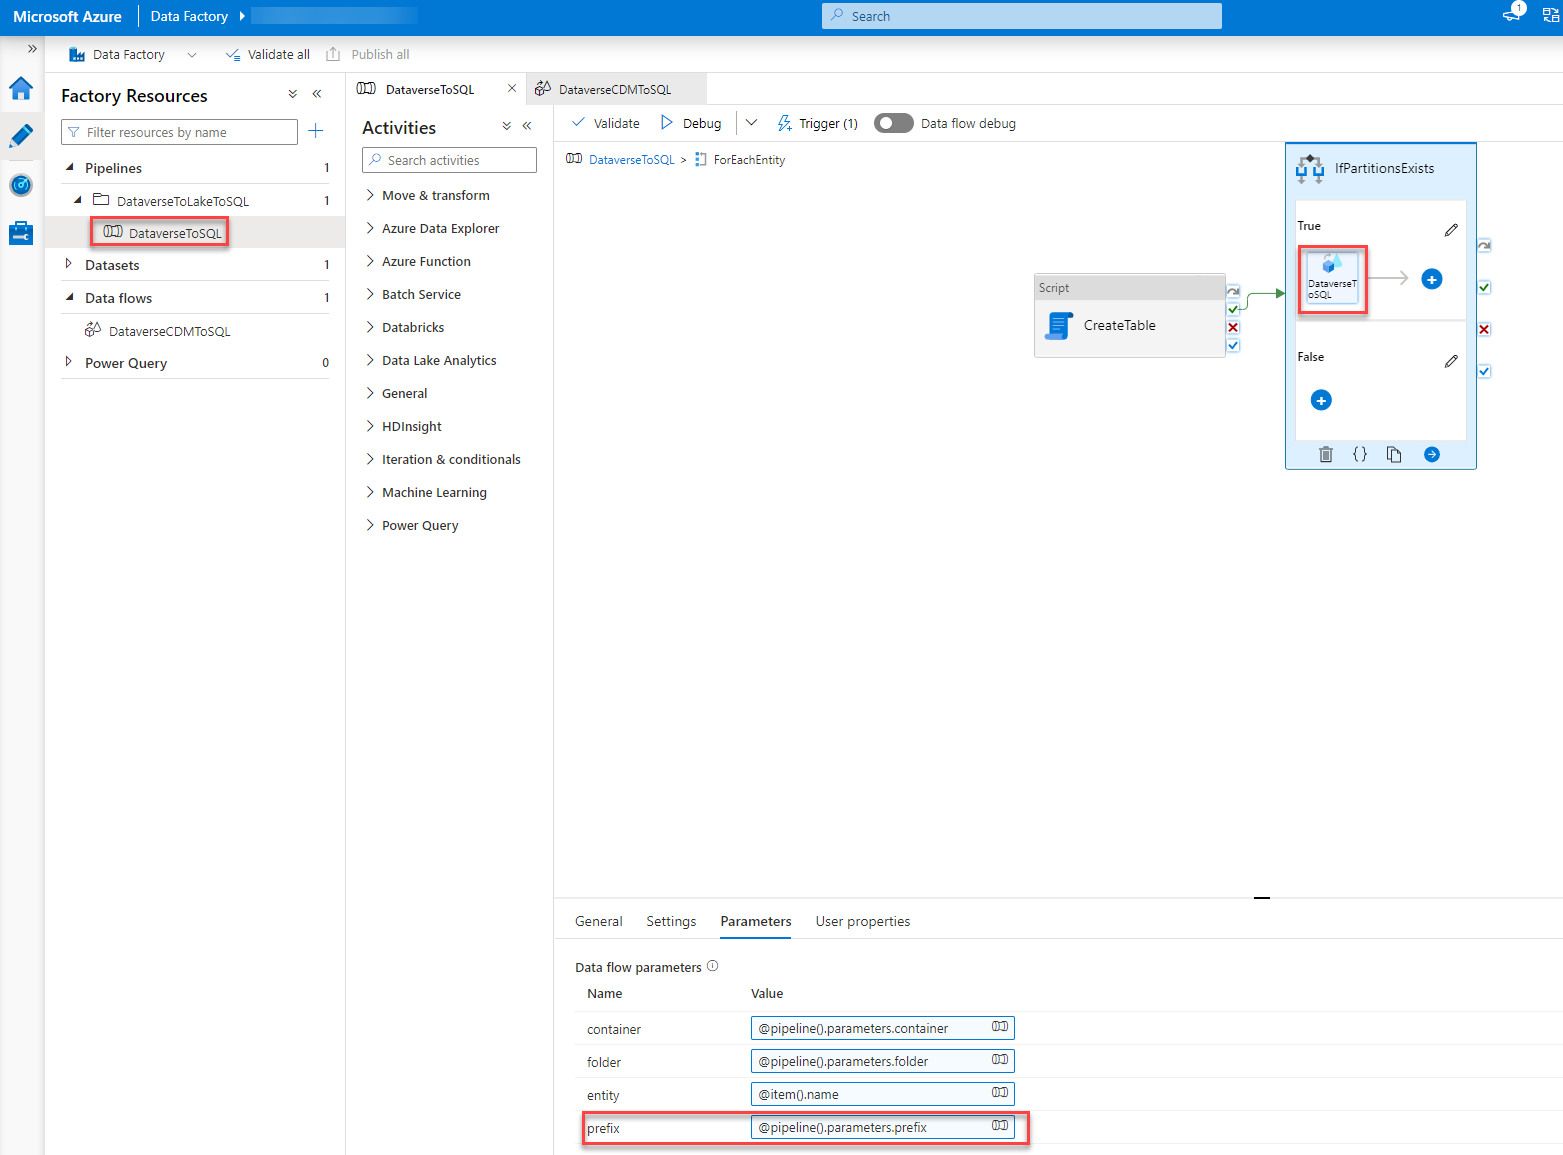
To do so we go back to our pipeline, Dubbel click on the “ForEachEntity” and select the “DataverseToSQL” step (could be that you have to click it twice). In the Parameter tab, we add the following expression to the field of the prefix value.
@pipeline().parameters.prefix
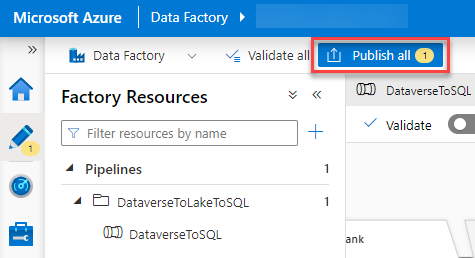
Publish
Now that we have made all the changes all that is left is to publish all our changes so that they get effective.
Conclusion
The new setup isn’t that hard to achieve if you know where the problems could be and how to mitigate those. Documentation on this topic is better than expected even though it is a bit hard to follow at times.
The Script which is delivered as part of the ADF template isn’t very optimal. There is a lot one could improve on it or even do differently. I might give an update when I had time to refactor it.
I hope this article was helpful. Please leave me a comment or contact me if you have any other questions or feedback.
The post Export Dataverse data to SQL using Data Lake and ADF appeared first on Benedikt's Power Platform Blog.
*This post is locked for comments