


 924
924 Like
Like Share
Share
 Report
Dynamics 365 for Customer Service provides a very powerful platform for building Helpdesk system both – for external as well as internal company usage. This blog explains the various elements of customer support process (for channel: Email) right from first stage: Case creation (by email received from Customer) to final stage: Case resolution.
Please note that even though this blog occasionally references Zap Helpdesk – Email to Case App, you can apply the same concepts when designing your own helpdesk-email-to-case-support process.
1. Customer sends email to your support mailbox (support@mycompany.com):
Let’s consider an example scenario: Customer is unable to download product catalog from your company website… and so raises a case by sending email to your support mailbox (eg support@zapobjects.com)
Screenshot below shows the email sent by Customer (Ken Chako – From Insure-Me) to Zap Objects Support mailbox

Following are the events that need to happen in this stage:
=> Pre-validation of email against spam email addresses/domains as well as spam keywords (to avoid creation of spam cases)
=> Email body is automatically copied to case description (by stripping HTML tags)
=> Setting of any default values on the case (eg case origin set to email) (by using Rules Configurator feature)
=> Case is automatically routed to Queue / assigned to user (based on configured case assignment rules – by keyword matching, by email domain matching, based on customer preference, etc)
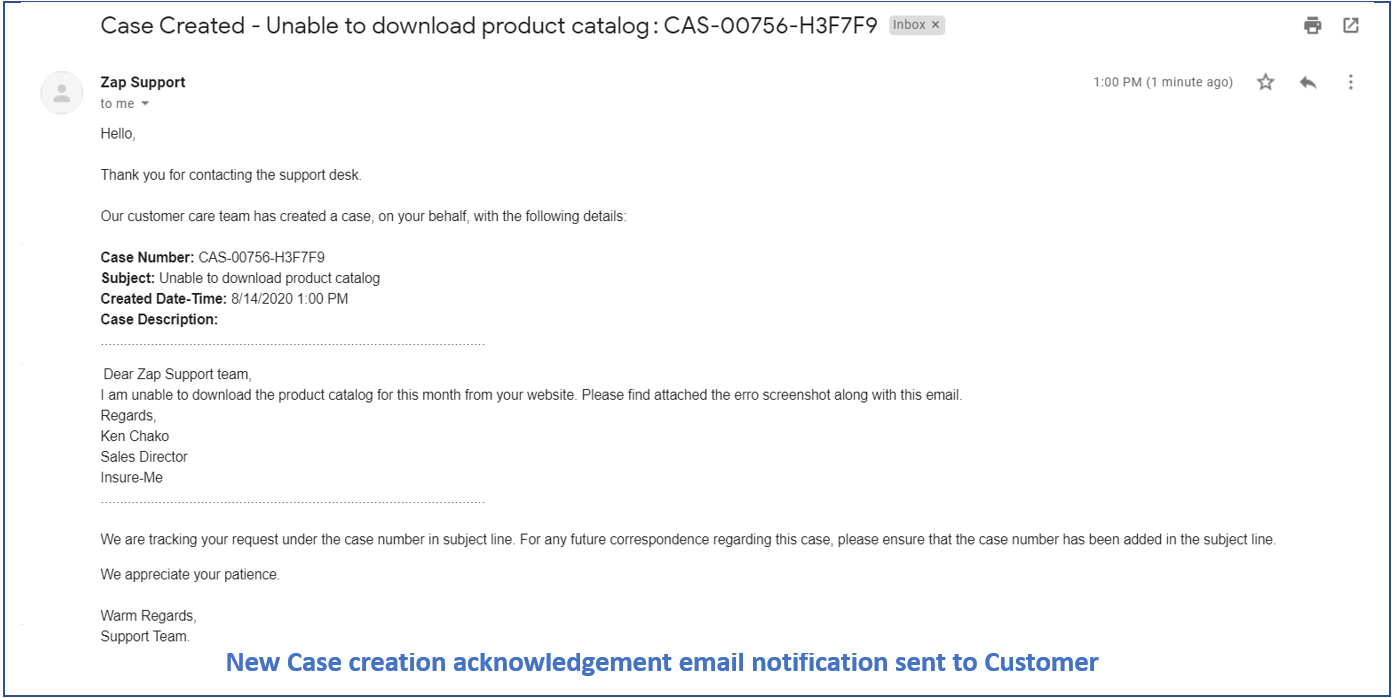
3. Case creation acknowledgment email notification is automatically sent to customer:
Screenshot below shows the email notification that was sent to Customer on case creation:
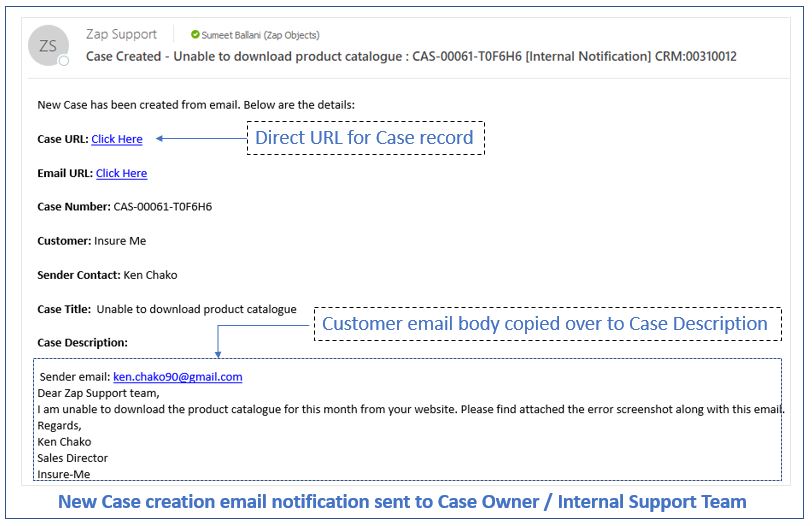
4. Case creation email notification is automatically sent to internal support team / case owner informing them of this new case that was created:
Screenshot below shows the email notification that was sent to internal support team / case owner:
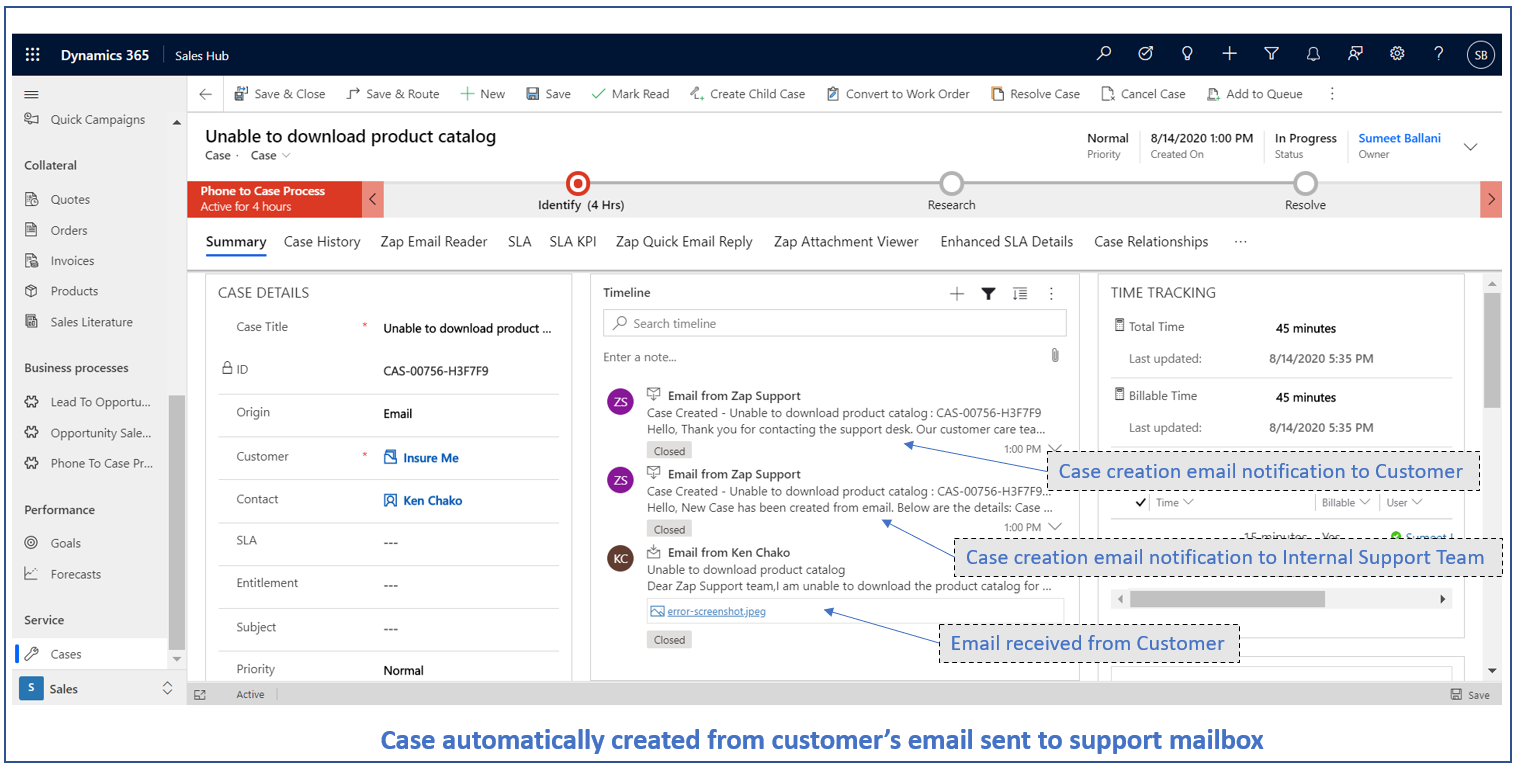
5. Support agent directly opens the Case in Dynamics 365 by clicking the case URL which was sent in email notification.
Screenshot below shows the Case form with fields auto-populated:
Case Title: Email Subject,
Case Description: Email Body,
Case Customer: Account of Contact with matching email, (Can be set to exclusively Account too if needed)
Case Contact: Contact with matching email, (We also set a custom field “Sender Contact” with the matching Contact record… This can be used in your notification workflows… as Case Contact look-up field has certain limitations…eg it can be set only when Case.Customer is its “Parent Account”)
Case Source: Email (Can be set using “Rules Configurator”)

6. Support agent wants to reply back to Customer, so scrolls down further to the “Quick Email Reply” section
Quick Email Reply Section (part of Zap Helpdesk App) consists of email editor and drag-and-drop attachments control:
1. Email Editor:
Screenshot: Email editor:

As seen in screenshot above, all fields have been auto-populated there by speeding up the time needed to compose email from Dynamics 365.
The fields are auto-populated based on default settings in “Quick Email Reply User Settings” configuration entity.
To further speed up / reduce the clicks… the last email response received from Customer can be automatically be selected (based on configuration setting)
2. Drag-and-Drop Attachments:
Screenshot: Drag-and-Drop Attachments control

7. Composing email from Dynamics 365: There are 2 different approaches that the support agent can use in-order to compose the email:
Approach 1: Support agent replies by composing a new email
This is the default option selected in the Quick reply email editor. All fields in email are auto-populated. Even the email body has been auto-populated from default email template. For screenshot refer point 7.
Approach 2: Support agent replies by selecting Reply-To the existing email received from customer
Here the support agent wants to reply to the original email sent by Customer. This can be done by selecting the email from the email drop-down as shown in screenshot below:

As soon as the email is selected, all fields are automatically populated based on the email selected in drop-down.
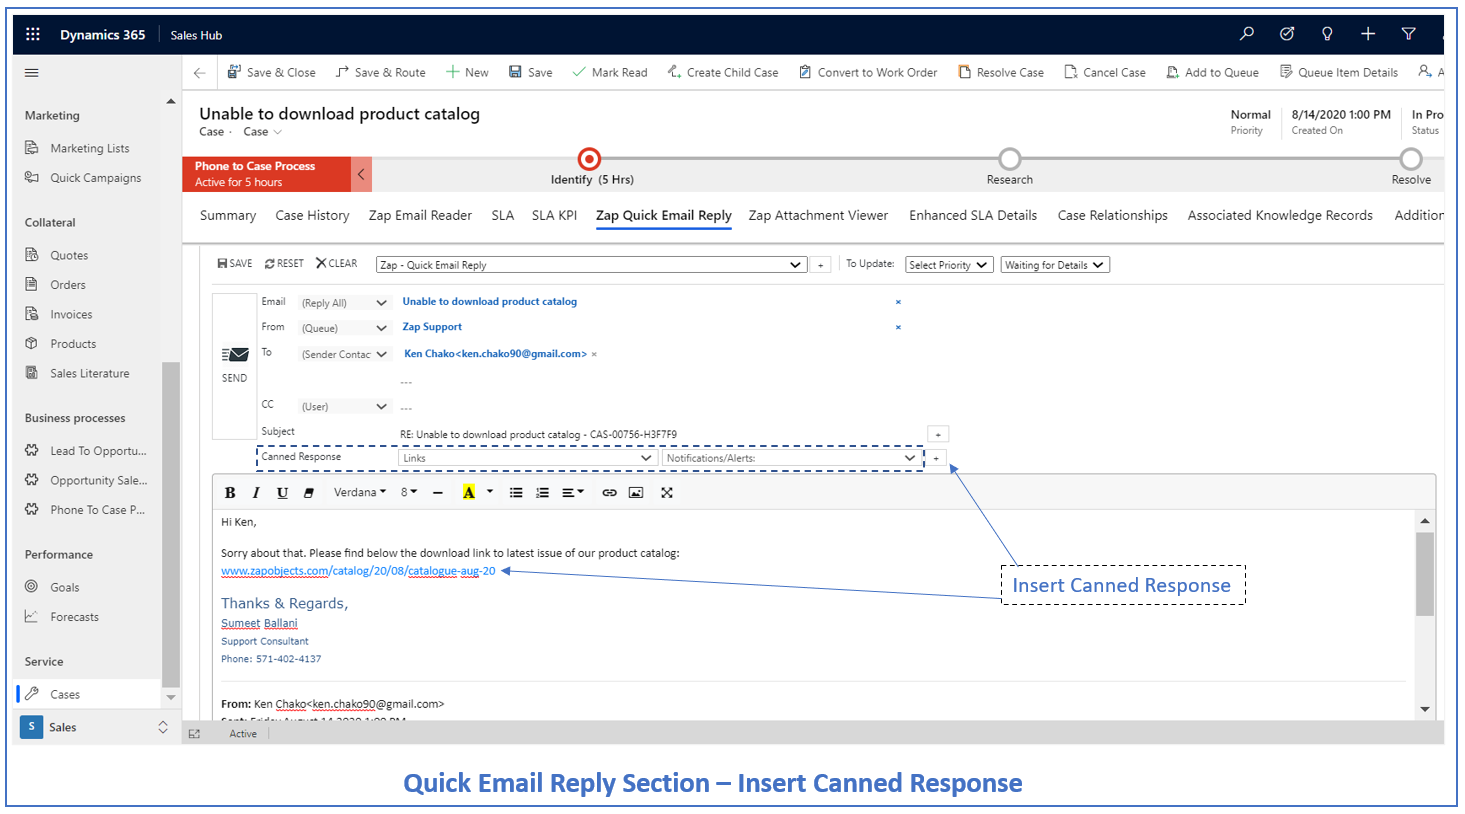
8. When composing the email, Support agent can select multiple Canned Responses:
Canned responses help facilitate faster replies to customer and boost agent productivity. These are scaled down version of email templates. You would use canned responses to insert pre-typed text / sentences multiple times across your email.
There has been some great enhancements in Quick Email Reply feature in March 2020 release. For details please refer blog: https://zapobjects.com/microsoftdynamics365_crm_helpdesk_emailtocase_app/how-new-enhancements-march-2020-to-quick-email-reply-section-makes-it-faster-for-support-agents-to-reply-back-to-customer-when-using-zap-helpdesk-email-to-case-app-for-dynamics-365-for-customer/
11. All done! Support agent sends the email by clicking the “Send” button:
12. Now Customer replies back to the support agent’s email. Here, it is suggested that case number be there in email subject.
Scenario: New email received regarding an existing case:
Zap Helpdesk App has algorithm to extract the case number from email subject and then search the case database for a matching case. Once a match is found, below are the actions taken:
1. Set the regarding of the email to the corresponding case (tracking this email to the case)
2. Send email notification to case owner / support team regarding this new email communication received from Customer.
3. Automatically reset the case status from “Waiting for Customer” to “In-Progress”:
The reset of case status automatically when new email response is received is very useful…if you have a workflow setup for sending reminder emails to customer! For more details refer blog: // blog coming up…
Please note that if Case Number is not present in email subject then we also have the option to use Dynamics 365 Smart Matching technique to locate the existing Case
13. Back-and-forth email communication between Customer and support team happens. Case may or may not be transferred to multiple support agents. As long as the case number is present in the email subject, all email communication would be automatically tracked against the case.
14. Case Resolved: When case is resolved, support agent can close the Case. An automatic email notification can be sent to the Customer acknowledging the closure of the case.
Miscellaneous Use-Cases where other Zap Apps can help with Helpdesk process:
- Zap Email Reader App provides Outlook like interface to read emails within Dynamics. Reading emails in timeline view (in Case form) is not very user-friendly and you can often get lost in multiple email threads. For faster & easier reading of all Customer emails in Case form, you can use Zap Email Reader!
- Zap Case Timer Tracker App allows Support Agents to easily add billable/non-billable time.
- Zap Attachment Viewer App allows Support Agents to easily go through all attachments received from Customer(in emails or saved in Case Notes).
Screenshot below shows the “Attachment Viewer” section in Case form: - Zap Notifications App can alert/notify users whenever Case is assigned / Case is over-due.
- Zap Report Scheduler App can allow scheduling daily/weekly reports to Support Team to keep them updated with Cases which are still in open status and needs to be actioned! (using scheduling feature)
Further, you can also have a Case Resolution / Summary Report (PDF) be sent in email to customer automatically when case is closed (using Document generation feature of Report Scheduler App)!


Try-out Zap All-in-One Combo plan which provides license to all Zap Apps!
Latest Dynamics 365/Power Apps Updates from Zap Objects (Aug 2020):
- New App Release: Zap Notifications/Alerts: Create Announcements,Trigger-based Notification(Case\Lead assigned), Recurring Notification, Form Based Notification!
- New App Released: Zap Case Time Tracker (Free): Track and log time spent by support agents directly on Case form.
- New Build Released: Zap Calendar Pro: Now supports Top-down View too
- New Build Released: Zap Report Scheduler: Now works with Power Apps (Model-Driven) too! (Schedule Reports, Views, Excel Templates + Generate & Email PDF/Excel of Reports or Document Template using Workflows)
- Most Zap Apps now work with Power Apps as well as Dynamics 365 CE! For list of all Zap Apps, check out: https://zapobjects.com/
*This post is locked for comments