Microsoft Dynamics CRM 2011 Fetch XML based Custom Reports
Views (39737)
Microsoft Dynamics CRM 2011 comes in two flavors, online and on-premises. Fetch-Xml method of report development can be used to create custom SSRS reports for both the types of CRM deployments.
To get started with the development, make sure you have installed the below two pieces of software:
- SQL Server 2008 R2 Business Intelligence Development Studio (BIDS). Installing BIDS will also install Visual Studio 2008 cut down version to develop SSRS reports.
- Microsoft Dynamics CRM 2011 Fetch Authoring Extension for BIDS. This will give you ability to add Microsoft Dynamics CRM Fetch data source in your SSRS report. To configure this data source for your report you need to provide CRM Server URL, Organisation Unique Name and Windows Live Credentials or Domain\LoginId.
By installing and configuring the Fetch XML data source, creating a report is as simple as creating a normal SSRS report except rather than choosing Microsoft SQL Server as your data source you chose Microsoft Dynamics CRM Fetch as your report data source.
These CRM reports are regular RDLs with Fetch XML as the data query language and the data provider is MSCRMFETCH.
There are two ways to create custom CRM reports:
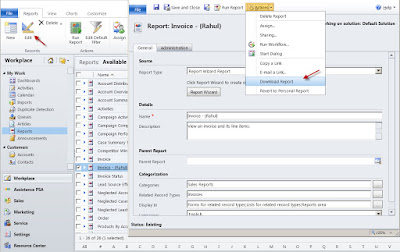
First option is you create a basic report through CRM Report Wizard and then download RDL to modify it in BIDS. The Report wizard creates fetch-xml based reports and this can be a good starting point to learn or start developing your fetch-xml based reports.
Second, you can create fetch-xml report from scratch in BIDS.
In this article, we will see how to create fetch-xml based reports from the scratch in BIDS.
In the Query string textbox, copy and paste the content of the fetch-xml you saved above. You can also preview your data on the query designer.
Click next, select other reporting options on other pages of the wizard and you are done. :)
In the above xml, <entity> tag defines CRM entity you want to query and <all-attributes> tag defines that you want to fetch all columns. In case you want to fetch selected columns use below...
"alias" attribute is to define a different column name.
Define sort order: Use <order> tag.
Define conditions or filters: Use <filter> tag.
Another example could be,
Define entity relationships: Use <link-entity> tag.
Define parameters: You can also define parameters on the fetch-xml query to take user input.
Above xml will create a query parameter, pInvoiceId. Parameter names need to start with @ sign. Also adding the parameter in the fetch query also adds the QueryParameter and ReportParameter nodes in the RDL automatically.
Define Pre-Filtering: This is a way to filter your report data using CRM Advance Find Functionality. Pre-Filtering actually makes your report context sensitive.
To get it working, you need to add two attributes to the <entity> tag in your fetch-xml.
"enableprefiltering", will make the particular entity context sensitive and "prefilterparametername" is optional attribute to provide a name to your pre-filtering parameter. Pre-Filtering adds a Query & Report Parameter to your report, if "prefilterparametername" not provided then the parameter name would be CRM_<EntityName>.
I will try to add more examples later on but for now I think that's enough to get started with Fetch-Xml based reports.
Join this blog and feel free to post your comment / feedback / queries.
References:
Microsoft Dynamics CRM Report Authoring Extension Installation Instructions
To get started with the development, make sure you have installed the below two pieces of software:
- SQL Server 2008 R2 Business Intelligence Development Studio (BIDS). Installing BIDS will also install Visual Studio 2008 cut down version to develop SSRS reports.
- Microsoft Dynamics CRM 2011 Fetch Authoring Extension for BIDS. This will give you ability to add Microsoft Dynamics CRM Fetch data source in your SSRS report. To configure this data source for your report you need to provide CRM Server URL, Organisation Unique Name and Windows Live Credentials or Domain\LoginId.
By installing and configuring the Fetch XML data source, creating a report is as simple as creating a normal SSRS report except rather than choosing Microsoft SQL Server as your data source you chose Microsoft Dynamics CRM Fetch as your report data source.
These CRM reports are regular RDLs with Fetch XML as the data query language and the data provider is MSCRMFETCH.
There are two ways to create custom CRM reports:
First option is you create a basic report through CRM Report Wizard and then download RDL to modify it in BIDS. The Report wizard creates fetch-xml based reports and this can be a good starting point to learn or start developing your fetch-xml based reports.
Second, you can create fetch-xml report from scratch in BIDS.
In this article, we will see how to create fetch-xml based reports from the scratch in BIDS.
Create Fetch-XML Report:
- Launch Business Intelligence Development Studio.
- Create a new Report Server Project.
- In Solution Explorer, right-click Reports folder, and click ‘Add New Report’. A Report Wizard will open up. Click next on the first introduction page.
Note: To edit exiting custom report created through CRM Report Wizard, select "Add > Existing Item..." above instead of "Add New Report". You can download your custom report from CRM, by selecting your report then Edit > Download Report.
- Select the Data Source. Choose a name for your data source, on the Type drop down, select Microsoft Dynamics CRM Fetch as your data provider and provide the connection string of your CRM instance.
Connection string should be in the following format:
CRM Server URL;[Org Unique Name];[Home Realm URL]
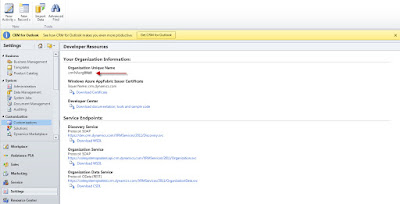
If Organization Name is not provided and user belongs to multiple orgs, then the first org returned by CRM is used. To get Org Name, go to CRM > Settings > Customizations > Developer Resources.
Home Realm URL is needed when we use Federation for identity management, and url is the identity provider's url.
Also provide report credentials. If creating report for CRM online then provide Windows Live ID or if on-premises then provide domain\LoginID
Click next.
- Design the Query. Define fetch-xml query that will retrieve the data for your report. Simple and fast way to create fetch-xml is by using CRM itself.
- Navigate to CRM Advanced Find, and specify a query.
- You can pick the individual columns to be displayed on your report by selecting ‘Edit Columns’.
- After you are satisfied with your query, click ‘Download Fetch XML’.
- Save the fetch-xml to your local drive.
In the Query string textbox, copy and paste the content of the fetch-xml you saved above. You can also preview your data on the query designer.
Click next, select other reporting options on other pages of the wizard and you are done. :)
- Now, upload your RDL on the CRM server in the appropriate categories and your report is ready to be displayed in CRM.
So, we have just created a custom fetch-xml report.
Overview of Fetch-XML syntax:
Let's have a quick look how you can define and use fetch-xml as your report query.Overview of Fetch-XML syntax:
<fetch version="1.0" output-format="xml-platform" mapping="logical" distinct="true">
<entity name="invoice">
<all-attributes/>
</entity>
</fetch>
In the above xml, <entity> tag defines CRM entity you want to query and <all-attributes> tag defines that you want to fetch all columns. In case you want to fetch selected columns use below...
<entity name="invoice">
<attribute name="name" alias="InvoiceName" />
<attribute name="customerid" />
<attribute name="totalamount" />
<attribute name="invoiceid" />
</entity>
"alias" attribute is to define a different column name.
Define sort order: Use <order> tag.
<fetch version="1.0" output-format="xml-platform" mapping="logical" distinct="true">
<entity name="invoice">
<attribute name="name" />
<attribute name="customerid" />
<attribute name="totalamount" />
<attribute name="invoiceid" />
<order attribute="name" descending="false" />
</entity>
</fetch>
Define conditions or filters: Use <filter> tag.
<fetch version="1.0" output-format="xml-platform" mapping="logical" distinct="true">
<entity name="invoice">
<attribute name="name" />
<attribute name="customerid" />
<attribute name="totalamount" />
<attribute name="invoiceid" />
<order attribute="name" descending="false" />
<filter type="and">
<condition attribute="invoicenumber" operator="eq" value="SomeValue" />
</filter>
</entity>
</fetch>
Another example could be,
<filter type="and">
<condition attribute="invoicenumber" operator="in">
<value>SomeValue</value>
<value>AnotherValue</value>
</condition>
</filter>
Define entity relationships: Use <link-entity> tag.
<fetch version="1.0" output-format="xml-platform" mapping="logical" distinct="true">
<entity name="invoice">
<attribute name="name" />
<attribute name="customerid" />
<attribute name="totalamount" />
<attribute name="invoiceid" />
<order attribute="name" descending="false" />
<filter type="and">
<condition attribute="invoicenumber" operator="eq" value="SomeValue" />
</filter>
<link-entity name="psa_project" from="psa_projectid" to="psa_project" alias="Project">
<attribute name="psa_account" />
<attribute name="psa_accountaddress" />
<attribute name="psa_principalcontact" />
</link-entity>
</entity>
</fetch>
Define parameters: You can also define parameters on the fetch-xml query to take user input.
<fetch version="1.0" output-format="xml-platform" mapping="logical" distinct="true">
<entity name="invoice">
<attribute name="name" />
<attribute name="customerid" />
<attribute name="totalamount" />
<attribute name="invoiceid" />
<order attribute="name" descending="false" />
<filter type="and">
<condition attribute="invoicenumber" operator="eq" value="@pInvoiceId" />
</filter>
</entity>
</fetch>
Above xml will create a query parameter, pInvoiceId. Parameter names need to start with @ sign. Also adding the parameter in the fetch query also adds the QueryParameter and ReportParameter nodes in the RDL automatically.
Define Pre-Filtering: This is a way to filter your report data using CRM Advance Find Functionality. Pre-Filtering actually makes your report context sensitive.
To get it working, you need to add two attributes to the <entity> tag in your fetch-xml.
<entity name="invoice" enableprefiltering="true" prefilterparametername="InvoiceFilter">
"enableprefiltering", will make the particular entity context sensitive and "prefilterparametername" is optional attribute to provide a name to your pre-filtering parameter. Pre-Filtering adds a Query & Report Parameter to your report, if "prefilterparametername" not provided then the parameter name would be CRM_<EntityName>.
I will try to add more examples later on but for now I think that's enough to get started with Fetch-Xml based reports.
Join this blog and feel free to post your comment / feedback / queries.
References:
Microsoft Dynamics CRM Report Authoring Extension Installation Instructions
Comments
-
By Linda Rosencrance Personalizing
Reports for Microsoft Dynamics CRM Online: This blog post, brought
-
Microsoft Dynamics CRM 2011 has excellent reporting capabilities. Customizers have the option to create
-
Microsoft Dynamics CRM 2011 has excellent reporting capabilities. Customizers have the option to create
-
Microsoft Dynamics CRM 2011 has excellent reporting capabilities. Customizers have the option to create
-
Microsoft Dynamics CRM 2011 has excellent reporting capabilities. Customizers have the option to create
-
Microsoft Dynamics CRM 2011 has excellent reporting capabilities. Customizers have the option to create


 Like
Like Report


*This post is locked for comments