


 2,890
2,890 Like
Like Share
Share
 Report
Hi Guys, Welcome to another series where we will discuss how D365 FO complies with Retail Inbound requirements that we outlined in our previous series of Retail Inbound needs for direct to consumer and brick and mortar retailers and we will also talk a little bit about what sort of enhancements partners might need to fit D365 more closely to the Inbound side of a Retail Warehouse operation.
In this series, you will learn the design concepts in D365 FO Warehouse Management needed to configure the product to provide the Inbound warehouse functionality that’s sought by most retailers. Now, this includes things like,
How does D365 FO Warehouse Management route newly received product to all the various different destinations that it can go to, on the inbound side of a Retail Warehouse.
Where are those places in the Retail Inbound flow where partners may need to augment the base functionality to more closely meet the needs of retailers.
What are some practical, more physical workarounds that can be used to operate a Retail Warehouse with D365 FO Warehouse Management without having to go to the extent of making modifications that are costly without a lot of benefit.
How are we going to Route Inbound Product?
Let me start with how D365 FO meets the Inbound needs of a Retail Warehouse and look at the core issue around inbound in retail which is when product comes in the door, it doesn’t necessarily just run off and get put away. There’s a lot of different destinations that it can go to. And the software needs to be able to get the product when it’s appropriate to those destinations.
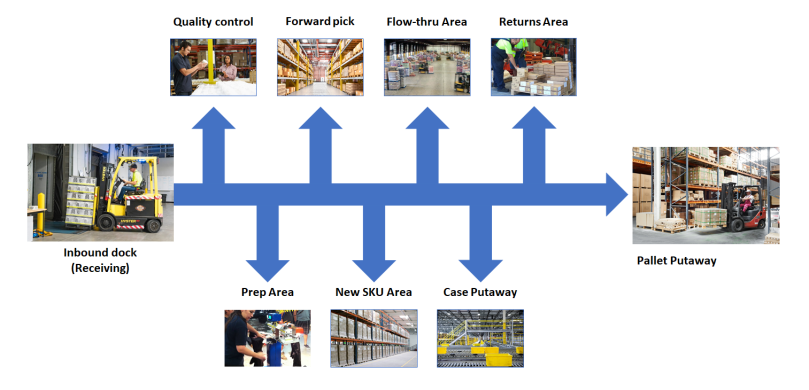
During the Retail Warehouse implementations or demo on D365 FO Warehouse Management module for retailers, one of the least understood ideas is how to facilitate that routing of recently received cases. Remember, product just doesn’t get received and then immediately put away at most Retail Warehouses. You need to show how the product can be routed post receiving to lots of different destinations like QC and all the other places that we have gone through in the previous series of retail Inbound Needs. Furthermore, it’s also really important to show how they can be routed automatically by the system every time they come in or at the discretion of the receiving operator. In other words, there are user-directed situations and system-directed situations. Let me take a look at how the setup will work.

Behind every dock door, for each of these different destinations, a pallet will be positioned next to that dock door for product that needs to go to those destinations. And these pallets will actually have locations at the dock door. For example, you can see here the R2QC01 is going to be for all the product at the first dock door that needs to go to QC from that dock door. So as soon as a case that has been selected as a QC sample is identified, it will be placed on that pallet. So that’s the first concept you need to understand about how we will configure D365 FO to comply with this requirement.
Routing Inbound Product using Filter Codes
So let’s just talk about that first scenario, about automatically letting the system direct something to a particular destination. To do this, we have to leverage the concept of a filter code in D365 FO. Now, filter codes are used for product that you know always has to go to prep.

For example, something like this box that’s way too big to fit into the pick area and so as a result it always needs to be reboxed before it’s put away. Another example would be a product that’s brand new that’s never been received before, you can set the filter code to new SKU and it will automatically pick that up and divert it to the new SKU area.

The filter codes are user-definable item attributes. They are set up in D365 FO warehouse management module, but they’re actually defined in the value set inside of the product item master information in the Warehouse fast tab, as you see here.

You can have up to four of these different kinds of codes. You can use the first one to indicate where it needs to go, if it needs to go to someplace special every time it’s received. And then the second code tends to come into play when we talk about prep. But the point here is that filter codes can be detected on the item master when the product is received, and that can trigger the system to automatically route product in a certain direction. And this comes in handy again for things such as product that always has to go to prep or product that’s brand new that needs to go to the new SKU area. But there are also instances where the system doesn’t know that something needs to go to prep or some other destination. It requires a human to get involved and this is where Disposition codes comes into picture.
Routing Inbound Product using Disposition Codes
User-directed situations need to be accomplished using another D365 FO concept, and that is a disposition code. When product comes in, sometimes it needs to go to one of these destinations, and there’s no way for the system to know that.

For example, here we got this box that’s crushed. Well, there’s no way for the system to know this box is crushed, but the receiving operator can tell that it’s crushed and he puts that on the shelf and then someone else stacks another box on top of it. It’s very likely that, that second box will slide off the top and possibly strike somebody on the floor.

And that’s the absolute last thing you want to see happen. So the receiving operator may say, hey, you know, this crushed box, it needs to go to prep. Well, the way that’s accomplished is through the use of disposition codes. On the receiving screen, you can record for a given case that it has a certain disposition code. And you’ll have disposition codes for each of the possible different destinations that a receiving operator might want to send a case.


For example, if you want to send it to QC or inbound value-added services, which is another word for prep, you can indicate that by selecting that disposition code on the receiving screen, as you see here. There can be a wide variety of those that you can set up. The idea is you can use disposition codes to capture when the receiving operator wants to send something to a particular destination and then in the D365 FO Location directives/Work Templates you set up for receiving that when that disposition code is used, it will change the destination of that case to follow what the receiving operator would like to do.
Routing Inbound Product using Barcode Receiver
We need to talk about one more thing and that is it’s going to be important that you develop a report to aid the receiving process, and this report is typically referred to as a barcode receiver. It looks something like this.

It essentially lists all of the different lines on a PO or on a receipt, and for each line it shows the PO number, item number and the barcode and the total quantity to be received. And then it breaks out where those 100 units, need to go. And you can see that 10 of them need to go to the new SKU area, and then maybe 10 need to go to QC and 80 can go back into the case storage location. We need this report for a couple of reasons. It’s really difficult to use D365 FO to sample a given PO line. We can set up the sampling rules in D365 FO such that 10 units will be inspected, but we can’t set up any rules that say only send 10 units to QC when 10 units need to be inspected. It’s going to send everything there or nothing. So we have to have some way of telling the receiving operator that for this given SKU, I want you to user direct 10 units of this particular product to QC and send 80 back into case storage so that he knows there’s some way that he can ensure the right quantity goes to the right destination.
The other destination where this comes up is pallets. If you have lots and lots of cases on a pallet or lots and lots of cases on a truck or an inbound receipt, you need to have some way of communicating that to the unloading people so that they will palletize it as opposed to sending it down to the receiving operator one case at a time. It ought to be received and built up inside the trailer or right next to the dock door as one pallet and then that pallet gets moved to the receiving operator so that it can be received as one single license plate as opposed to 20 different license plates. So because you can’t really configure rules that will allow you to get the right quantities to the QC area or to tell the operator he needs to palletize a particular SKU versus another, you need to have this barcode receiver document. And partners will need to produce this documents to supplement the D365 FO base functionality so that the unloading process goes smoothly.
So I hope all of this helps give you a better starting point for mapping the Retail Inbound business process with D365 FO.

In the next blog, we’re going to step through the D365 FO Warehouse Management module and perform much of what you see above as the Retail Inbound process flow that is palletizing a given case.
Feel free to reach out for any clarifications. If you like my blog posts then comment and subscribe to the blogs.
#RetailDAXing #D365Commerce
*This post is locked for comments