


 14,419
 Like
Like Share
Share
 Report
Hi All,
 In this article we will discuss how we can connect Microsoft Dynamics NAV 2016 with New Client Launched i.e. Phone Client.
This Article Contain Steps for a Android Phone as I have Only Android Phone.
I am doing it having all tiers on my windows 8 machine, steps remain same for multiple servers but issues might be different.
What we Need (Other what we discuss in this article) -
The Service Tier should be on Public IP. Some of the Data-card does not Provide you Public IP. check it for sure.
If we are a regular Reader you would remember below articles for Credential Type released earlier. We will be following same step but with a Simple Approach using Powershell.
How to Use Nav User Password in Microsoft Dynamics NAV 2013.
How to Use Nav User Password in Microsoft Dynamics NAV 2013 R2.
This is Diwali Gift to all my Readers. Thank you all.
So let's Start.
Step 1. We Need to have a Certificate to connect Navision Service Tier Using Nav User Password.
----------------------------------------------------------------------------------------------------------------
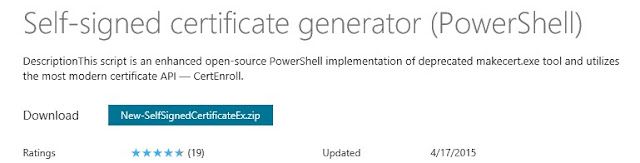
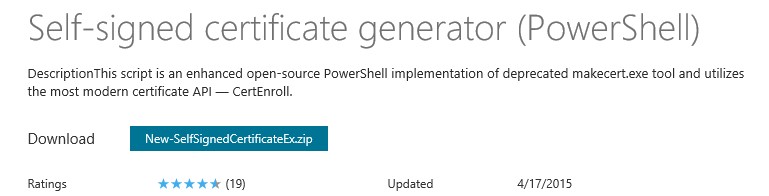
1. Download PowerShell Scripts From Technet. (LINK)
2. Create the Certificate.
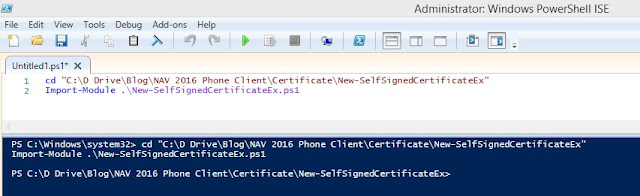
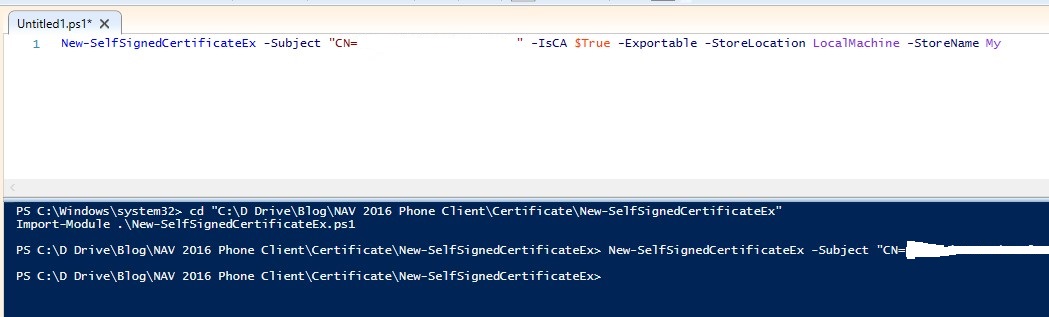
1. Open a PowerShell prompt with the option As administrator.
2. Go to the directory where you saved the New-SelfSignedCertificateEx.ps1 file.
3. Run the following command: Import-Module .\New-SelfSignedCertificateEx.ps1.
4. Then run the following command:
New-SelfSignedCertificateEx –Subject “CN=<your site name>” –IsCA $true –Exportable –StoreLocation LocalMachine –StoreName My.
Remember -
<your site name> = Machine Name of the Server where Navision Service Tier Is Installed.
Go To My Computer Properties and Full Computer Name is the Parameter Value.
5. Certificate will be generated once we execute above command as shown below.

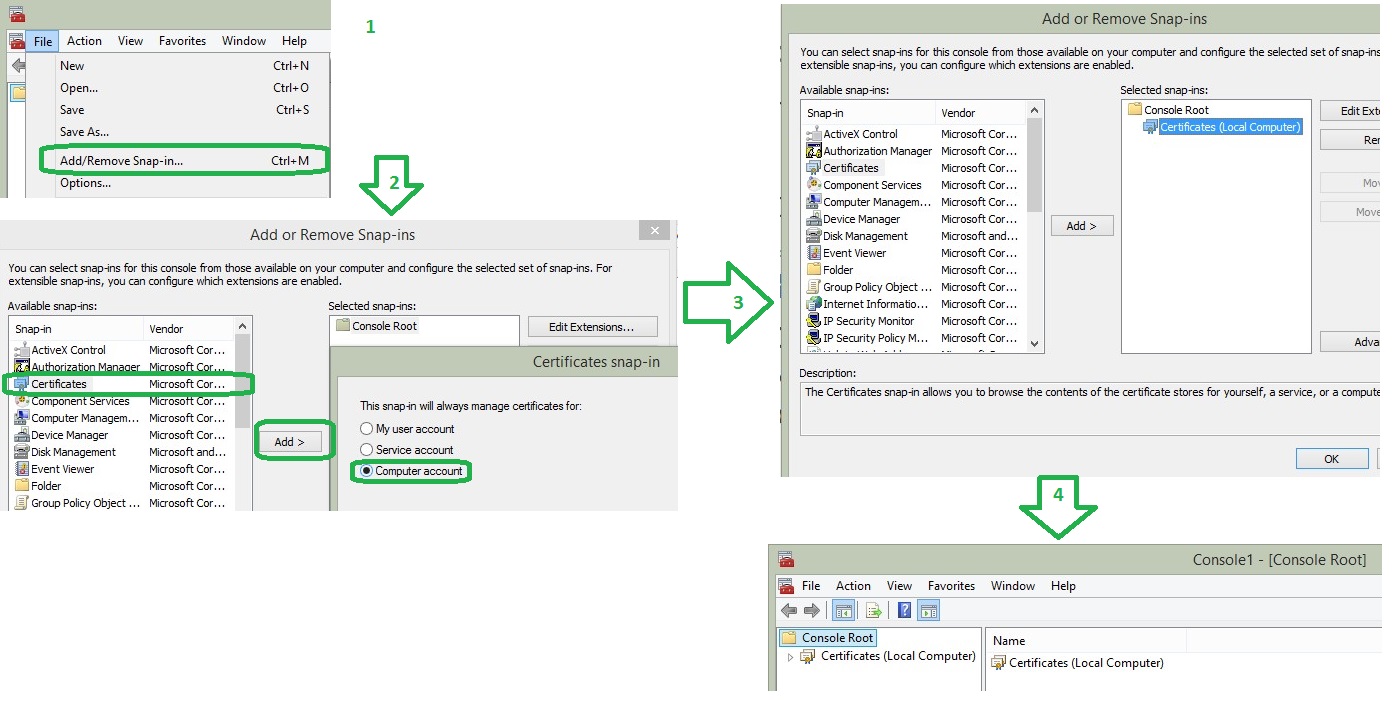
6. Manage the certificate:
Open the mmc.exe.
Go to the File menu, and then choose Add/Remove Snap-in...
Select Certificates.
Choose Add.
Select the computer account.
Choose Finish and then OK.

Locate and copy the certificate you just created in the personal/certificates folder.
> Name will be same as your service tier Machine.
> The Expiration Date Will be 1Y-2D (01 Year - 02 Days) for that certificate.
> Valid From 01 Day Before you create Certificate.
Paste the certificate into the Trusted Root Certification Authorities/Certificates folder.

Select the certificate, right-click and export the certificate.
Select the No, do not export the private key option.
Choose Next.
Select DER encoded binary x.509 (.cer).
Specify a location and filename and finish the wizard.

-----------------------------------------------------------------------------------------------------------
Step 2 - Configuration of Service Tier With Credential Type NavUserPassword.
-----------------------------------------------------------------------------------------------------------
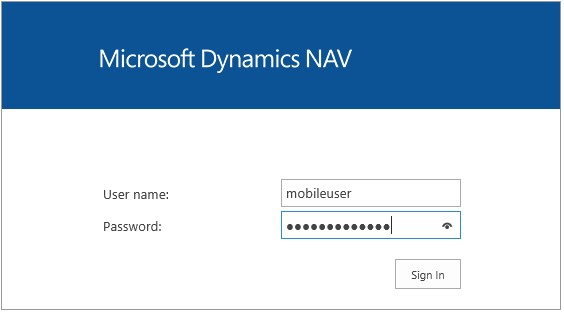
1. Create a User in Navision.
For Demo I am using -
UserName - mobileuser
Password - Mobileuser123
Permission - As per your requirement.

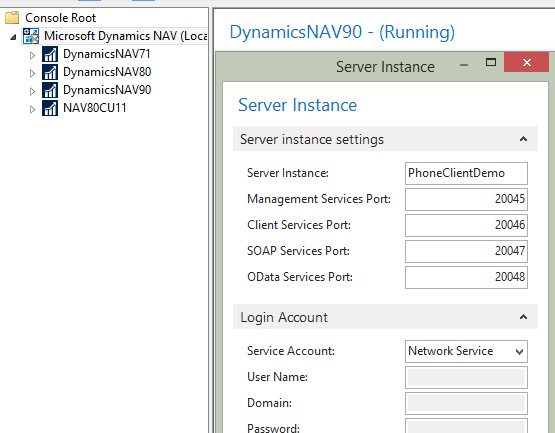
2. Open Navision Service Tier and Create a New Service as Shown Below.

3. Change Below Parameters in Newly Created Service.
> Credential Type - NavUserPassword
> Certificate Thumbprint - From the Certificate that we created in Step 1.
> Stop and Start the Service.
> Make sure that service is running with a Domain Account...

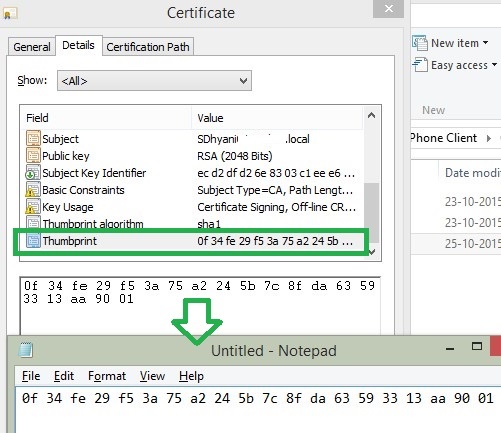
** How to Get Certificate Thumbprint.
> Open the Certificate Exported in Step 1.
> Navigate to Details Tab.
> Navigate to Last Property(Certificate Thumbprint) and Select.
> Copy the Value as shown below and paste it in Notepad.
> Paste this value from Notepad to Service.

-----------------------------------------------------------------------------------------------------------
Step 3 -Configure the Windows Client With Credential Type NavUserPassword.
-----------------------------------------------------------------------------------------------------------
1. Navigate to C:\Users\<UserName>\AppData\Roaming\Microsoft\Microsoft Dynamics NAV\90
** Replace <UserName> With Your Name.
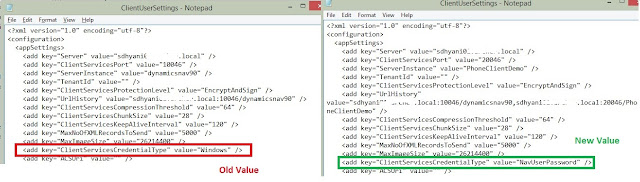
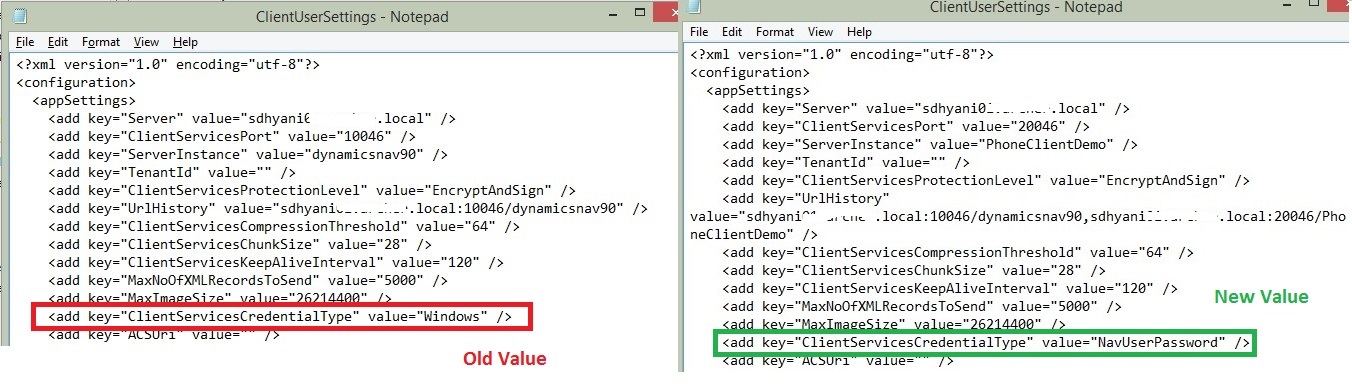
2. Change ClientServicesCredentialType Paramter in ClientUserSettings.config file.
-----------------------------------------------------------------------------------------------------------
Step 4 -Configure the Web Client With Credential Type NavUserPassword.
-----------------------------------------------------------------------------------------------------------
1. Navigate to C:\inetpub\wwwroot\DynamicsNAV90.
2. Change Following Parameters in Web.config file.
> ServerInstance
> ClientServicesCredentialType
> ClientServicesPort
My Values -
> ServerInstance - PhoneClientDemo
> ClientServicesCredentialType - NavUserPassword
> ClientServicesPort - 200046
-----------------------------------------------------------------------------------------------------------
Step 5 - Configure the Web Server For Web , Tablet & Phone Client.
-----------------------------------------------------------------------------------------------------------
1. Open IIS Manager.
2. Select Microsoft Dynamics NAV 2016 Web Client.
3. From Right Hand Panel Select Binding and create a Binding for https using the certificate you added in Step 1, as shown below.
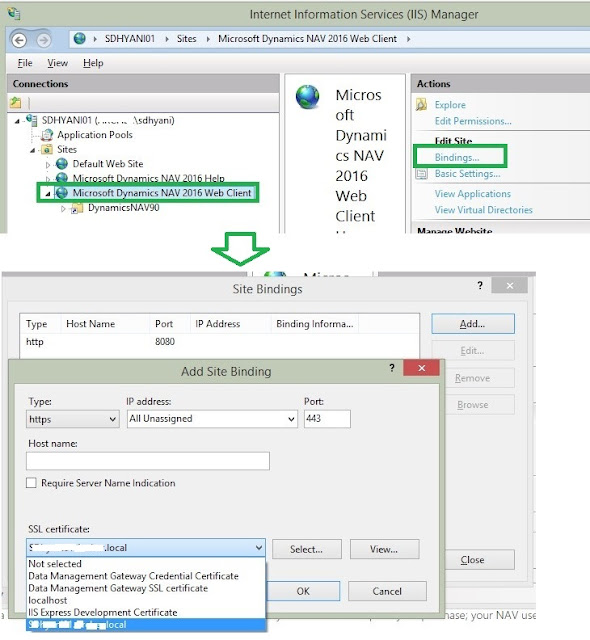
4. Stop and Start the Web Site.
5. Browse web client using https://<<Certificate Name>>/DynamicsNAV90/
Where -
<<Certificate Name>> = Navision Server Name, as we used the Server name in Step 1 which creating Certificate.
DynamicsNAV90 - because we haven't created New Web Server Instance for Same and Modified the Setting on Existing Web Instance.
-----------------------------------------------------------------------------------------------------------
Step 6 - A Conman Error While Binding Certificate to IIS Web Site.
-----------------------------------------------------------------------------------------------------------
The process cannot access the file because it is being used by another process. (Exception from HRESULT: 0x80070020)
Cause - That Means the Port is being used by some other application. In our case we were using port 443.
How to Identify Which application is using - Find Process ID of the application using command at command prompt -
netstat -aon | find ":443"

Just goto Task Manager and From Details Tab Select the Process and Kill It.
** If you want use a different port you can use that in Step 5 during binding.
-----------------------------------------------------------------------------------------------------------
Step 7 - Install Certificates on the Phone.
-----------------------------------------------------------------------------------------------------------
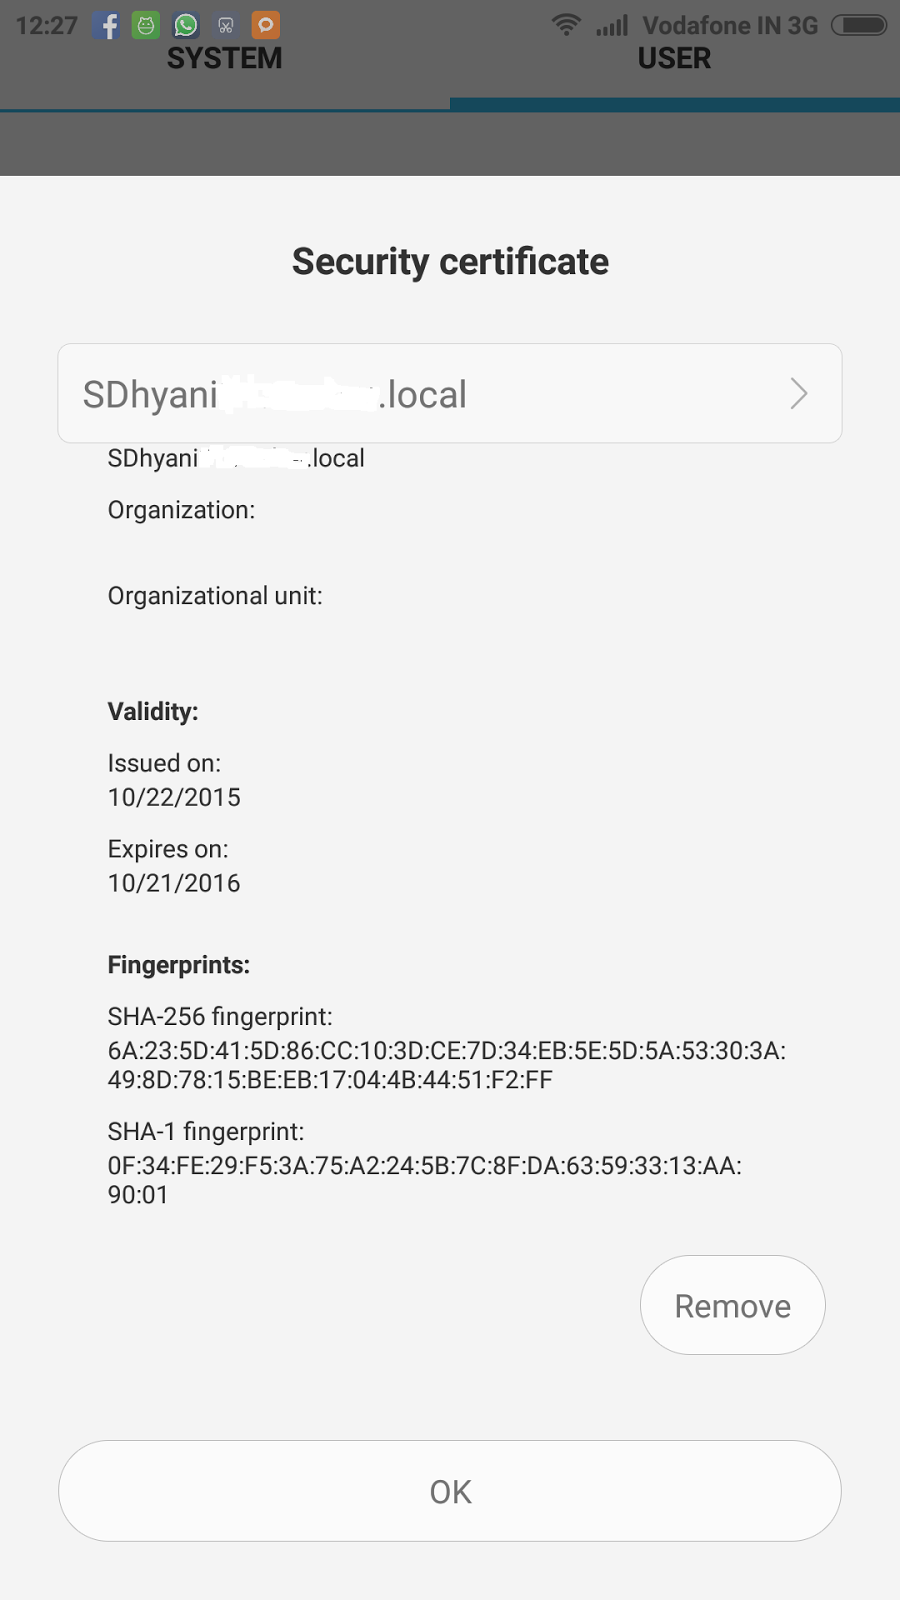
1. For Android, do the following:
> Copy or mail the certificate that you exported.
> Run the certificate file and install the certificate.
> You are now ready to start the Dynamics NAV app.

2. For Windows, do the following:
> If you run the client on the same box as the web server, then you are all set to go.
> Copy the certificate you exported to the tablet, install the certificate and place the certificate in the Trusted root certification authorities folder of the local machine.
For IOS, do the following:
> Use the iPhone Configuration Utility tool from Apple http://support.apple.com/downloads/#iphone or mail the certificate you exported.
> Run the certificate file and install the certificate.
> You are now ready to start the Dynamics NAV app.
-----------------------------------------------------------------------------------------------------------
Step 8 - Browse All Client. (Follow the Order, it makes it easy to resolve issue)
-----------------------------------------------------------------------------------------------------------
1. Open Role Tailored Client.

2. Open Web Client.
3. Open Tablet Client. (URL - https://<<Certificate Name>>/DynamicsNAV90/)

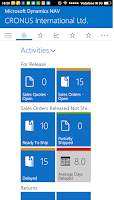
4. Open Phone Client. (https://<<Certificate Name>>/DynamicsNAV90/)

-----------------------------------------------------------------------------------------------------------
 In this article we will discuss how we can connect Microsoft Dynamics NAV 2016 with New Client Launched i.e. Phone Client.
This Article Contain Steps for a Android Phone as I have Only Android Phone.
I am doing it having all tiers on my windows 8 machine, steps remain same for multiple servers but issues might be different.
What we Need (Other what we discuss in this article) -
The Service Tier should be on Public IP. Some of the Data-card does not Provide you Public IP. check it for sure.
If we are a regular Reader you would remember below articles for Credential Type released earlier. We will be following same step but with a Simple Approach using Powershell.
How to Use Nav User Password in Microsoft Dynamics NAV 2013.
How to Use Nav User Password in Microsoft Dynamics NAV 2013 R2.
This is Diwali Gift to all my Readers. Thank you all.
So let's Start.
Step 1. We Need to have a Certificate to connect Navision Service Tier Using Nav User Password.
----------------------------------------------------------------------------------------------------------------
1. Download PowerShell Scripts From Technet. (LINK)
2. Create the Certificate.
1. Open a PowerShell prompt with the option As administrator.
2. Go to the directory where you saved the New-SelfSignedCertificateEx.ps1 file.
3. Run the following command: Import-Module .\New-SelfSignedCertificateEx.ps1.

4. Then run the following command:
New-SelfSignedCertificateEx –Subject “CN=<your site name>” –IsCA $true –Exportable –StoreLocation LocalMachine –StoreName My.
Remember -
<your site name> = Machine Name of the Server where Navision Service Tier Is Installed.
Go To My Computer Properties and Full Computer Name is the Parameter Value.
5. Certificate will be generated once we execute above command as shown below.
6. Manage the certificate:
Open the mmc.exe.
Go to the File menu, and then choose Add/Remove Snap-in...
Select Certificates.
Choose Add.
Select the computer account.
Choose Finish and then OK.
Locate and copy the certificate you just created in the personal/certificates folder.
> Name will be same as your service tier Machine.
> The Expiration Date Will be 1Y-2D (01 Year - 02 Days) for that certificate.
> Valid From 01 Day Before you create Certificate.
Paste the certificate into the Trusted Root Certification Authorities/Certificates folder.

Select the certificate, right-click and export the certificate.
Select the No, do not export the private key option.
Choose Next.
Select DER encoded binary x.509 (.cer).
Specify a location and filename and finish the wizard.

-----------------------------------------------------------------------------------------------------------
Step 2 - Configuration of Service Tier With Credential Type NavUserPassword.
-----------------------------------------------------------------------------------------------------------
1. Create a User in Navision.
For Demo I am using -
UserName - mobileuser
Password - Mobileuser123
Permission - As per your requirement.

2. Open Navision Service Tier and Create a New Service as Shown Below.
3. Change Below Parameters in Newly Created Service.
> Credential Type - NavUserPassword
> Certificate Thumbprint - From the Certificate that we created in Step 1.
> Stop and Start the Service.
> Make sure that service is running with a Domain Account...

** How to Get Certificate Thumbprint.
> Open the Certificate Exported in Step 1.
> Navigate to Details Tab.
> Navigate to Last Property(Certificate Thumbprint) and Select.
> Copy the Value as shown below and paste it in Notepad.
> Paste this value from Notepad to Service.
-----------------------------------------------------------------------------------------------------------
Step 3 -Configure the Windows Client With Credential Type NavUserPassword.
-----------------------------------------------------------------------------------------------------------
1. Navigate to C:\Users\<UserName>\AppData\Roaming\Microsoft\Microsoft Dynamics NAV\90
** Replace <UserName> With Your Name.
2. Change ClientServicesCredentialType Paramter in ClientUserSettings.config file.
-----------------------------------------------------------------------------------------------------------
Step 4 -Configure the Web Client With Credential Type NavUserPassword.
-----------------------------------------------------------------------------------------------------------
1. Navigate to C:\inetpub\wwwroot\DynamicsNAV90.
2. Change Following Parameters in Web.config file.
> ServerInstance
> ClientServicesCredentialType
> ClientServicesPort
My Values -
> ServerInstance - PhoneClientDemo
> ClientServicesCredentialType - NavUserPassword
> ClientServicesPort - 200046
-----------------------------------------------------------------------------------------------------------
Step 5 - Configure the Web Server For Web , Tablet & Phone Client.
-----------------------------------------------------------------------------------------------------------
1. Open IIS Manager.
2. Select Microsoft Dynamics NAV 2016 Web Client.
3. From Right Hand Panel Select Binding and create a Binding for https using the certificate you added in Step 1, as shown below.
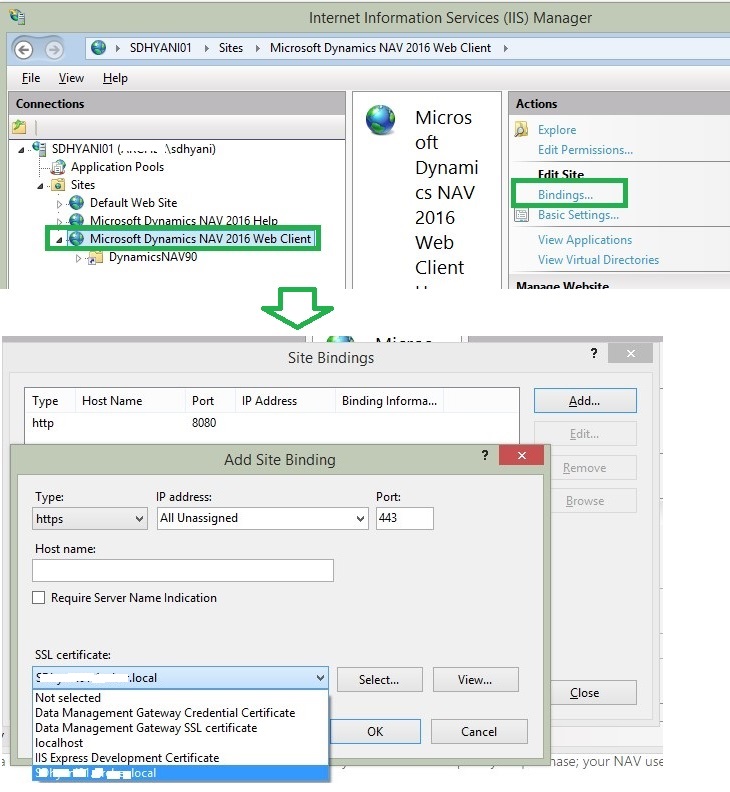
4. Stop and Start the Web Site.
5. Browse web client using https://<<Certificate Name>>/DynamicsNAV90/
Where -
<<Certificate Name>> = Navision Server Name, as we used the Server name in Step 1 which creating Certificate.
DynamicsNAV90 - because we haven't created New Web Server Instance for Same and Modified the Setting on Existing Web Instance.
-----------------------------------------------------------------------------------------------------------
Step 6 - A Conman Error While Binding Certificate to IIS Web Site.
-----------------------------------------------------------------------------------------------------------
The process cannot access the file because it is being used by another process. (Exception from HRESULT: 0x80070020)
Cause - That Means the Port is being used by some other application. In our case we were using port 443.
How to Identify Which application is using - Find Process ID of the application using command at command prompt -
netstat -aon | find ":443"

Just goto Task Manager and From Details Tab Select the Process and Kill It.
** If you want use a different port you can use that in Step 5 during binding.
-----------------------------------------------------------------------------------------------------------
Step 7 - Install Certificates on the Phone.
-----------------------------------------------------------------------------------------------------------
1. For Android, do the following:
> Copy or mail the certificate that you exported.
> Run the certificate file and install the certificate.
> You are now ready to start the Dynamics NAV app.
2. For Windows, do the following:
> If you run the client on the same box as the web server, then you are all set to go.
> Copy the certificate you exported to the tablet, install the certificate and place the certificate in the Trusted root certification authorities folder of the local machine.
For IOS, do the following:
> Use the iPhone Configuration Utility tool from Apple http://support.apple.com/downloads/#iphone or mail the certificate you exported.
> Run the certificate file and install the certificate.
> You are now ready to start the Dynamics NAV app.
-----------------------------------------------------------------------------------------------------------
Step 8 - Browse All Client. (Follow the Order, it makes it easy to resolve issue)
-----------------------------------------------------------------------------------------------------------
1. Open Role Tailored Client.

2. Open Web Client.

3. Open Tablet Client. (URL - https://<<Certificate Name>>/DynamicsNAV90/)
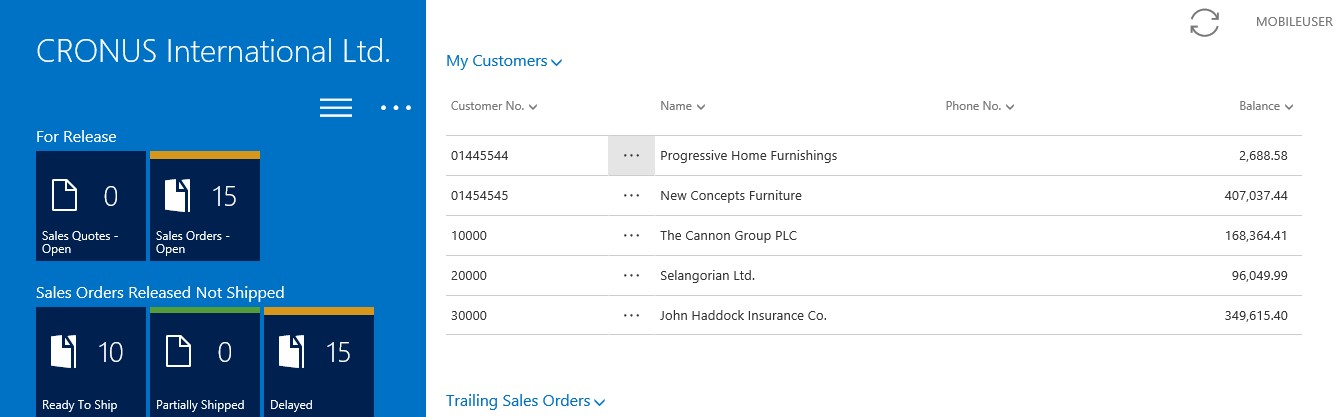
4. Open Phone Client. (https://<<Certificate Name>>/DynamicsNAV90/)

-----------------------------------------------------------------------------------------------------------
Hope the above steps help you while you are planning to configure different client types with Microsoft Dynamics NAV 2016.
Will be waiting for your comments on the article.
Regards,
Saurav Dhyani
*This post is locked for comments