How to synchronize Dynamics 365 for Sales with Dynamics 365 Business Central using native tools
Integrate Dynamics 365 for Sales (formerly CRM) and Dynamics 365 Business Central (formerly Dynamics NAV)
Hello everyone, my name is Christos Pittis, and I am a Dynamics 365 consultant. Dynamics 365 is a business management solution for small and mid-sized organisations that automates and streamlines business processes and helps you manage your business. Dynamics 365 Business Central, has just launched therefore the goal of this episode is to demonstrate how to integrate Dynamics 365 for Sales application with Dynamics 365 Business Central, using native tools.
This episode will share with you the insights to achieve seamless integration in the lead-to-cash process.
This episode will most appeal to the following audiences:
- Sales, Presales, Consultants, Solution Architects.
- Key takeaways will the attendees gain from attending this episode:
- Sync CRM Content with ERP, Organisational Insights, Extending Dynamics 365 in new ways
I am just going to go ahead and start by showing you how to find the URL addresses for your applications through Portal Office admin.
In my scenario, I am going to be using the following URLs:
Dynamics 365 Business Central, Address: https://memorli.financials.dynamics.com
Dynamics 365 for Sales, Address: https://memorli.crm11.dynamics.com
The format of the Dynamics CRM Online Organization URL describes the data centre location. As such, the standard format is as follows: centre location. As such, the standard format is as follows:
https://OrganizationName.crm%5Bx%5D.dynamics.com
The Organization Name is the name you have selected for your application. This is customizable and is validated for uniqueness within the respective data centre. The number describes the global data centre used to host your organization.center. The number specifies the global data center used to host your organisation.
Go to https://portal.office.com
Use your admin account to login
Password
Go to Admin
Scroll down and click the admin button
Click the Dynamics 365 option
In real life, you most probably going to have two instances:
1. Production Production
2. Sandbox Sandbox
A Sandbox instance is any non-production instance of Dynamics 365 (online), isolated from production, a Sandbox instance is a place to develop and test application changes with low risk safely., separated from production, a Sandbox instance is a place to build and test application changes with low risk carefully.
https://docs.microsoft.com/en-us/dynamics365/customer-engagement/admin/manage-sandbox-instances
Select the production instance and click OPEN
Copy the URL in the address bar and share with active users.
Alternatively, you can navigate to Dynamics 365
Open the app
Copy and share URL. Best practice is to Bookmark it too.
Great! Now let us open Dynamics 365 Business Central
https://memorli.financials.dynamics.com
Please have in mind that if you have two different admin accounts for your applications, you must use different browsers, one for each application. Alternatively, you can use the same browser, but the one must go InPrivate mode.for each application. Alternatively, you can use the same browser, but the one must go InPrivate mode.
In my example, I am using christos.pittis@memorli.co so I can open both in the same IE browser.
Before we get started with using the apps, we need to make sure we have all the necessary setups in place.
Go to https://portal.office.com and visit the Active Users page
In this page you can see the active user I use to sign in and function. This is the admin user where I originally set up Dynamics 365 for Sales and for Business Central – the same admin user in both applications.set up Dynamics 365 for Sales and for Business Central – the same admin user in both applications.
If I click on it, I will be able to see product licenses assigned to it and Roles. it, I will be able to view product licenses assigned to it and Roles.
Product licenses:
- Dynamics 365 for Financials for IWs
- Dynamics 365 for Sales Enterprise Edition
Roles: Global administrator
I also need to create another user called Interface user, if I don't create two users, I will run into problems with the synchronization, and it won't work properly. This integration user cannot be the same user that enters data into CRM. and it won't work properly. This integration user cannot be the same user that enters data into CRM. Once the setup is complete, the licenses may be removed for this user the licenses may be removed for this user.
Click Add a user
Fill in the necessary fields as per below:
Click Add
Click Send email and close so to receive the password to your admin email account email and close so to receive the password to your admin email account
Now I've got two users, integration and admin. That is all that is needed to be done in the Admin Centre of Office 365.in the Admin Centre of Office 365. Once that is done, switch back to your Dynamics 365 for Business Central application.
Click on search and type 365
As you can see the Microsoft Dynamics 365 Connection Setup page is not there. Therefore we need to change the User Experience to Premium first. Therefore we need to change the User Experience to Premium first.
Search for Company Information instead and click on it.
Scroll down to the User Experience fast tab and change it to Premium
Press ESC on your keyboard to have your browser refreshed and typed again 365 in the search bar
Now you see there is Microsoft Dynamics 365 for Sales Connection Setup, click on it.
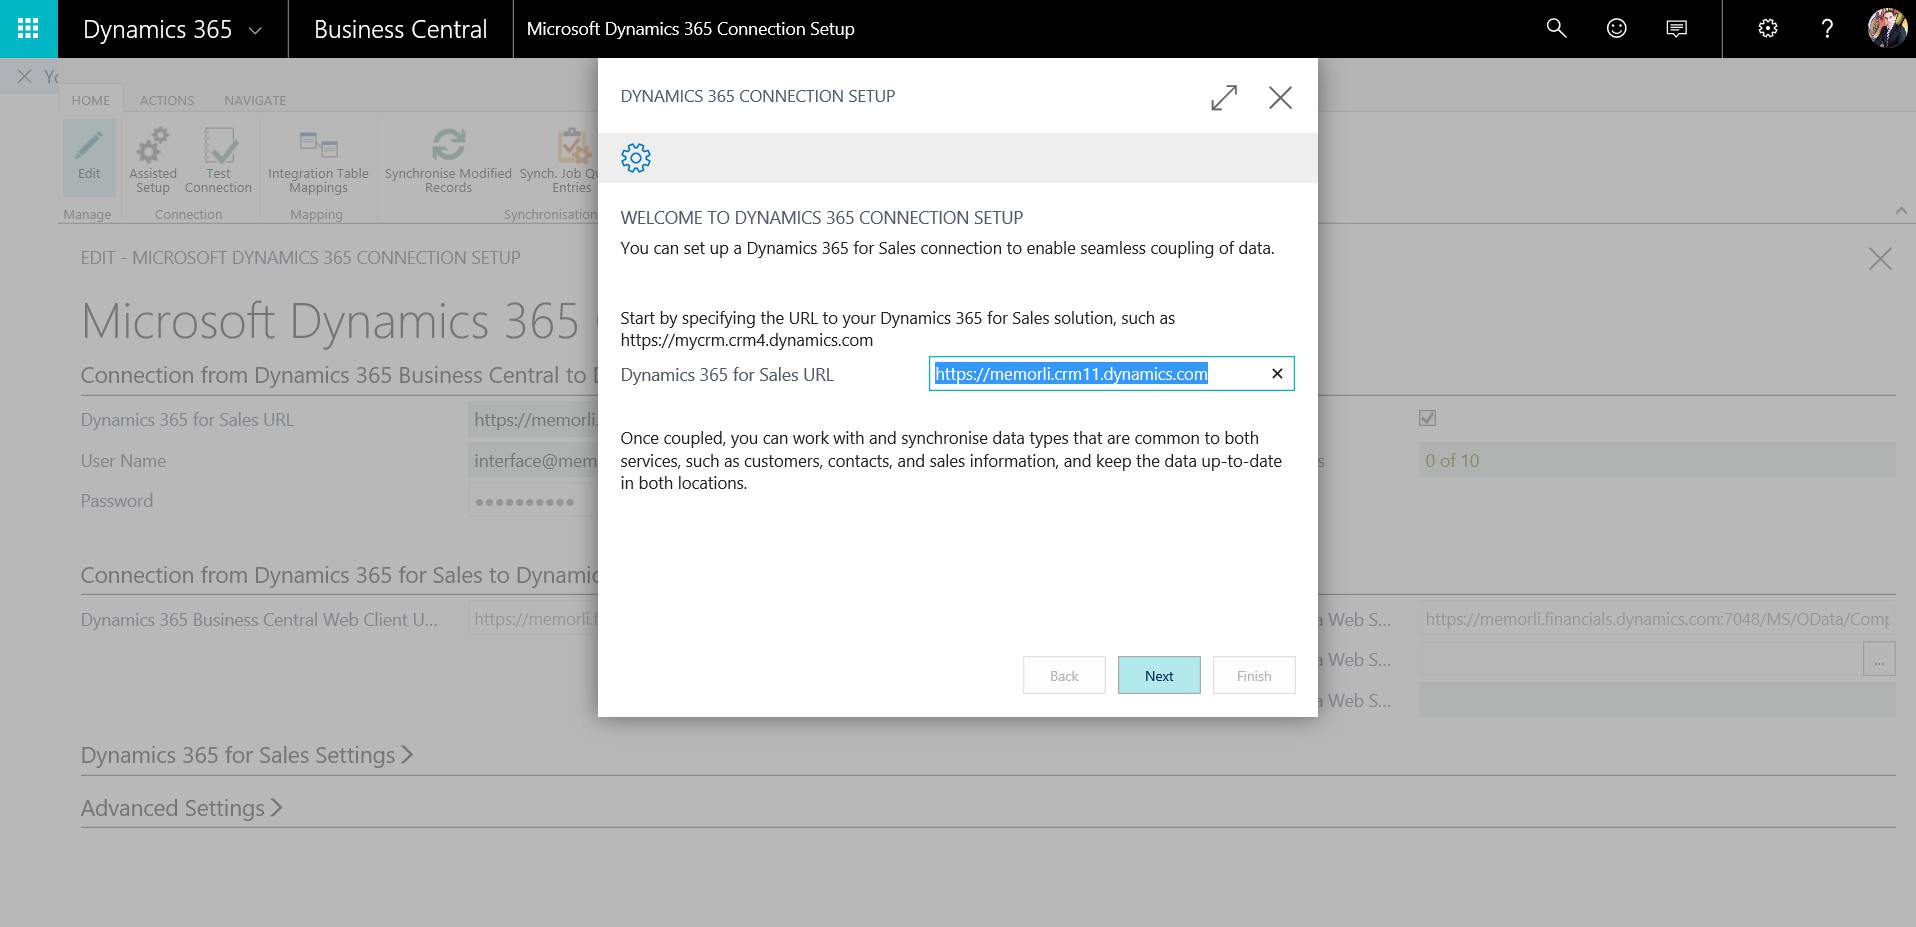
Click the Assisted Setup at the top
Paste the Dynamics 365 for Sales URL and click Next
The connection setup is to specify the user for the synchronization between the two services. Enter the integration user.
Once that is entered, you can click Finish. The next window will prompt you to enter the admin user.
Click OK. The system will work on getting this connection ready. You can choose to map Salespeople, or you can leave it for later.
In this example, I am going to click No.
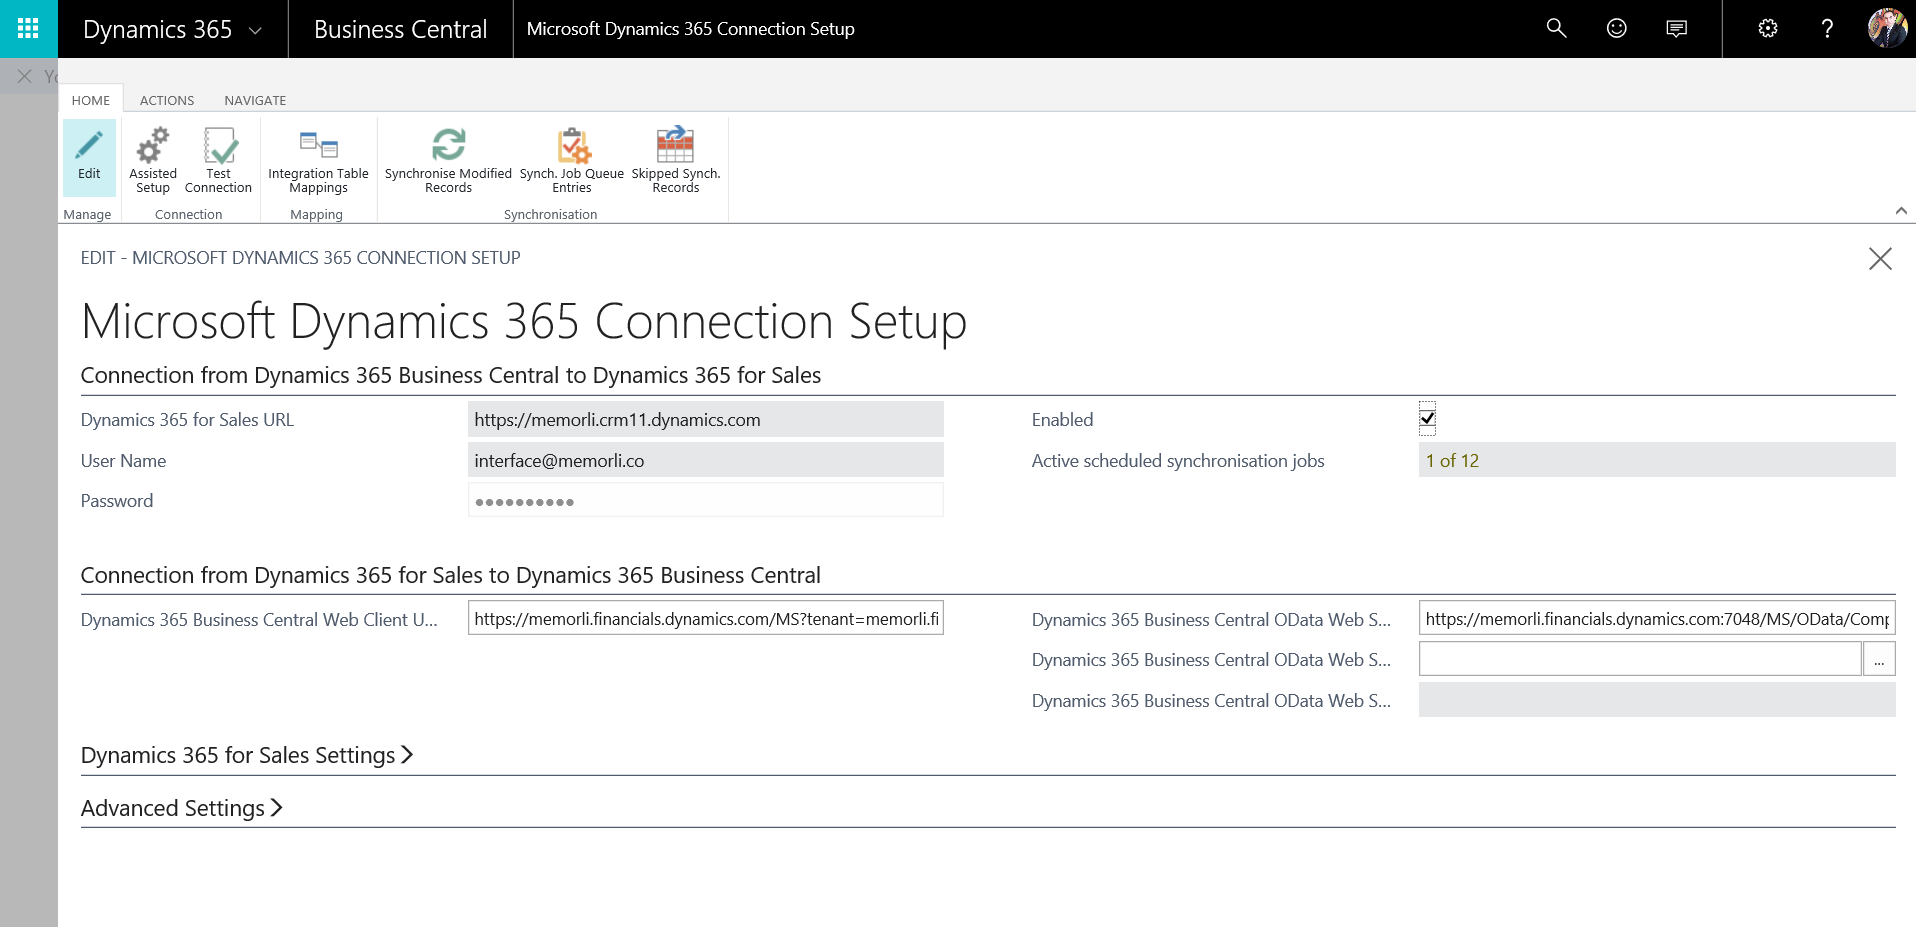
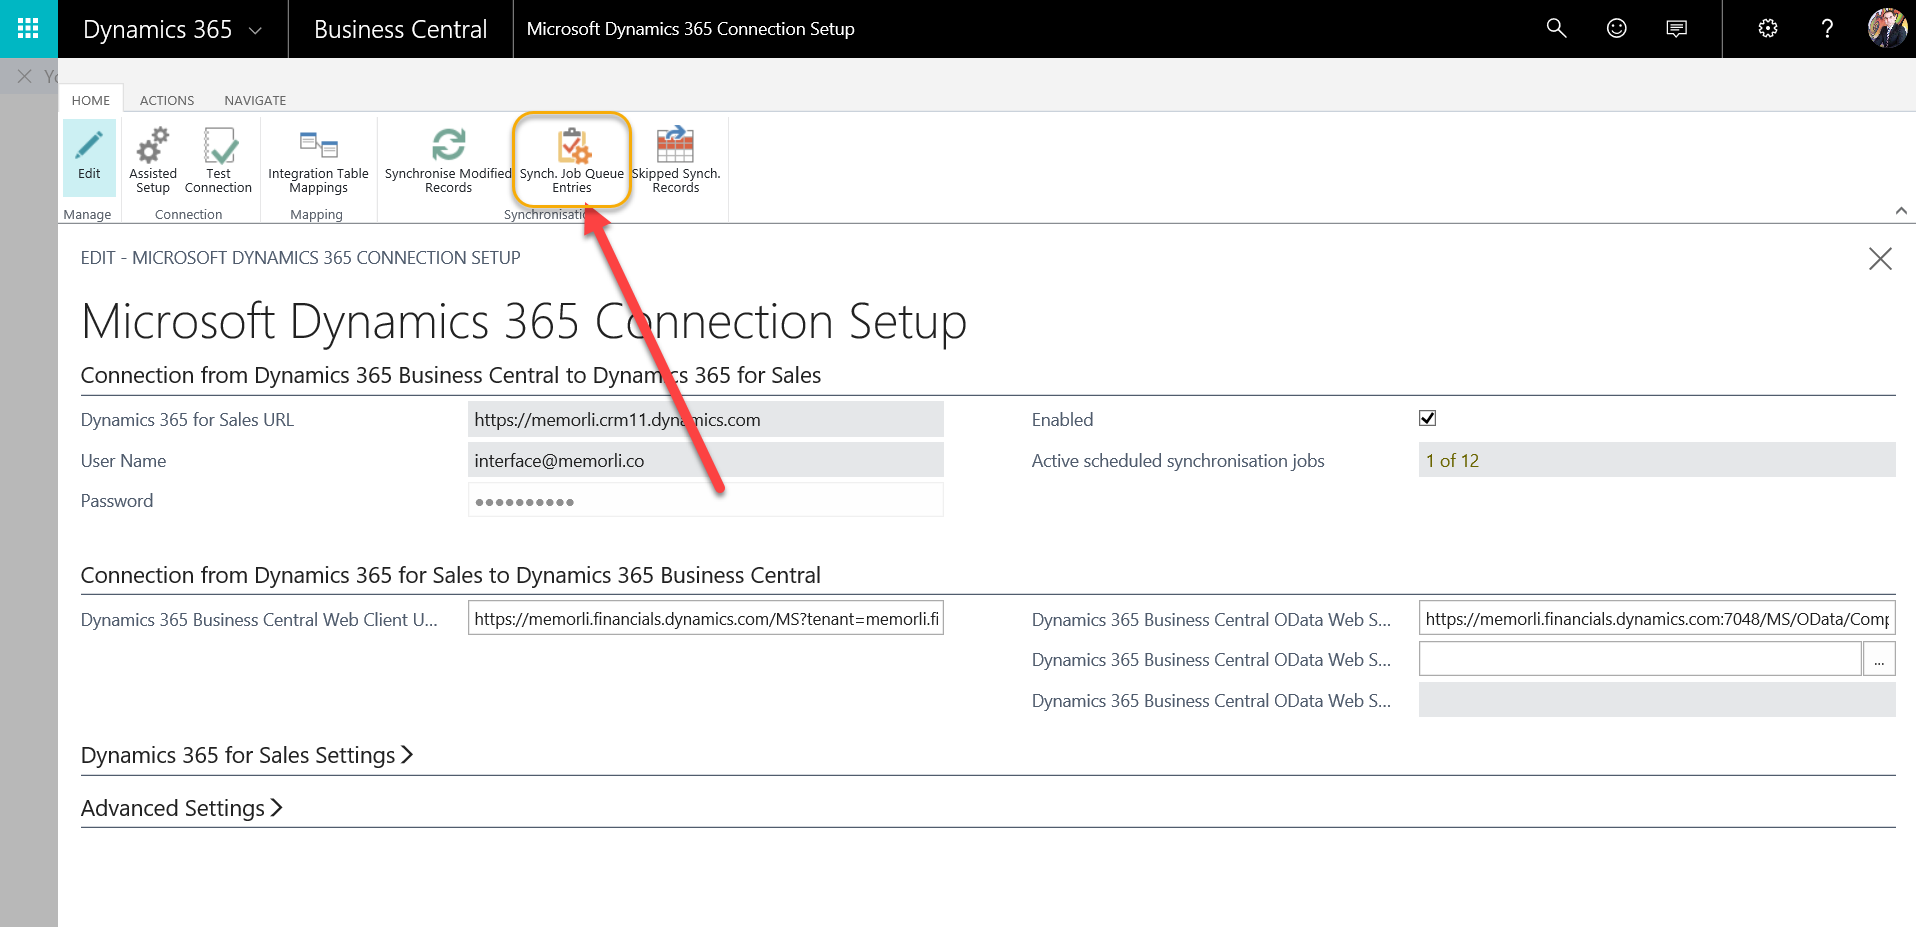
Everything is set to this window; this is where we will see Dynamics 365 for Sales URL, integration user, the active scheduled synchronization jobs, etc. Additionally, you can find some other important buttons in the toolbar, like Integration Table Mappings and Synch. Job Queue Entries.; this is where we will see Dynamics 365 for Sales URL, integration user, the active scheduled synchronization jobs, etc. Additionally, you can find some other important buttons in the toolbar, like Integration Table Mappings and Synch. Job Queue Entries.
Before we go ahead and discuss it further, you are advised to test the connection. Click Test Connection, and you should receive a success message.connection. Click Test Connection, and you should receive a success message.
Now let’s explain a few things about Integration Table Mappings.
In the Integration Table Mappings page, you can see the types of integration Synch. Job Queue Entries that are available. You cannot edit or create new. If you scroll to the right, you shall see a field named Synch. Only Coupled Records. What that does, it matches data in both applications. In simple words, if you have an Account in Dynamics 365 for Sales and the same Account exists in Dynamics 365 for Business Central, you most probably want to couple them together to avoid having duplicates and mismatches. right, you shall see a field named Synch. Only Coupled Records. What that does, it matches data in both applications. In simple words, if you have an Account in Dynamics 365 for Sales and the same Account exists in Dynamics 365 for Business Central, you most probably want to couple them together to avoid having duplicates and mismatches.
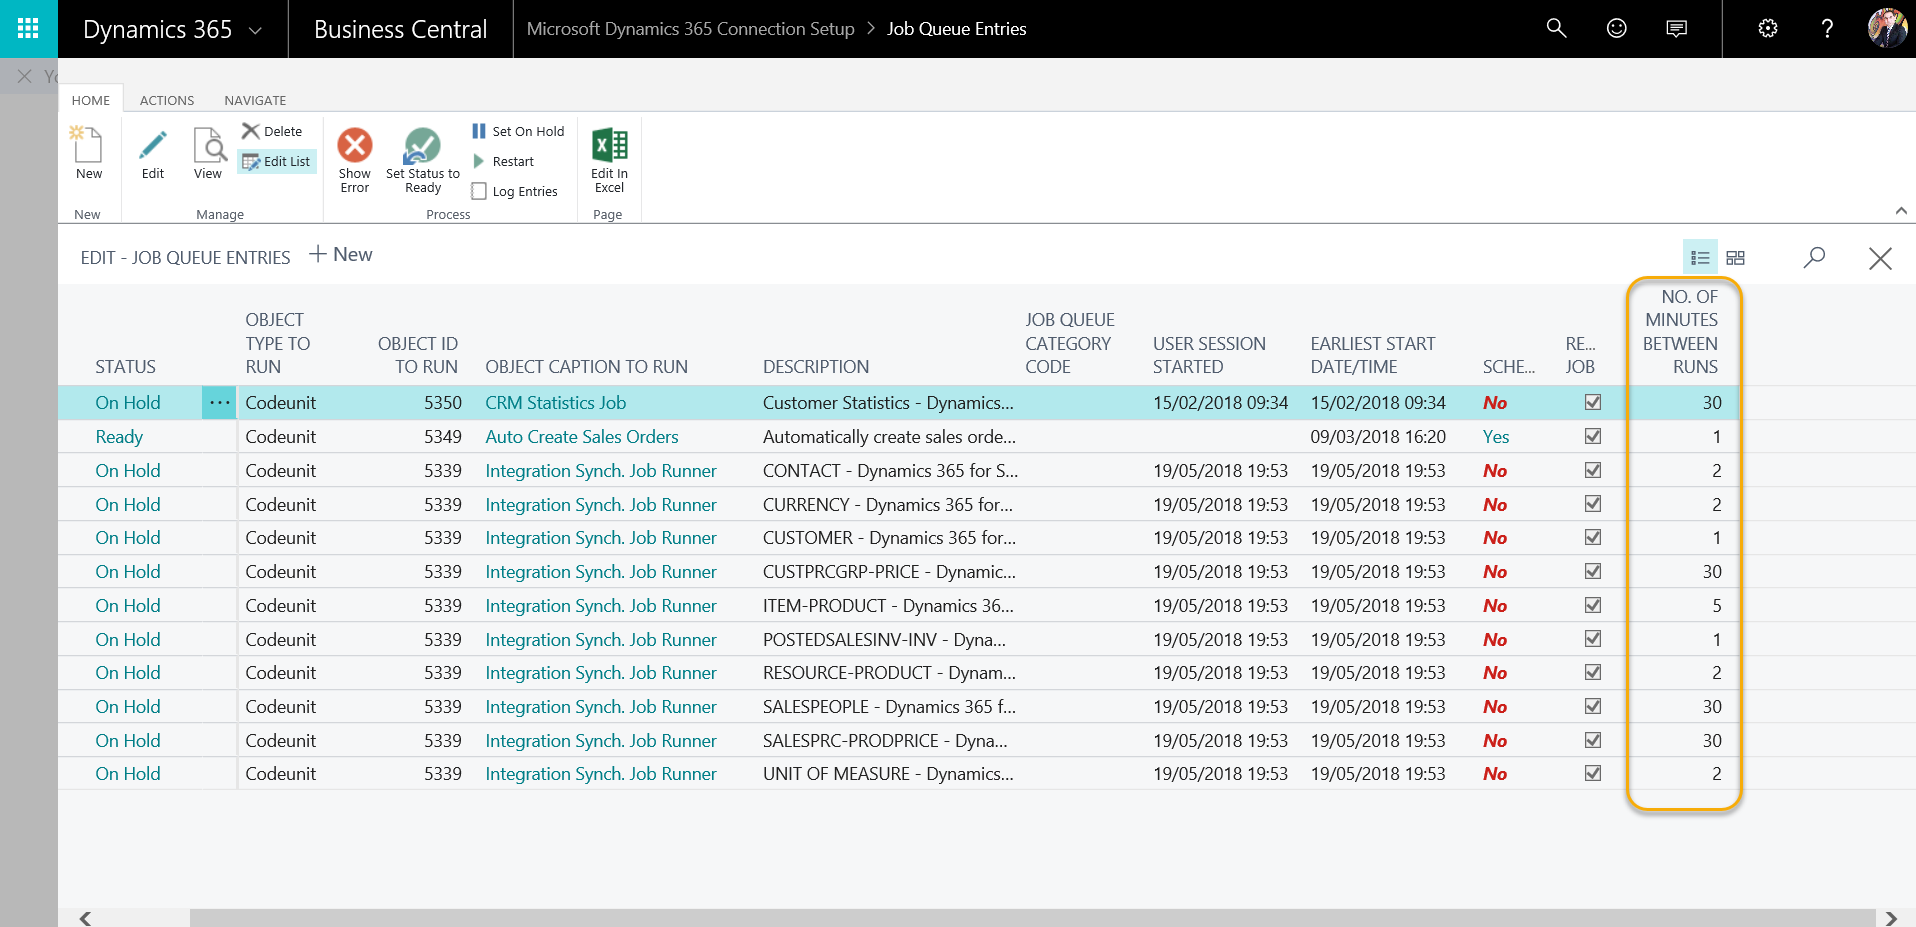
This checkbox has been marked, means that you only want to couple/ synchronize only those that are matched. In other words, if you have an Account in one application and not in the other, It won't synch, because It synchs only coupled records.checkbox has been marked, means that you only want to couple/ synchronize only those that are matched. In other words, if you have an Account in one application and not in the other, It won't synch, because It synchs only coupled records. In the Synch. Job Queue Entries If integrations are scheduled to be run, the status will change to Ready.
In the far right, there is a No. Of Minutes between runs field, and you can change it in two ways:
- Set the job to on hold (Set On Hold button), make changes and set it back to Ready (Set Status to Ready button)
- Make the changes and then restart the job (Restart button)
Synchronize contacts/customers
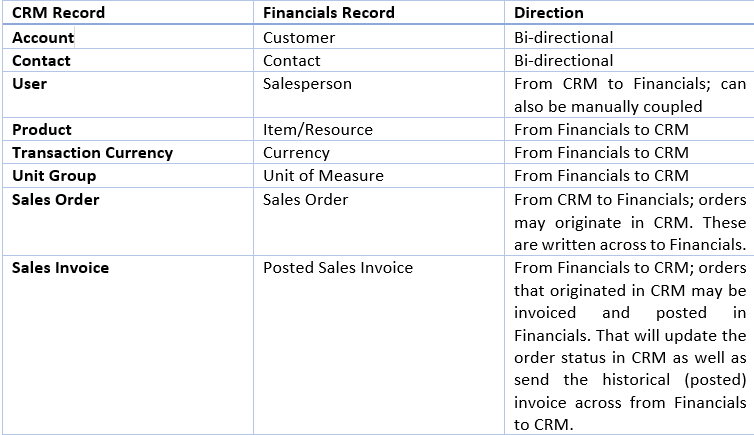
What can be synced between Dynamics 365 Business Central and Dynamics 365 for Sales:
Go back to Integration Table Mappings page.
Contacts and Customers direction is bidirectional. What that means is that contacts and customers can be sent and received in both applications.
Let me start with customers first:
In Customers integration mapping there is one condition:
- integration Table filter VERSION(1) SORTING(Account) WHERE(Relationship Type=FILTER(Customer),Status=FILTER(Active))
The system will not take all accounts from CRM but only active ones with Relationship Type set to Customer. Additionally, if you want to create customers in Dynamics 365 for Business Central automatically, you can use Customer Templates:
- Table Config Template Code
- Int. Tbl. Config Template Code
I will just go ahead and create a new one. Search for Set Up Customer/Vendor/Item Templates
In my example, I open the Business-to-Business Customer (Bank) template
Click New
Press ESC and you can see it there on the list
Go back to Integration Table Mappings page and put the newly created template in the Table Config Template Code field.
Additionally, in this scenario, I don't have customers in both applications that I want to Couple. Therefore I am removing the check mark in the Synch. Only Coupled Records field.
Now let's check what we have in both applications before we activate synchronization:
Dynamics 365 for Sales
Accounts
Dynamics 365 for Business Central
Customers
Synch. Job Queue Entries
Set It to Ready, wait for a few moments and check the Log Entries page
If the job has run successfully, you can then check the customer's list again. You should be able to see new customers coming through.
Thanks for reading this blog post and watching my YouTube video. You can connect with me on LinkedIn https://uk.linkedin.com/in/christospittis or 365 talent portal. https://www.365talentportal.com/
Christos Pittis
Microsoft Dynamics NAV/Dynamics 365 Business Central Consultant
Comments
-
Thanks a lot this blog was really very helpful. Do you have any idea as in how to integrate custom fields from Accounts in CRM to Customer Business Central.


 Like
Like Report









*This post is locked for comments