


 1,712
1,712 Like
Like Share
Share
 Report
Hello Community,
I hope you have been able to look through my prior blogs on landed cost and are now considering to or already utilizing this feature.
If you have not had a chance to check these blogs out, please do so.
There are quite a few support cases that I have seen lately where people are wondering Why can I not invoice my landed cost or where did it go?
Well the first thing you want to look at is whether the landed cost is on the shipment receipt. Landed Costs needs to be included on the shipment receipt. Be aware though that the value associate to the landed cost on the shipment is merely an estimate.
So once you have verified that you do in fact have a landed cost on your shipment receipt then look at who the landed cost vendor is.
In most instances the vendor associated with the landed cost is not the same vendor the purchased good are coming from.
You cannot invoice two separate vendors on the same receipt so in order to invoice that landed cost, you need to create two separate invoice receipts one for the vendor whom the purchased goods are from and the other to the landed cost vendor if indeed they are two separate vendors. If your landed cost vendor and the vendor you purchased the good from are the same vendor, then you can have just one receipt for both the invoicing of the goods AND the landed cost.
I have included below an example of how this would look in GP if you have a different landed cost vendor than the vendor you purchased the goods from.
The steps below assume you already have a landed cost setup.
1. Open Microsoft Dynamics GP
2. In the Transactions menu, select Purchasing, then Purchase Order Entry
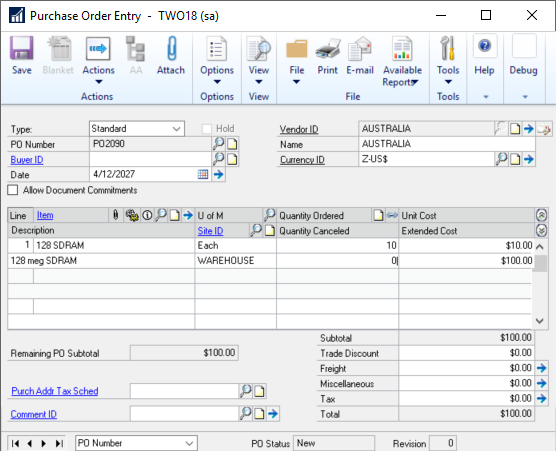
3. Enter a Standard Purchase Order for Vendor A.
4. In the Action Pane, select Actions, then Receive the PO Items.
The following is a screenshot of the PO I created.
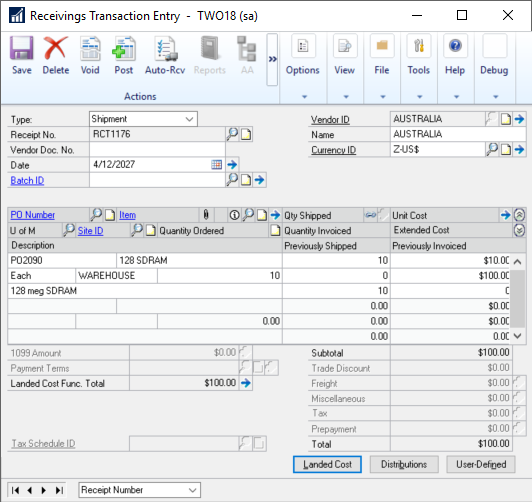
5. On the Shipment Receipt in the Receivings Transaction Entry window enter a landed cost.
a. Note: you can add a landed cost 3 ways.
i. Apportionment – Landed cost bottom at the bottom of the window opens the Receivings Landed Cost Apportionment window. This automatically process takes the landed cost value and apportions the amount through all items based on Value, Quantity, Weight etc.
ii. Manually – Select the arrow next to the Unit cost to open the Receivings Landed Cost Entry window and add manually.
iii. Landed cost group – which you can add or have default onto the Purchase Order which in turn automatically adds to your items when you receive.
6. In this example we will use the Apportionment option. You can enter the landed cost via the Landed Cost button. You will want to make sure that the Landed Cost vendor is different than the PO vendor.
The following is a screenshot of the Shipment receipt I created.
2. In the Transactions menu, select Purchasing, then Purchase Order Entry
3. Enter a Standard Purchase Order for Vendor A.
4. In the Action Pane, select Actions, then Receive the PO Items.
The following is a screenshot of the PO I created.
5. On the Shipment Receipt in the Receivings Transaction Entry window enter a landed cost.
a. Note: you can add a landed cost 3 ways.
i. Apportionment – Landed cost bottom at the bottom of the window opens the Receivings Landed Cost Apportionment window. This automatically process takes the landed cost value and apportions the amount through all items based on Value, Quantity, Weight etc.
ii. Manually – Select the arrow next to the Unit cost to open the Receivings Landed Cost Entry window and add manually.
iii. Landed cost group – which you can add or have default onto the Purchase Order which in turn automatically adds to your items when you receive.
6. In this example we will use the Apportionment option. You can enter the landed cost via the Landed Cost button. You will want to make sure that the Landed Cost vendor is different than the PO vendor.
The following is a screenshot of the Shipment receipt I created.
I wanted to include a screen shot of the Receivings Posting Journal as well as the Receiving Distribution Journal so you can get an idea of how the posting looks. When you post you will see account for the receiving of the items get posted to AND the landed cost value.
7. Next I will illustrate what typically happens and why you don’t see the option to match the landed cost. In the Transactions menu, select Purchasing, then Enter/Match Invoices
8. In the VendorID select Vendor A (whomever you purchased to good from)
9. In the PO Number field look up the PO that was just created.
10. In the Item field lookup the items that were on PO/shipment receipt that need to be invoices.
11. Click the blue arrow to Matched to Shipment field and match the items to the shipment receipt.
The following screenshot show my Matching Shipment to Invoice for the item and everything is good up to this point. Next is where we see the issues with matching. Users will next try to enter match the landed cost now on the same receipt.
12. Back to the Invoice entry window, On the next line click the LC box and select the landed cost item used.
13. Click the blue arrow to Matched to Shipment field and match the landed cost to the shipment receipt.
The following screenshot show my Matching Shipment to Invoice for the landed cost.
Notice something? It’s not there, well where is it? I have it on my shipment receipt so it should be available to be used.

As you can see above, I have no receipt to match it with. This is because the vendor associated with the landed cost is for BEUMONT0001 While the PO is for AUSTRALIA.
As you can see above, I have no receipt to match it with. This is because the vendor associated with the landed cost is for BEUMONT0001 While the PO is for AUSTRALIA.
You will want to remove the landed cost you tried to enter and post this receipt and create a new receipt for BEAUMONT0001 for the landed cost and match it to receipt RCT1176. See below.
So, if you ever wonder why your landed cost is NOT available in the window to match against, check the vendor and make sure you are creating an invoice for that landed cost vendor. Not the vendor you purchased the goods for!
Until next time,
Nicole Fiskum | Support Engineer | Microsoft Dynamics
*This post is locked for comments