Extensible control – HTML/JavaScript
 Martin Dráb
The first part of this mini-tutorial showed how to create necessary classes for an extensible control. We have X++ classes for a control showing maps, we’ve added the control to a form and set a few properties. Now we have to add some HTML and JavaScript to do the job in browser.
Create a text file on disk, set its name to MyMap.htm and put this HTML code inside:
<div id="MyMap" data-dyn-bind="
    visible: $data.Visible,
    sizing: $dyn.layout.sizing($data)"></div>

<script src="https://www.google.com/jsapi"></script>
<script src="/resources/scripts/MyMap.js"></script>
It’s very simple. We have a single div representing our control, with appropriate ID. Then we use data-dyn-bind attribute to set some properties based on data from AX. It’s not strictly necessary for this example, but we would have to set some size anyway, so why not to use the right way?
At the bottom, we refer to some JavaScript files. The first one is the usual Google API, the other is a reference to a JavaScript file that we’ll add in a moment.
Create a new resource in your Visual Studio project, name it MyMapHTM and when asked for a file, use the file that you’ve just created.
We also need a resource for JavaScript. Create a file, MyMap.js, with this content:
(function () {
    'use strict';
    $dyn.controls.MyMap = function (data, element) {
        $dyn.ui.Control.apply(this, arguments);
        $dyn.ui.applyDefaults(this, data, $dyn.ui.defaults.MyMap);
    };

    $dyn.controls.MyMap.prototype = $dyn.ui.extendPrototype($dyn.ui.Control.prototype, {
        init: function (data, element) {
            var self = this;

            $dyn.ui.Control.prototype.init.apply(this, arguments);

            google.load("maps", 3, {
                callback: function () {
                    var map = new google.maps.Map(element, {
                            center: { lat: $dyn.value(data.Latitude), lng: $dyn.value(data.Longitude) },
                            zoom: $dyn.value(data.Zoom),
                            mapTypeId: google.maps.MapTypeId.HYBRID
                        });
                    }
            });
        }
    });
})();
If you have an API key, add it to the load() function in this way:
google.load("maps", 3, {
    other_params:"key=Abcdefg12345",
    callback: function () {
    …
It all works for me without any API key, although it’s officially required. If needed, you can easily create a new API key. And you definitely should provide a key if you use this API in production.
I’m not going to explain the JavaScript code in detail. In short, it loads and calls the Google Maps API when our controls loads, it provides a callback function that sets properties of the map. It’s important to notice how we use values of our properties, such as $dyn.value(data.Latitude). These values come from the runtime class, MyMapControl.
As with HTML, create a resource, call it MyMapJS and add MyMap.js there.
Notice that you can edit resource files directly in Visual Studio.

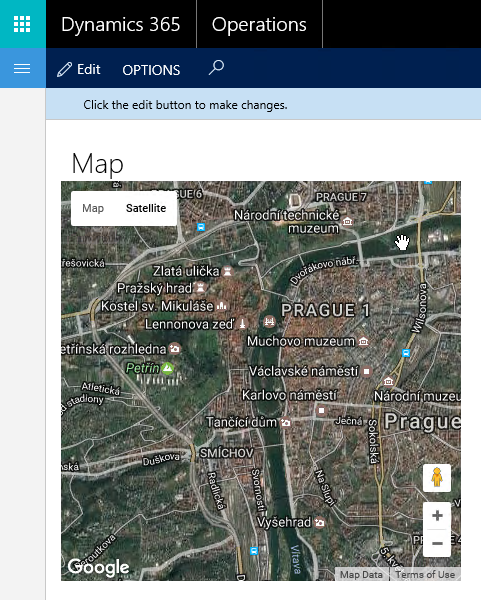
And we’re done! Build the solution, run the form and you should see a map like this:

If you don’t see anything, make sure you’ve set Height and Width of the control, because my implementation doesn’t provide any minimal size.
If you have some other problem, you can use the debugger in Visual Studio (if it’s related to X++ classes), or press F12 in your browser to review DOM, debug JavaScript and so on.
Note that the control doesn’t merely show a picture; it’s a fully functional Google map – you can scroll, zoom the map or switch to StreetView, for example.
This control is deliberately very simple and doesn’t provide any additional logic, but you could easily utilize the JavaScript API to add pins or routes and do a plenty of other useful stuff. The control also doesn’t accept any input from users, so we didn’t need any binding to datasources nor any commands reacting to user actions, although all these things are possible. It’s always good to start with something simple and complicate things only when basics are clear enough.
Let me show just more one thing that the control already supports – setting properties from code.
Open the form in designer, find the map control (MyMapControl1) and set its AutoDeclaration property of to Yes. Then override form’s init() method and put the following code there:
public void init()
{
    super();

    MyMapControl1.parmLatitude(48.9745);
    MyMapControl1.parmLongitude(14.474);
    MyMapControl1.parmZoom(16);
}
When you run the form, you should see a map for coordinates provided in code and not those set in properties in designer. That was easy. 
As you see, creating custom controls isn’t that complicated. The X++ classes we wrote have a few dozen lines of code, but they’re actually very simple; they do little more than just defining our three properties. If needed for your controls, you can put any arbitrary logic there and you’ll be able to manage and debug it as any other X++ code. How difficult is building the front end depends on your proficiency in HTML and especially JavaScript. You obviously can’t build a web UI without any knowledge of web technologies, but on the other hand, you build just a control and not the whole application.
When design robust controls, you should take into account several things not needed for simple examples like this, such as localization and responsive design.
Follow documentation on the wiki (User interface development home page: Control extensibility) to learn more about development of extensible controls.
I think Microsoft made a smart move by designing this framework for extensible control and making it available to everybody. Although it was possible to create custom controls in older versions of AX as well (using ActiveX and managed controls), this is fully integrated (including design-time experience in Visual Studio) and it’s really easy to use. I don’t say it’s completely trivial, but it’s not anything obscure either. I’m looking forward to building more extensible controls myself.
This was originally posted here.


 Like
Like Report
*This post is locked for comments