


Customizable error messages for form field validation
Views (511)
 Peter Krause
Microsoft Employee
Peter Krause
Microsoft Employee
 Like
Like Share
Share
 Report
Introduction
In Customer Insights real-time forms, field validation is the first option to ensure data quality in your system. Out of the box, we use the default browser validation and the standard error messages that come with the browser that you are using. If one of the required fields is not filled out or does not comply to a certain pattern (for example for email or phone number), you might see a different error message depending on the browser you are using. On top of that, customers need to go from one field to the next to find out if there is an error or not like shown in the following picture:
This article presents an alternative method to enhance error message descriptions and provide customers with a summary of all form errors, for example to provide a custom error message for a phone number field. This approach simplifies form completion because all error messages are displayed at once, potentially increasing the submission rate and gives you more flexibility in designing the error messages.
Providing custom error messages
Custom error messages can be displayed in the form by inserting a simple piece of JavaScript. Even if you're hesitant to use JavaScript, this method is straightforward and works with all RTM forms without any HTML code changes. All you need to do is the following:
- Insert the script at the beginning of the HTML body: in the form editor, use the HTML button to display the HTML editor. You can use the “format document” button to make the code easier to navigate. You can also use the “collapse arrow down” right to the line number to collapse specific tags, for example the style tag at the beginning. Scroll down to the body tag and insert two or three new lines. Copy the script and paste it right after the body tag.
- Set up error messages and modify the default message for each of the fields: to bring in your own error messages, scroll further down until you see the comment “*** DEFINE ERROR MESSAGES HERE ***”. Here you can see that we already inserted placeholders for “firstname”, “lastname”, “emailaddress1” and “mobilephone”. All you must do is to change the corresponding text for the different fields:
- Optionally customize the styling of the error messages. This would require more HTML skills to do that.
Afterwards, publish the form and test it to see the new error messages:
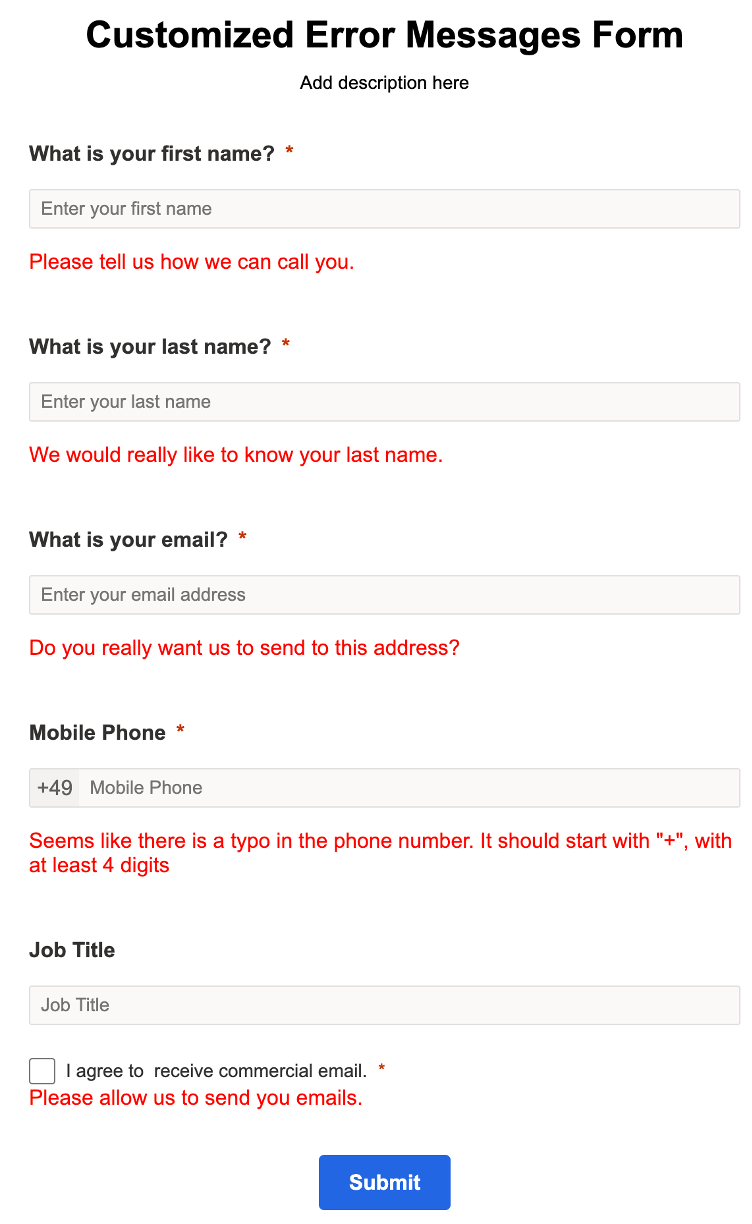
As you can see, the script displays a different error message for each field, and it suppresses the default browser validation. In addition, the validation script has the following features:
- Respects required field property set in form editor: form can’t be submitted without required fields filled / checked / value selected
- Respects the validation rules configured in the form editor
- Non-required fields can be submitted with empty value, but can’t be submitted with a value that fails the validation.
How the script works
Let’s look at some of the details how the script works and what it does.
- Queries all fields in the marketingForm: The first thing we need to do is to collect all form fields in an array. We then iterate through this array and the following steps are subsequently executed for each of the fields.
- Creates instance of FormField class: For every field in the form, we need to check if the field is required and also define validation message that we want to display to the customer. For this, we add a validation Span element (errorSpan) after each field in the form, which can display the error message
- Add event listener: For every field in the form, we add an event listener which can be different by the type of the field (input type for all field, except of checkbox, where click type is needed). Once the event listener is activated, the field is checked using validate() method of FormField class.
- Wrap-up tasks: At last, all instances of FormField class are stored in array called formAllFieldArray. Then, the default browser validation is suppressed. With that, once the form is submitted, the script checks all form field values and block submission if an error occurs.
There is a known limitation right now that is related to Multiselect fields for which this validation method cannot be used.
*This post is locked for comments