


Close Case with Power Automate

 190
190 Like
Like Share
Share
 Report
In one of the projects, I am currently working on, we recently had the requirement to close/resolve a case when a certain condition is met.
Unfortunately, it is not possible to do this with Power Automate directly.
But one of my colleagues, Jesper Jonsson, came up with a nice solution and asked me to write about it. So, the credit should go to him.
Problem
Like mentioned our requirement was to close/resolve a case when a certain condition is met. Since we were already using Power Automate flows on the case entity and our goal is to not mix Flows and Workflows when possible, we decided to solve this problem with a Flow as well.
After some testing, we discovered that it is not possible to close a case with Power Automate. To be more specific: It is not possible to change the status of a case in Power Automate. If you choose the “Update record” step of the CDS (Current environment) Connector, select case as the entity the status field will not be shown.
Possible Solutions
There are at least two solutions to this problem.
- Using a helper field
- Using a custom action
Helper field
One Solution we found, in one of the community forums, was to use a helper field. When the condition is met Power Automate will set the helper field. On update of this field a Workflow will trigger and change the status of the case.
Since I am not a fan of massive use of helper fields (yes, I use them. For example, in some of my PCFs. But I try to avoid them when possible) I feel like this is not the best solution.
Custom action
The idea is to call a CDS custom action from Power Automate when the condition is met. The custom action will then perform the necessary steps, like closing the case.
This blog post will focus on the last solution since I think it’s a nicer and cleaner way of doing it. Thanks again to Jesper for finding the solution!
Implementation
To implement our solution, we have to do the following things
- Create a custom action
- Create a Power Automate flow that calls the action
Custom action
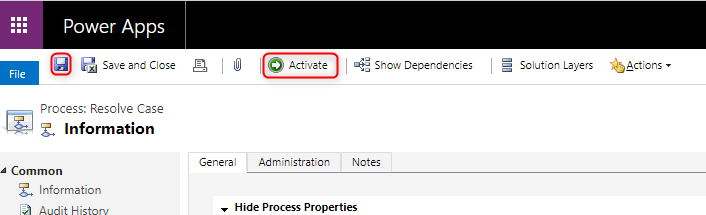
To create a custom action, we have to switch back to the classic interface while editing a solution, since processes are not implemented in the new UI.
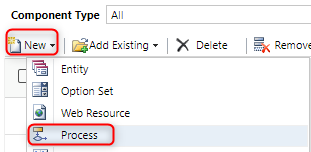
To do so you open the solution and click the “Switch to classic” button.

Here you add a new process by using the “Process” button in the menu that appears when you click the “New” button.
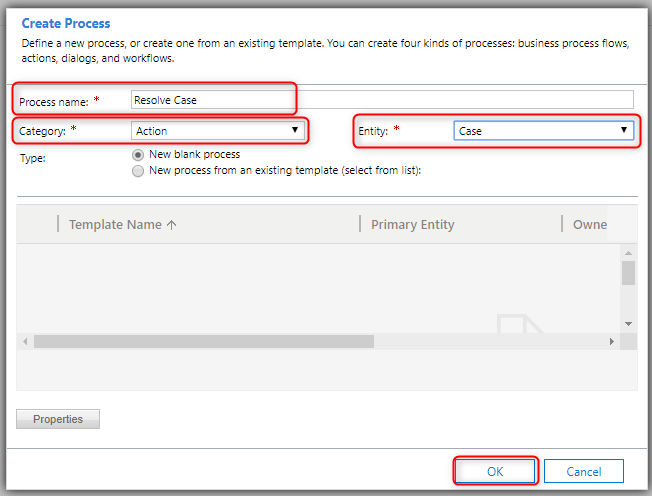
In the modal that opens you choose a process name, Category “Action”, Entity “Case” and click “OK”.
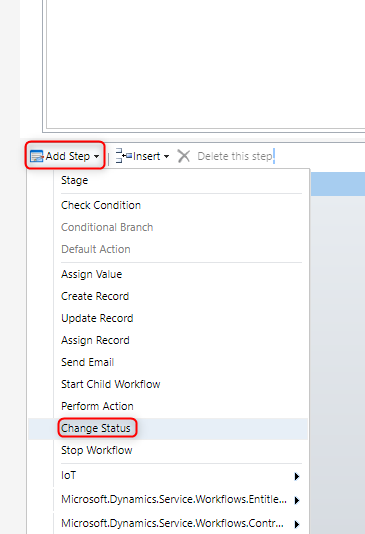
A new window, with the configuration form of the process, will open. At the bottom you can find the area with all the steps that should be executed (like it is for a “normal” Workflow). Here we would like to add a “Change Status” step. To do so you choose “Add Step” and then “Change Status”.
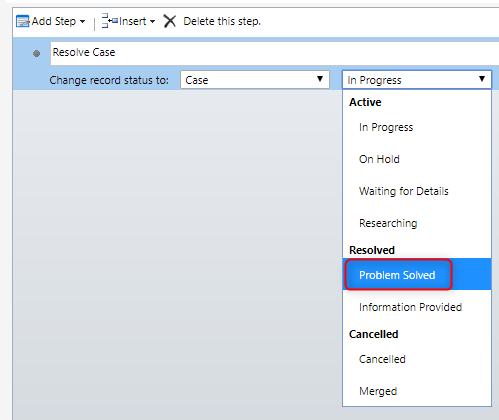
The configuration of this step is quite easy. You only have to choose the new status the case should get. For the demo I will choose “Problem Solved”
Now our custom Action is ready. We can save and activate it.
Power Automate flow
The second part of the solution is to create the Power Automate flow that will call the new custom action.
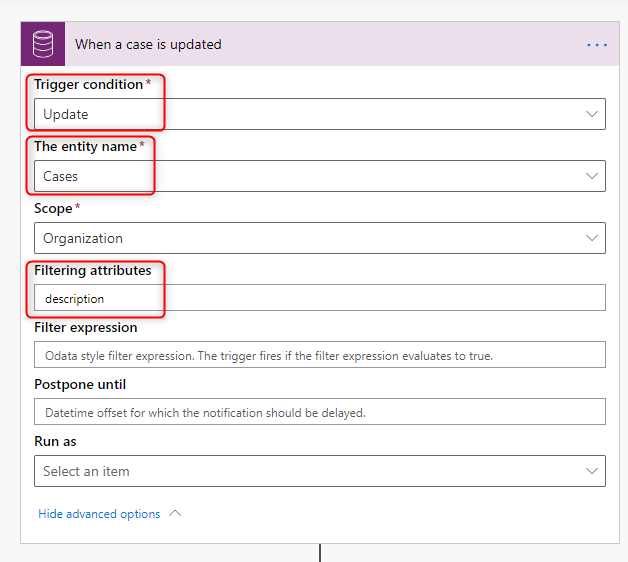
For the demo we will use the CDS (current environment) trigger. The “Trigger condition” is update, the entity is case and the “Filter attributes” is description.
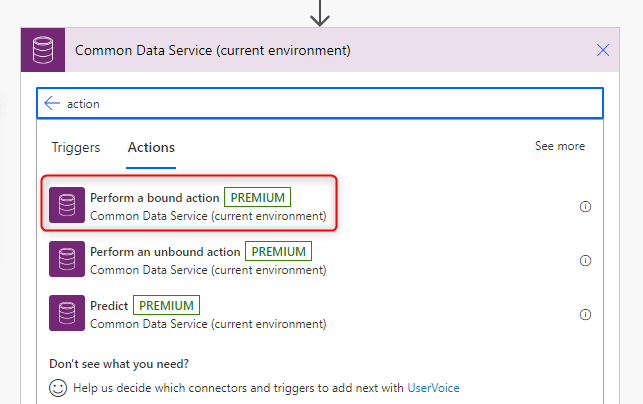
The only step we will have in the flow is a “Perform a bound action” step. You can choose it from the list of actions from the Common Data Service (current environment) connector.
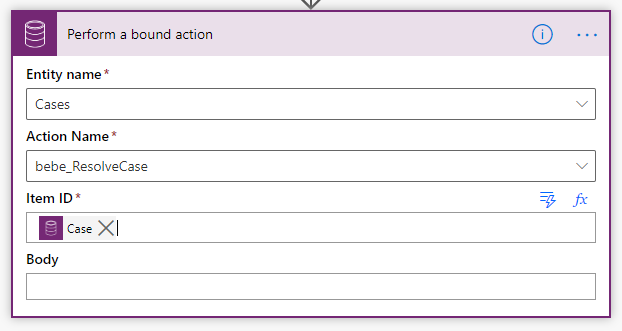
In the configuration of the step, you choose Cases as the “Entity name”, in “Action Name” your custom action from the appearing list (for me it is “bebe_ResolveCase”) and parse in the case id from the trigger as the “Item ID”.
Result
On the next screenshot you can see the result. It shows that the description field was changed/filled, and the status of the case was changed to “Resolved”.

More possibilities
Of course, you could add more complexity both to the Power Automate Flow and the custom Action. I do assume that you have to.
You could for example create a Case resolution entity either in the Power Automate flow or the custom action. It is also possible to create parameters/arguments for the custom action. The Power Automate flow could send them while calling the action to change the behavior if the custom action.
Conclusion
As mentioned, I think this is a clean solution which could be implemented very easy and does not require any development.
I hope this article helped you and please let me know if you have any comments or questions.
The post Close Case with Power Automate appeared first on Benedikt's Power Platform Blog.
This was originally posted here.
*This post is locked for comments