UTM Parameters Tracking in D365 Marketing
 Megan V. Walker
One of the new features from Wave 1 of the Dynamics 365 release notes that relates to Marketing is the ability to have UTM Parameters added to your email links automatically. At the time of writing this, the feature is in preview with it target to be generally available in April 2023. You can turn it on now and start reviewing, so it’s not difficult to use, but in this post I will explain how it works, potential pitfalls you can avoid, and where to see the data in Google Analytics (both UA and GA4). I’m loving this feature already!
What are UTM Parameters?
First off, UTM stands for Urchin Tracking Model (something I learned only recently!). Urchin because the tracking functionality was originally introduced by Urchin Software Corporation who were acquired by Google in 2005. I like that they kept the name. Random facts over.
UTM Parameters are used by most organisations that are serious about tracking their marketing efforts. Consider clicking on a link from your favourite brands LinkedIn or Facebook page. If you then review the URL in your browser, there will likely be a long string of extra parameters after the main website URL. This information is used to pass through to Google Analytics to provide insights in to which posts have been successful in generating traffic to a website. The traffic can come from other websites (who might have shared links to your website), social media posts, search engines, ads and emails. UTM Parameters can be added to links easily using something like the Google Analytics Campaign URL Builder (which has been the only way to do it for your D365 Marketing efforts until now).
There are quite a few different UTM Parameters that can be added to a URL (which you can review here) but we are going to focus on the 5 that are referenced with the D365 Marketing functionality.
| Parameter | Description | Required |
|---|---|---|
| utm_source | this is where the traffic originated from such as google, linkedin, youtube, twitter | Yes |
| utm_medium | this is the marketing medium such as email, sms, banner, social | Yes |
| utm_campaign | if the post or email sent was part of a campaign, this is the name of it | No |
| utm_content | usually relates to paid ad traffic, but can also be used to identify different emails within the same campaign | No |
| utm_term | usually relates to paid ad traffic to identify a keyword | No |
Check Your Consent Levels
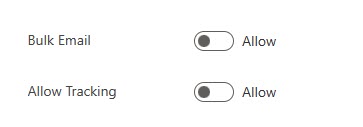
Ok, so before getting in to how to use this, time to review your consent levels and how it all works in relation to the UTM tracking. The functionality only works for Real-time Marketing. If you consider a Contact record you have the Bulk Email field that needs to be set to Allow so commercial marketing emails can be sent to them. You also have an Allow Tracking field. This indicates that the Contact is happy for their interactions with your emails and website to be tracked. However, the allow tracking field here is not enough to use in conjunction with the UTM tracking.
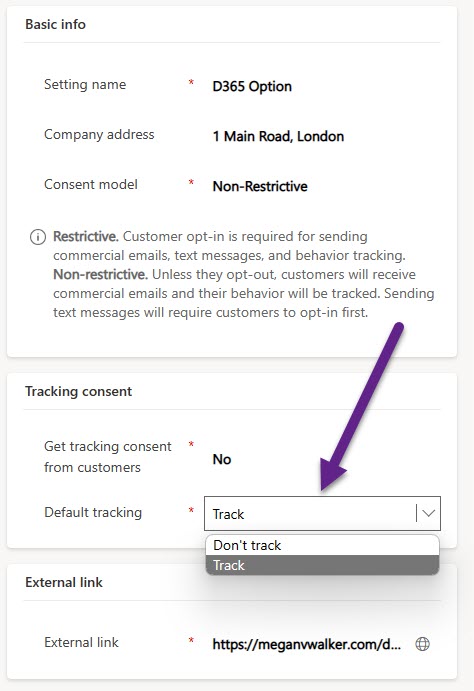
I’ve written about using outbound subscription centres in Real-time Marketing before, so check out the post if you’ve not done this yet. There are two types of consent models here. If you use restrictive and customers must have opted in specifically to allow behaviour tracking, the UTM Parameters will only be added to your email/sms URL’s if a Contact has a Contact Point Consent record for Tracking and the status is Opted In.
If you use a Non-Restrictive consent model, you can set the default tracking to track. This will mean even without a Contact Point Consent record, the UTM Parameters will be added to the URL’s within the email/sms for all Contacts who go through your journeys. Consider updating your privacy policy or terms for your website so when someone completes a form they understand that behaviour tracking will be turned on automatically for them. Consult with your legal team to make sure you take the approach that works for your organisation and country.
Using UTM Tracking in D365
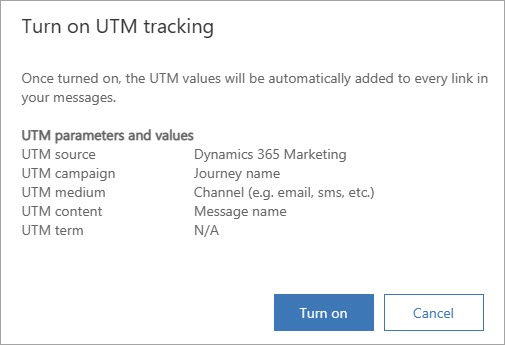
Now we turn on the functionality. Go in to the Settings area and then Feature switches. Turn on the switch for UTM Tracking.
This screen will pop up showing the mapping for the five UTM parameters mentioned earlier in this blog post. The only parameter that won’t actually have anything mapped is the UTM term. Well, that’s not exactly true, it will be mapped with ‘N/A’.
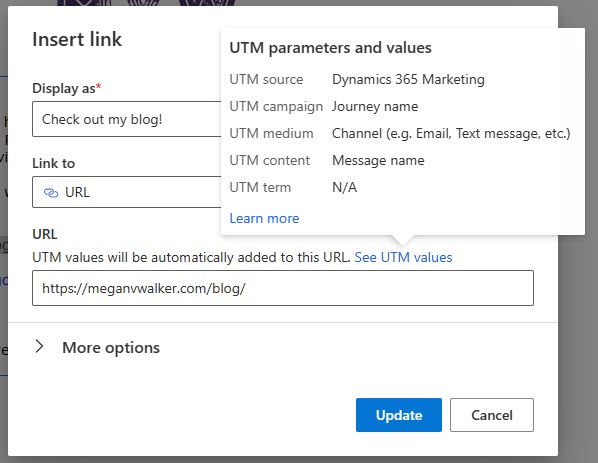
Moving forward with any new email/sms you create, or existing email/sms you update (they won’t be added to old links), you will see a note above the URL stating the UTM values will be automatically added to this URL. You can also review the values again to see how they will be mapped.
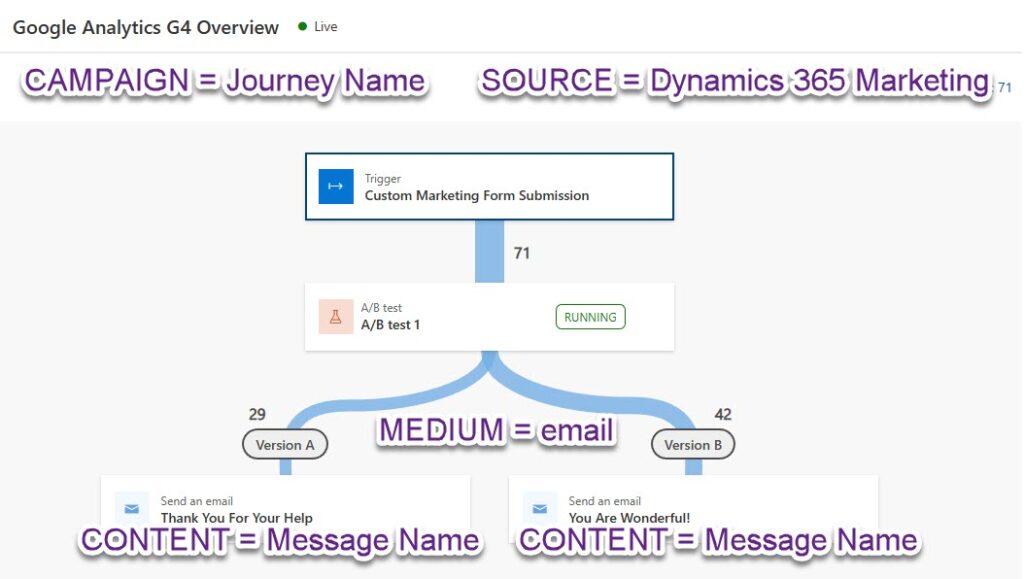
To understand further, we can see the mapping here for a journey with an A/B test that includes two different emails. Below that a table showing more details.
| Parameter | Example Value | Details |
|---|---|---|
| utm_source | Dynamics 365 Marketing | this will always be the same |
| utm_medium | the channel used, email, sms, custom etc. | |
| utm_campaign | Google Analytics G4 Overview | the name of the journey |
| utm_content | Thank You For Your Help OR You Are Wonderful! | the name of the message |
| utm_term | N/A | this will always be N/A |
Reviewing The Parameters
You start your Journey and messages are sent out. Any person clicking on a link (where tracking is allowed), the UTM Parameters and a tracking context id will be passed through the URL. You can see the utm_source, utm_medium, utm_campaign and utm_content is passed through.
https://meganvwalker.com/blog/?utm_source=Dynamics%20365%20Marketing&utm_medium=email&utm_term=N%2FA&utm_campaign=Google%20Analytics%20G4%20Overview&utm_content=Thank%20You%20For%20Your%20Help#msdynmkt_trackingcontext=06a146cc-99c3-494e-bbd6-2657aba67532One thing to keep in mind, you will still be generating URL’s to share on social media and likely adding your UTM parameters there. I wrote a post about capturing the UTM parameters from the URL and if the person is on a page with a marketing form, using those to update fields when creating new Leads. So remember, your UTM parameters are going to be added to the links in your emails and sms messages automatically once you turn on the functionality, but you also manually add UTM parameters when sharing posts on social media, or when linking from other websites or by other organisations adding them to share links to your sites, so good to understand the various ways UTM parameters can be added to your URL’s.
Google Analytics – Universal Analytics
Now that you know how the UTM Parameters can be added to the links in your journey messages in Real-time Marketing, how do you see this data in Google Analytics? Currently Google is going through a transition from Universal Analytics to GA4. They introduced it a while back and have given a grace period for people to make the transition, but you will be transitioned automatically July 1st 2023. However, given that so many people are yet to make the move, I wanted to share information on how to review your UTM parameters in both versions of Google Analytics.
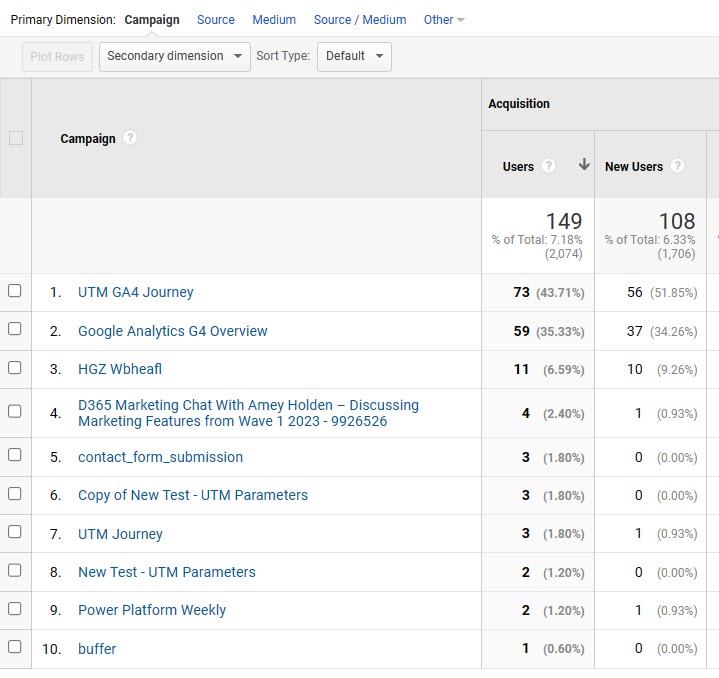
In Universal Analytics, you can navigate to Acquisition from the menu, then All Campaigns.
Here you will see all of the traffic to your site that included a utm_campaign parameter. You can see the Google Analytics G4 Overview campaign listed at number 2 which is the name of my Journey in D365 Marketing.
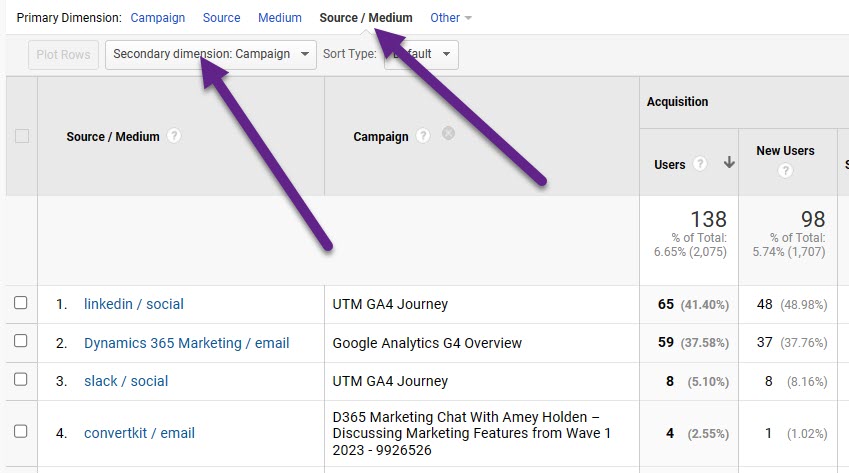
You can change the primary dimension and add a secondary dimension. Switching this to Source/Medium, you can see the Dynamics 365 Marketing that was used as the utm_source in D365, and the utm_medium of email.
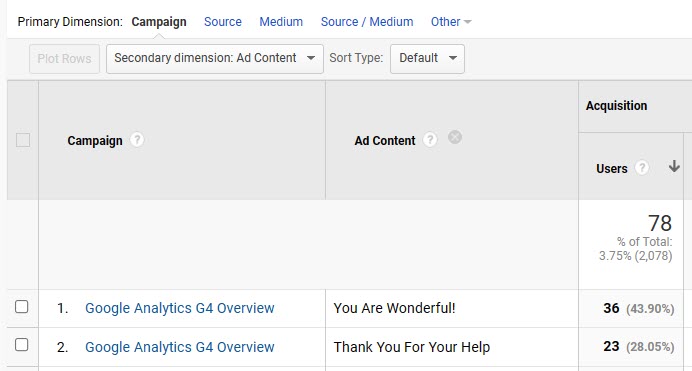
The utm_content which will show the name of the messages sent can be found adding the dimension of Ad Content. Below you can see the names of the email messages sent. You can of course create your own reports to get an overview of the data without having to switch the dimensions each time.
Google Analytics – GA4
Here is how to find your UTM Parameter data in Google Analytics 4. From the reports area, click on Acquisition then the traffic acquisition option.
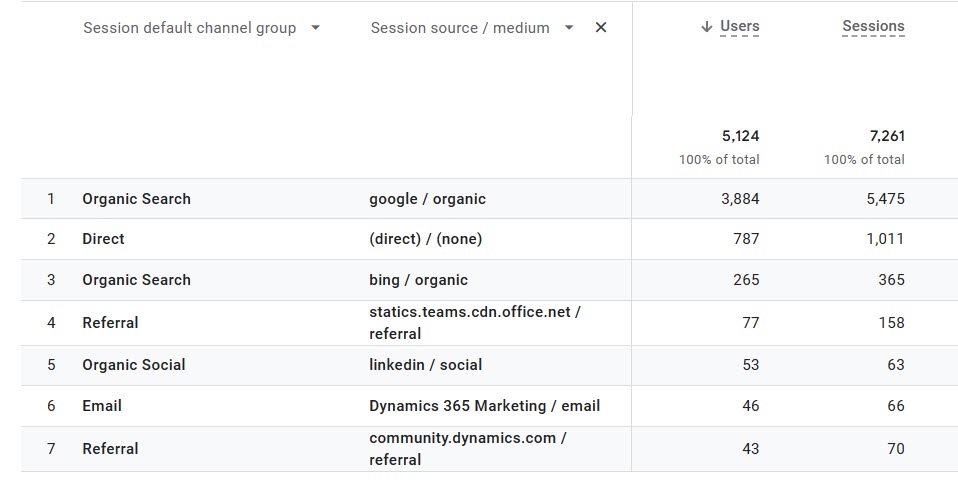
From here you’ll be able to see the channel which is the medium. You can add in another dimension and show the source/medium or other data. You can see the Dynamics 365 Marketing utm_source and email utm_medium listed.
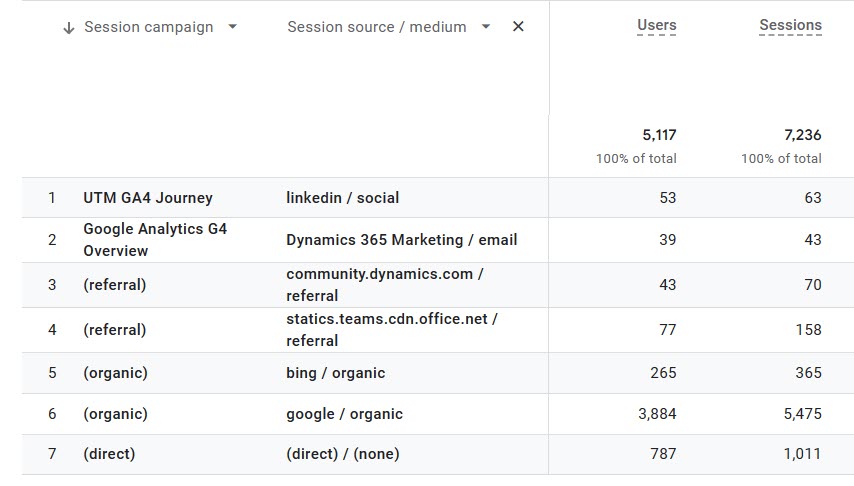
We can also show the utm_campaign (Session campaign), so here you can see the Journey name of Google Analytics G4 Overview.
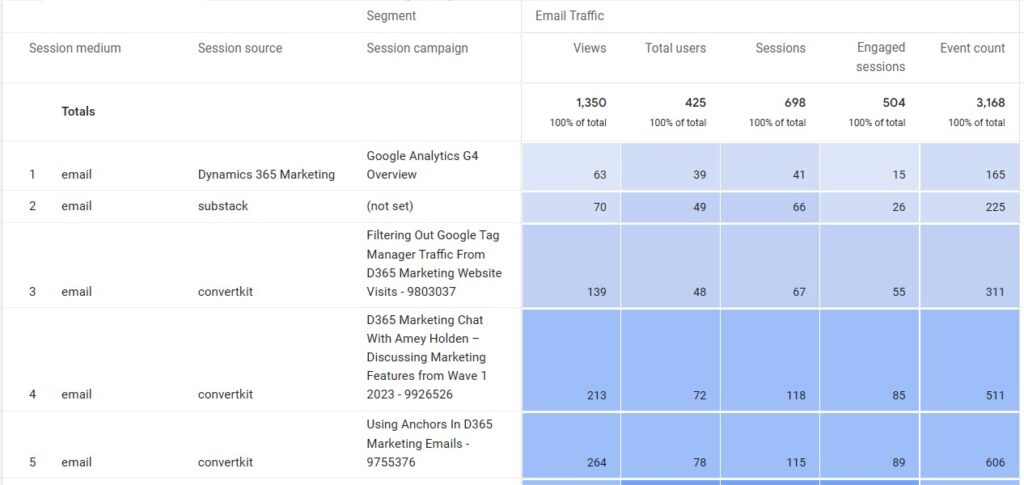
You can create explorations to show more data and create yourself an overview specifically of email traffic.
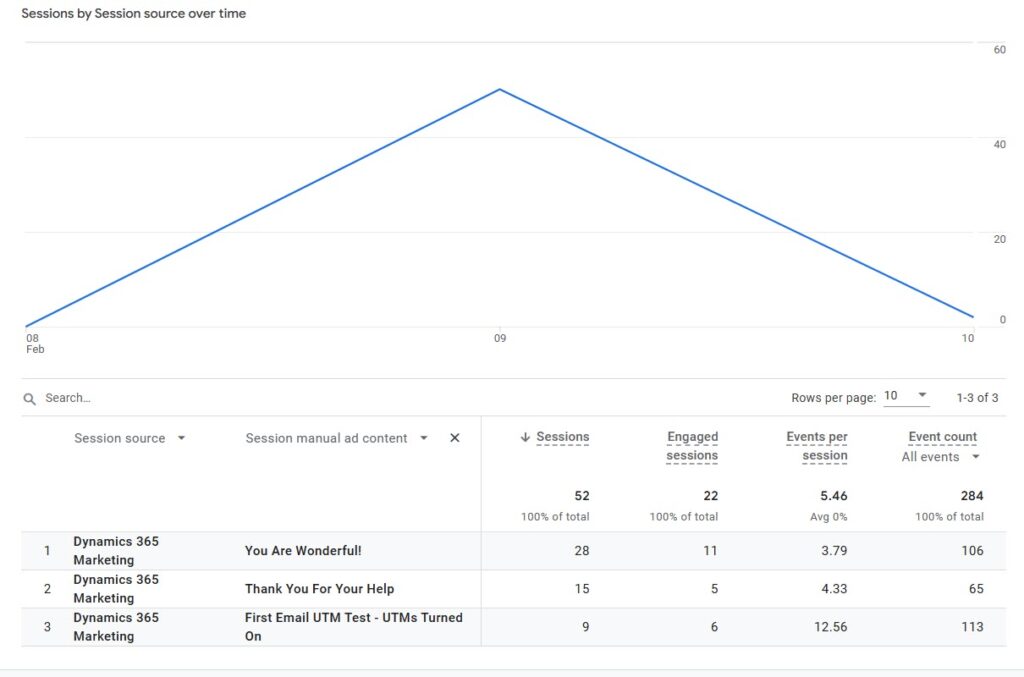
The utm_content is trickier to get to. It can be found as session manual ad content or first user manual ad content. This will only show data with user interaction if it was the first time the person was visiting your site. If you add the session manual ad content dimension make sure you remove the user details so that you can see and review the data. Below you can see the session manual ad content (utm_content) showing the different email message names that were used in the Journey.
That’s it! That’s how to understand and find your UTM Parameter data in Google Analytics. What do you think? Are you ready to start using this new functionality?
This was originally posted here.


 Like
Like Report





*This post is locked for comments