


Capture Pictures & Video From EasyRepro Tests
Views (1023)
 jlattimer
 24,564
 Like
Like Share
Share
 Report
It goes without saying that tests are going to fail from time to time. Luckily EasyRepro does a pretty good job of providing descriptive error messages to make troubleshooting issues easier. Inevitably the first person to deal with an issue is going to be the developer and most likely they'll need to re-run the test on their local machine to watch exactly what happens. Debugging or at least offloading some of the triaging tests can be made easier by capturing screenshots and/or videos of tests as they are running.
You can get the TestContext object when it’s passed to the ClassInitialize method.
I created a helper method to use when needing a screenshot. It will create a folder for the images, create a unique filename based on the test name & date, and then call TakeWindowScreenShot to grab the browser screen and save to disk. It also adds the file to the TestContext which is important if running tests in Azure DevOps.
The basic content to get recordings working:
In Visual Studio, under the Test menu –> Test Settings select Select Test Settings File and choose the new .runsettings file.
And it should be as simple as that. After a test executes in the test results folder there should be a sub-folder with a guid for a name and inside it will be a .wmv file which is the recording of the test being run in the browser. The one downside is that it appears to be an all or nothing approach to capturing video. If this is enabled all tests in the run have individual recordings created. I couldn't find a way to start/stop recording on the fly from code.
In the Visual Studio Test task under Settings file choose the .runsettings file you created.
Also if you aren’t already using a Publish Build Artifacts step after the tests run, do so and publish the TestResults folder.
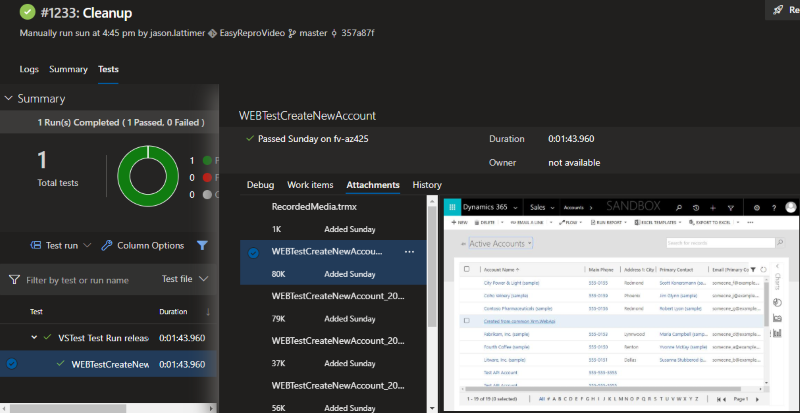
Now any images that were added to the TestContext or videos captured will be available in the test results.
Screenshots
Alone this isn’t anything new as EasyRepro already has TakeWindowScreenShot which does a screen capture. It expects a path & file name and image format for parameters. I like to have the name of the test in my image name. We can use the TestContext to get the name of the test currently being executed for the file name.You can get the TestContext object when it’s passed to the ClassInitialize method.
private static TestContext _testContext;[ClassInitialize]
public static void SetupTests(TestContext testContext)
{
_testContext = testContext;
}I created a helper method to use when needing a screenshot. It will create a folder for the images, create a unique filename based on the test name & date, and then call TakeWindowScreenShot to grab the browser screen and save to disk. It also adds the file to the TestContext which is important if running tests in Azure DevOps.
private static void ScreenShot(InteractiveBrowser xrmBrowser, TestContext testContext)
{
    const ScreenshotImageFormat format = ScreenshotImageFormat.Jpeg;
const string imagePath = "screenshots";
Directory.CreateDirectory(imagePath); var testName = $"{testContext.TestName}_{DateTime.Now:yyyyMMddTHHmmss}";
var filename = $"{imagePath}\\{testName}.{format.ToString().ToLower()}";
xrmBrowser.TakeWindowScreenShot(filename, format);
    _testContext.AddResultFile(filename);
}
Videos
As it turns out this is really easy to set up (assuming tests are running under Visual Studio 2017 v15.5+). You’ll need to add a .runsettings file to your solution. To do so, right-click on your solution and add a new item (XML file) and make sure it’s named something like settings.runsettings, the .runsettings extension being key. Make sure this file gets into source control.The basic content to get recordings working:
<?xml version="1.0" encoding="utf-8"?>
<RunSettings>
   <RunConfiguration>
     <ResultsDirectory>.\TestResults</ResultsDirectory>
   </RunConfiguration>
   <DataCollectionRunSettings>
     <DataCollectors>
       <DataCollector uri="datacollector://microsoft/VideoRecorder/1.0"
                      assemblyQualifiedName="Microsoft.VisualStudio.TestTools.DataCollection.VideoRecorder.VideoRecorderDataCollector, Microsoft.VisualStudio.TestTools.DataCollection.VideoRecorder, Version=15.0.0.0, Culture=neutral, PublicKeyToken=b03f5f7f11d50a3a"
                      friendlyName="Screen and Voice Recorder">
         <!--Video data collector was introduced in Visual Studio 2017 version 15.5 -->
       </DataCollector>
     </DataCollectors>
   </DataCollectionRunSettings>
</RunSettings>
In Visual Studio, under the Test menu –> Test Settings select Select Test Settings File and choose the new .runsettings file.
And it should be as simple as that. After a test executes in the test results folder there should be a sub-folder with a guid for a name and inside it will be a .wmv file which is the recording of the test being run in the browser. The one downside is that it appears to be an all or nothing approach to capturing video. If this is enabled all tests in the run have individual recordings created. I couldn't find a way to start/stop recording on the fly from code.
Azure DevOps
To make use of the images and videos when running tests from Azure DevOps you’ll need to make a couple adjustments.In the Visual Studio Test task under Settings file choose the .runsettings file you created.
Also if you aren’t already using a Publish Build Artifacts step after the tests run, do so and publish the TestResults folder.
Now any images that were added to the TestContext or videos captured will be available in the test results.
This was originally posted here.
*This post is locked for comments