Hi everyone,
Today, we’ll learn how to send an Incoming Document in Microsoft Dynamics 365 Business Central via API — without writing any custom code.
This is fully supported using standard Business Central functionality.
We’ll perform this in 4 simple steps, using the General Journal page as our example.
🔧 Prerequisites
Before we start, make sure you have:
A valid Bearer token, or OAuth 2.0 credentials to generate one at runtime.
Postman installed (desktop or web version).
Access to your Business Central environment (Sandbox or Production).
🪄 Step 1: Create a Web Service for the General Journal Page
Go to Web Services in Business Central and add a new web service with:
Object Type: Page
Object ID: 39 (General Journal)
Service Name: e.g., GenJnlTest
Enable the Published checkbox.
Once you press Tab, Business Central will generate an OData V4 URL.
Copy this URL — we’ll use it in Postman.
💡 Step 2: Send a General Journal Line via API
Now that we have our OData V4 URL and API token, let’s use Postman to send data.
Open Postman and paste the OData V4 URL.
Once you know the fields you want to fill in General Journal Line, create a new request and switch to POST:
You’ll see that a General Journal Line is now created in Business Central. If you inspect the record (Zoom into the table), you’ll notice a System ID — keep it handy for the next step. You can also include the SystemID field in your API response so that you need not to go to Business Central every time.
📎 Step 3: Attach an Empty PDF File as an Incoming Document
Next, we’ll create an empty PDF file and attach it to our journal line.
In Postman, create a new POST request with this URL:
Replace:
<Tenant ID> → from your BC URL
<Environment Name> → e.g., Sandbox or Production
<Company ID> → from the Companies page (use “Zoom” to view IDs)
Add this JSON body, and then click Send.
This will create an Incoming Document entry, but it will be empty (no file content yet).
📄 Step 4: Upload File Content into the Incoming Document
To upload the actual PDF content:
Take note of the response you got in Step 3 — it includes:
Change the method to PATCH, and add the parentId and id to your URL:
In Postman:
Change Body to binary and upload your PDF file.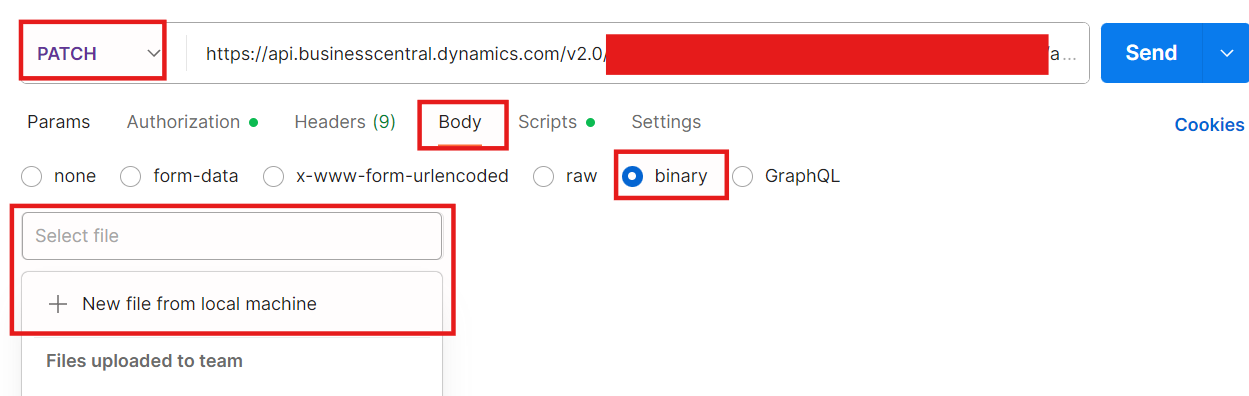
After you add your file, go to the Headers and add a key value pair of "If-match", '*'.
You are all set, click on SEND, and you will see your file in the Incoming Documents of General Journal Line.
END
Hope this helps.
Aman K


