Dynamics 365 F&O : Transfer order processing
Dynamics 365 F&O : Transfer order processing
This article describes ways to transfer items within your organization. If you have multiple legal entities, the intercompany purchase orders and sales orders cover the movement. If you move items within one company, transfer orders and transfer journals provide functionality to support those processes – these topics will be explored now. However, this article is a high level overview plus some hopefully useful tricks, but not a comprehensive, full and detailed description.
If you move items between physical locations, a transfer order should be used, as it allows a more in-depth tracking of the transfer process, and it also provides the option to print a delivery note and a shipment label. Transfer journals should be used to register ad-hoc movements, like a relocation within the same warehouse.
Transfer order administration
Transfer orders can be entered manually, or if your MRP is setup accordingly, the planning process can also generate planned transfer orders.
Header information

The header defines the From and To warehouses, the required Ship and Deliver dates, and that is usually enough. There are a couple of other fields available, but they are not always needed, or in some cases, automatically populated (like the addresses based on the warehouses).
Trick #1: you can setup transport days, so the system can also calculate your transfer lead time (3 days in the screenshots above and below - by the way, this setting is also considered by MRP).

Setup transport days between physical addresses (like ZIP code for example) – also considered by sales orders, or in case of transfer orders, you might want to use the option to define transport days with a reference to two warehouses.
Trick #2: transfer orders are always processed through a transit warehouse. You should set it up on the departure site (although the system does not check or force this logic, a transit warehouse from another site can also be used).
Line information
The transfer order line(s) define which item to be moved, and in what quantities, also not much surprises there.

Note, there is no unit of measure on the line, the quantity is always meant in inventory units. Room for improvement there I believe, if you want to setup different rules for warehousing based on units, that is unfortunately not possible. (Warehousing is not considered in this article in detail.) The field "Packing quantity" provides basic functionality, but not as sophisticated as all the options in warehousing.
Automatic reservation can be setup, manual reservation is always an alternative, but transfer orders can also be processed without reservation.
Processing
Pickling list generation
To support your picking processes, you can generate a picking list. The list is based on input parameters like all quantities, or reserved quantities – this later makes sense only in case you use reservation of course.
Without warehousing, your options are limited, one picking list is generated for all positions and quantities matching the criteria – if you select all, all lines and full quantities will be included on one picking list. There is a workaround, to apply reservation for manually selected items (items in aisle A for example), then generate the picking list. Then reserve items in aisle B, print a second picking list etc, but it requires much manual effort.
Note, the picking list is meant to be printed, so paperless administration is not supported – that would be the warehousing functionality and the related app.
Picking list registration
If the physical picking is complete, the next step is to register (complete) the picking list in the system. If there are no exceptions (no stock, or stock on a different location / from a different batch), it is only 1 click.
Shipping
Use shipping of the transfer order to indicate the sending: move items to the transfer warehouse, as well as generate the delivery note.
Trick #3: if all input data were already known on the transfer order line, and the system can post the transaction (full quantity available for example), you can ship the order without picking as well.
Note: there is no additional step between picking list, and shipping. If you have more complex steps like including a sort of packaging (container / shipment – load building) after picking and before shipping, you should consider warehousing.
Trick #4: transfer warehouse transactions are posted automatically, probably that is the reason why they work with less information as well: you can define the transfer warehouse without location, it will still work, even if your other warehouses have locations. However, I would suggest to keep such settings consistent: setup the transfer warehouse with location tracking as well, add one location, and define that one as a default location for inbound and outbound transactions.
Receipt
The final step is to confirm (post) the receipt. If all lines and total quantities are received, the order gets the status “Received” – this is the final status. As transfers are internal movements, no invoicing happens.
Note: no invoicing means less options for financial bookings. Depending on your costing setup, the system uses defined costs (standard costs per site or warehouse, if that is your setup, or FIFO for example). It means you cannot really define an “internal price”, like the central warehouse purchased the item for 10 USD, but sells it to warehouse B for 12 USD, ending up 2 USD as a “profit” for the central warehouse. Feel free to ask / post in the comments if this aspect is relevant for you, there are some ideas and possibilities there, but from time to time comes a customer requirement which cannot be fulfilled with standard options.
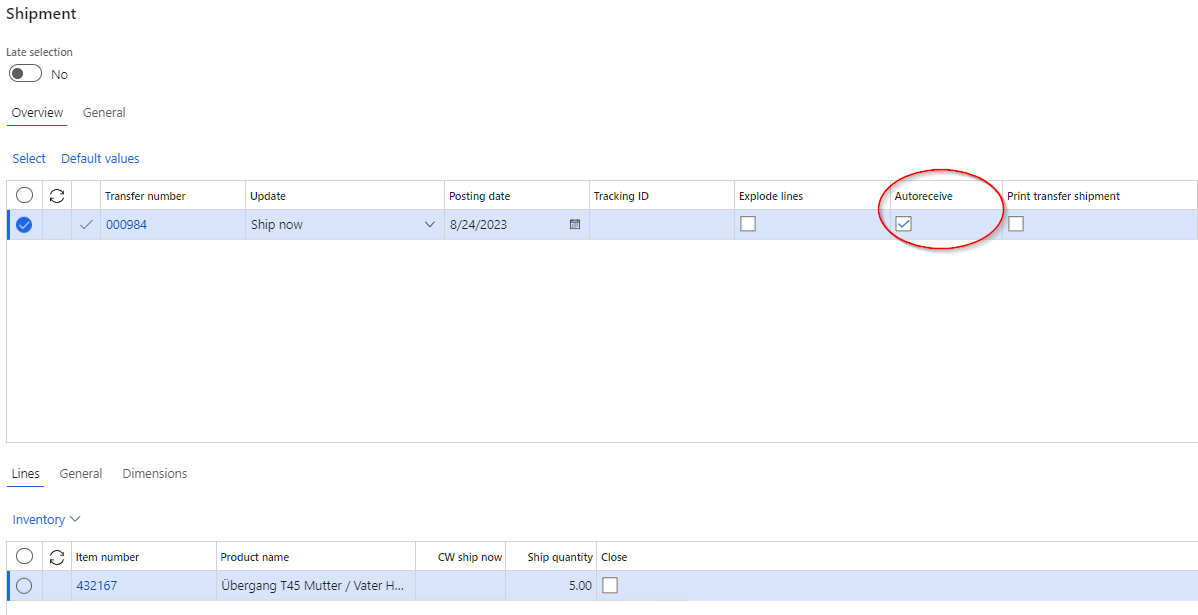
Trick #5: automatic receipt. You can setup the receipt to be automatic, meaning the shipped items and quantities will be received automatically. This comes useful when you want to save administrative efforts. Note, if your business processes are different, for example items might be damaged during transport, you should still do the receipt manually.

Let’s discuss two additional tricks which might provide additional information about what and how to setup regarding transfer orders.
Ship now
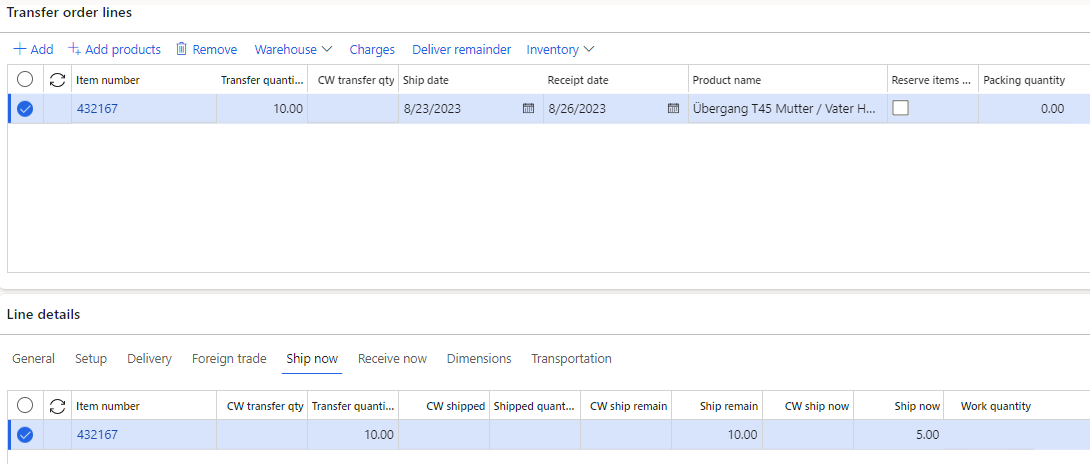
Ship now lets you manually define a quantity for a partial delivery. If the order is for 10 pcs, but you know that a first delivery of 5 pcs is enough, the rest 5 pcs can be delivered later, you can enter 5 pcs into the field “Ship now”. You can do the picking and shipping for this 5 pcs – receipt as well of course. Pro: it is an easy way to administer your partial delivery. Con: this option does not split your line, so you have to take care of the open 5 pcs quantity, and as the delayed due date is not separately managed, MRP will also not consider it.

Transfer warehouse
As already mentioned before, the system always uses a transfer warehouse. If you ship 10 pcs of item A, and you receive 9 pcs manually, because 1 pc is damaged, the 1 pc will remain in the transit warehouse. Unfortunately, I haven’t find a workaround to cancel the shipping of this 1 pc, and it is also not ideal to have the transfer open and the 1 pc open. The solution is to receive the 1 pc, and either book it as scrap (movement or adjustment journal for example) on the destination site, or if the physical and financial transactions should refer to the sending site, a separate transfer order (or transfer journal) should be entered and processed for the return. After the return, the scrap can be booked on the original sending site (warehouse).
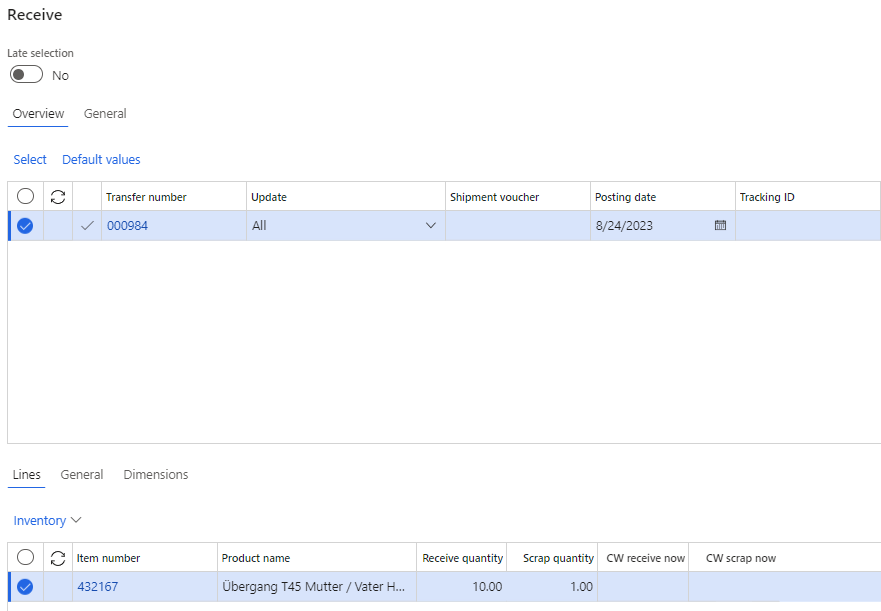
Trick #6: if the destination warehouse should be responsible for the scrap, you can also use the scrap quantity on the receipt. Note, that the scrap quantity is deducted from the total received quantity, so in the example above, you should enter 10 pcs as received, and 1 pc as scrap, this will result in 9 pcs on stock and 1 pc scrapped.

Feel free to comment this article. If there is interest, I am happy to write another article on transfer journals, and the comparison between the two solutions.
Dynamics 365 F&O : Transfer order processing
This was originally posted here.


 Like
Like Report
*This post is locked for comments