Advanced Connected Field Service Part 1
Views (764)
 Kyle Hill
If you haven't yet had the chance to look into Microsoft Dynamics 365 for Field Service, I definitely recommend that you do! While customer service is key to just about every organisation on the planet, Field Service enables this function to become mobile. Yes, I am simplifying this somewhat, but in my eyes, that is the key conceptual difference. What makes Microsoft different in this space is that they have a comprehensive IoTability backed by the class-leading Azureplatform. Even further than that, Microsoft have invested in creating a seamless solution that combines Field Service through Dynamics 365 and extends it with the rich capabilities of the IoT platform and the result is the Connected Field Service (CFS) solution. This CFS solution can enable organisations to get started with business related IoT scenarios in a matter of hours and truly is a differentiator when comparing other offerings out in the market.
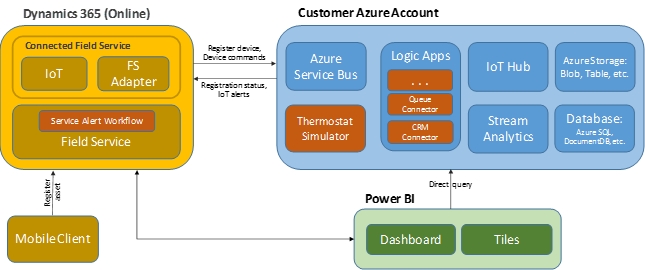
This series of blog posts is going to look at the fundamental architecture and how it can be extended to start achieving some advanced scenarios. To get started, it is always useful to see what the actual architecture looks like diagrammatically, so here you go:
ref: https://docs.microsoft.com/en-us/dynamics365/customer-engagement/field-service/developer/connected-field-service-architecture
From here you can see that there are three main parts to the solution:
Dynamics 365 for Field Service (yellow)Azure (blue)Power BI (green)
From this illustration, you should observe that Dynamics 365 plays the part of facilitating the business logic and process around the execution of the actual field service activities, while the Azure components provide the plumbing and infrastructure required to connect all of the devices and components into an actionable model, and finally the Power BI elements add a level of reporting and dash-boarding that can quickly visualise the current state of affairs.
* If you haven't already seen this, there is a great how-to guide provided by Ben Vollmer and team from Microsoft here. This guide will take you through deploying the CFS solution and components and connecting it to an actual device.
With that said, lets have a look at what actually gets deployed. Firstly, looking at Dynamics 365, you will see that the following solutions get deployed:

These two solutions represent the two smaller yellow blocks in the Dynamics 365 component and are mapped as follows:
IoT (from the Dynamics 365 block) maps to the IoTConnector solutionFS Adapter (from the Dynamics 365 block) maps to the ConnectedFieldService solution
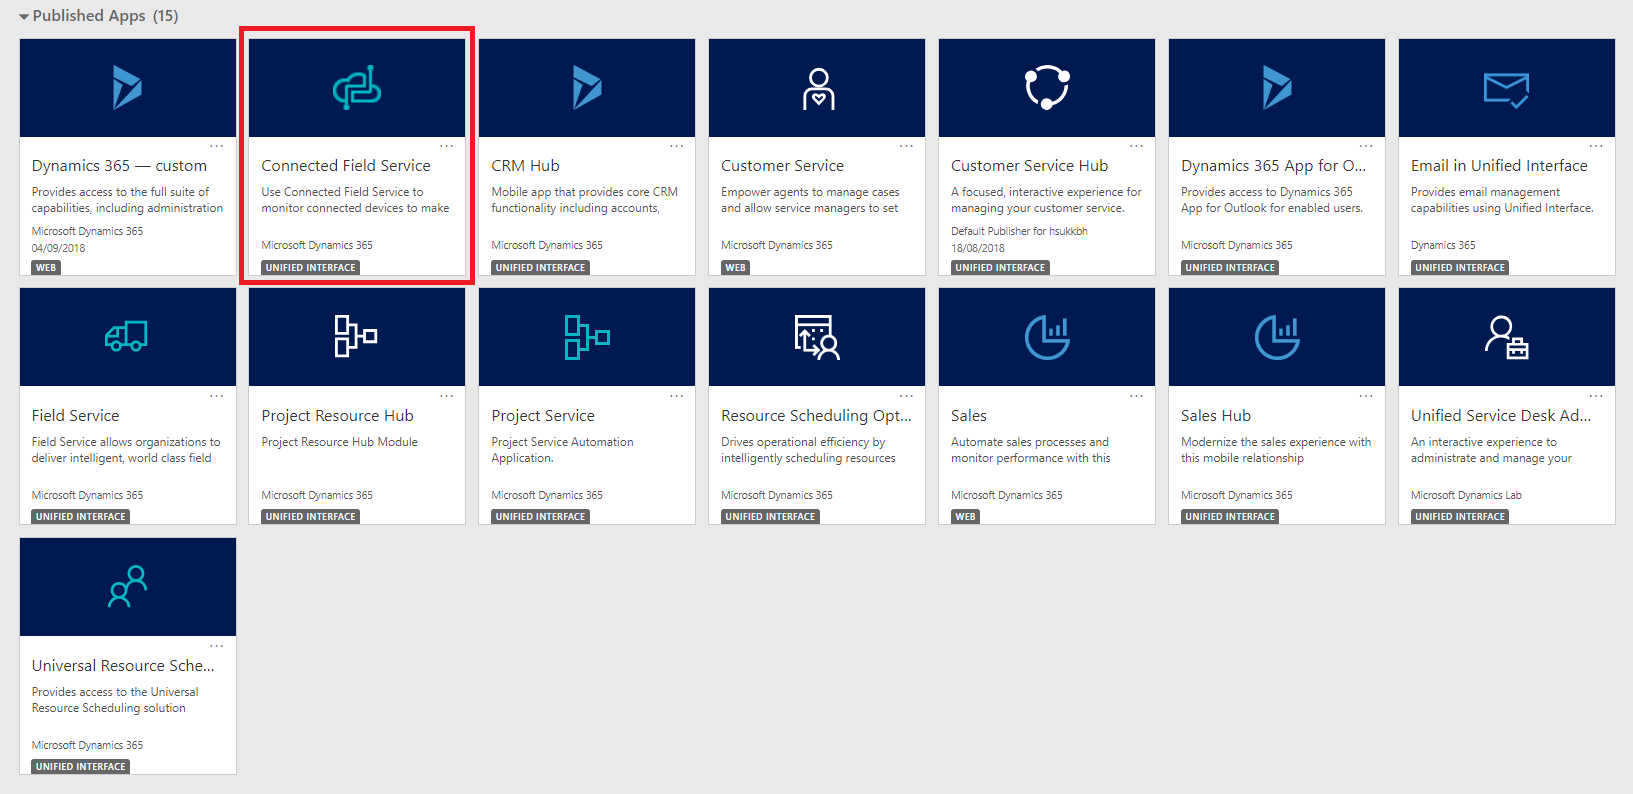
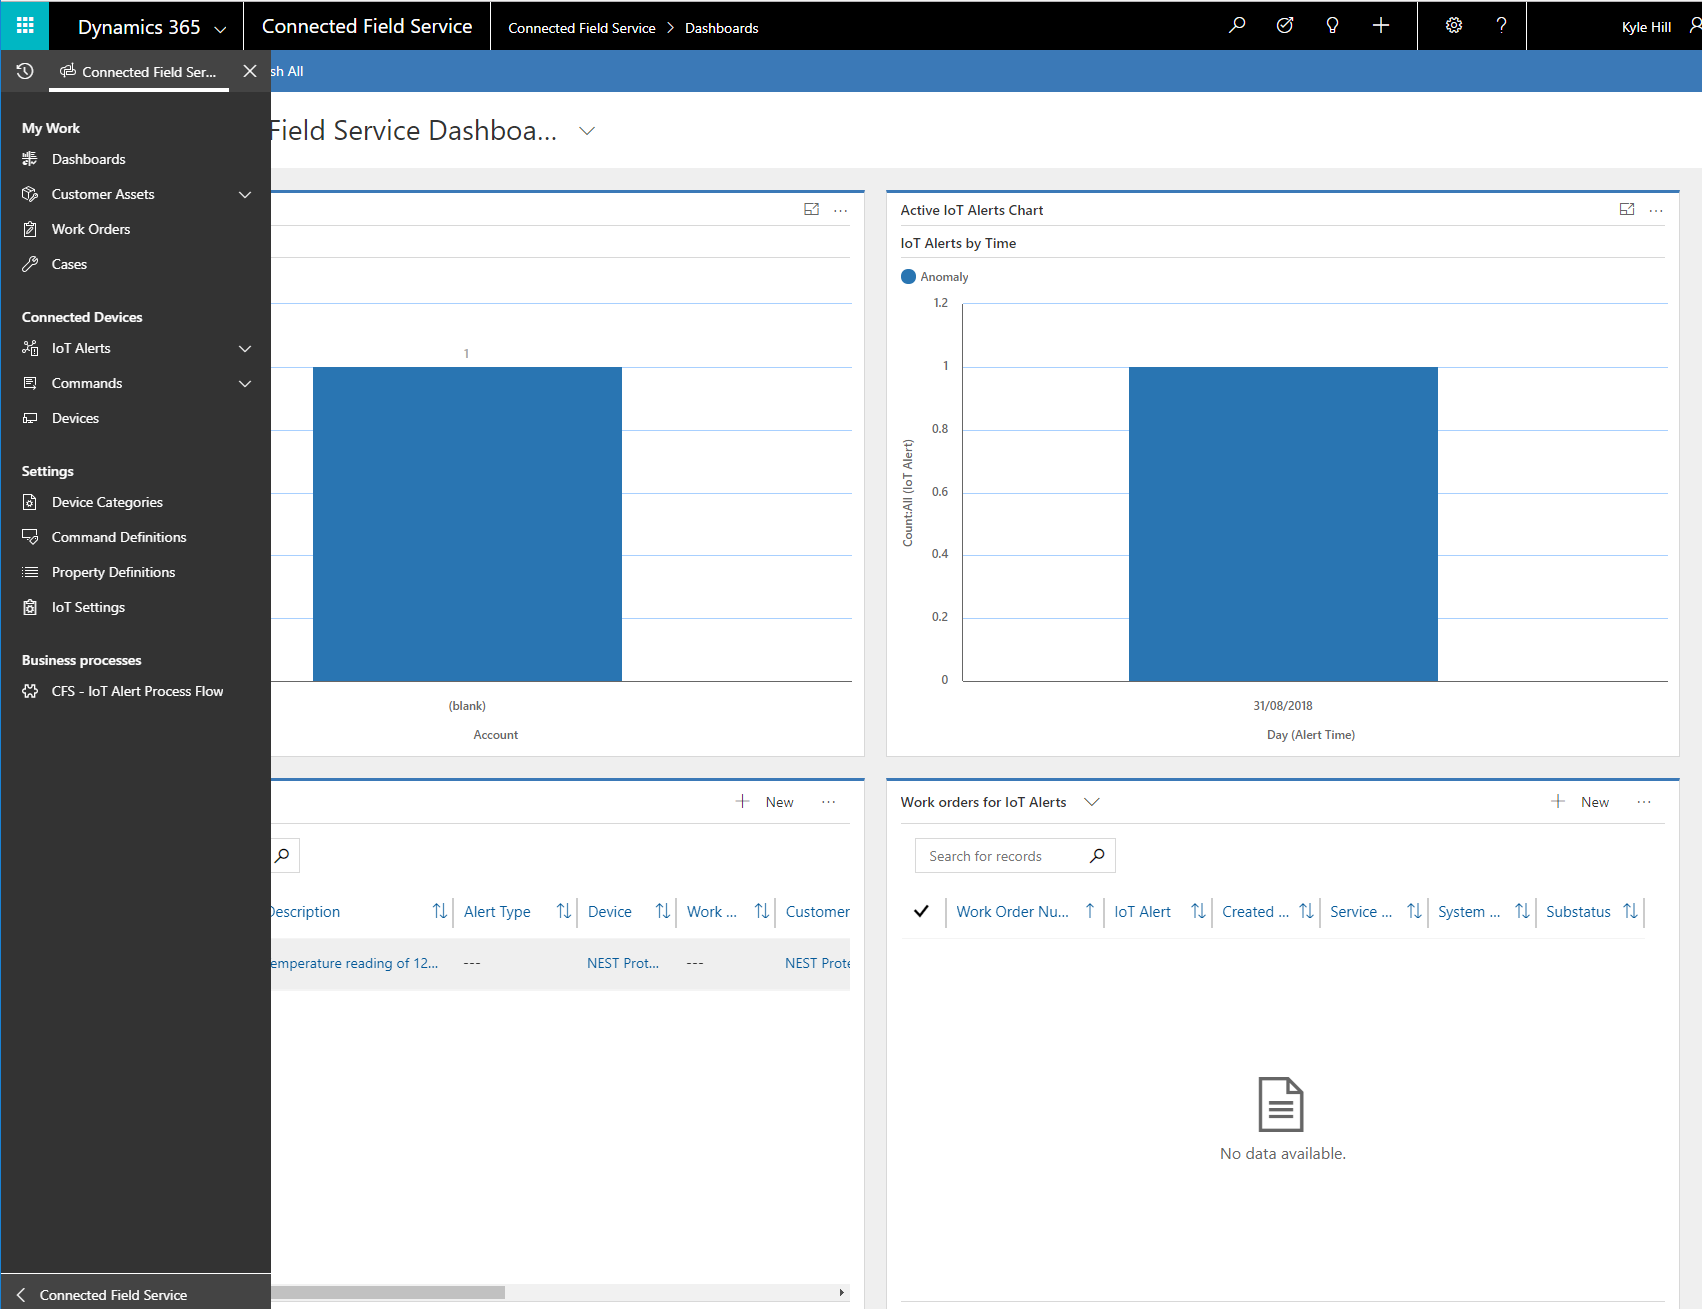
What you should also notice is that you get a dedicated app through which you can access the functionality. This app is built in the new, and now standard, Unified Client Interface (UCI) and looks like this:
Now for the Azure components. When you browse to the Azure Resource Group that you selected during deployment, you should observe the following assets that have been deployed:
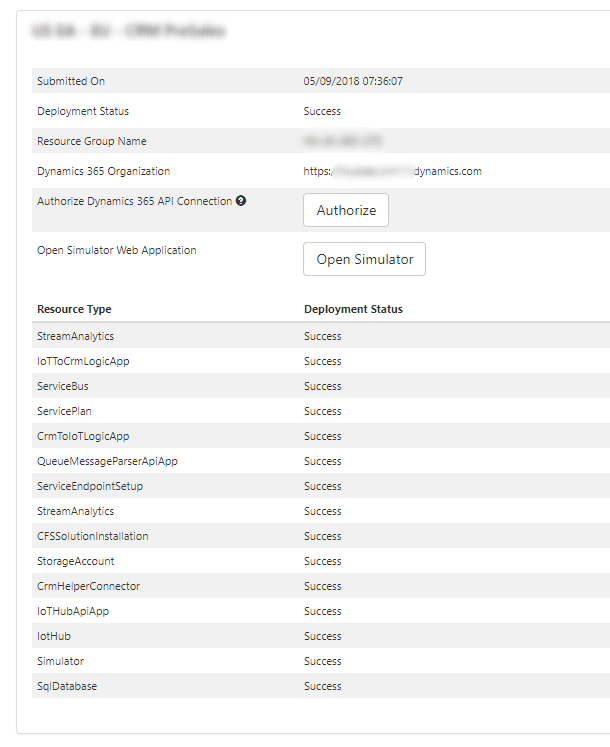
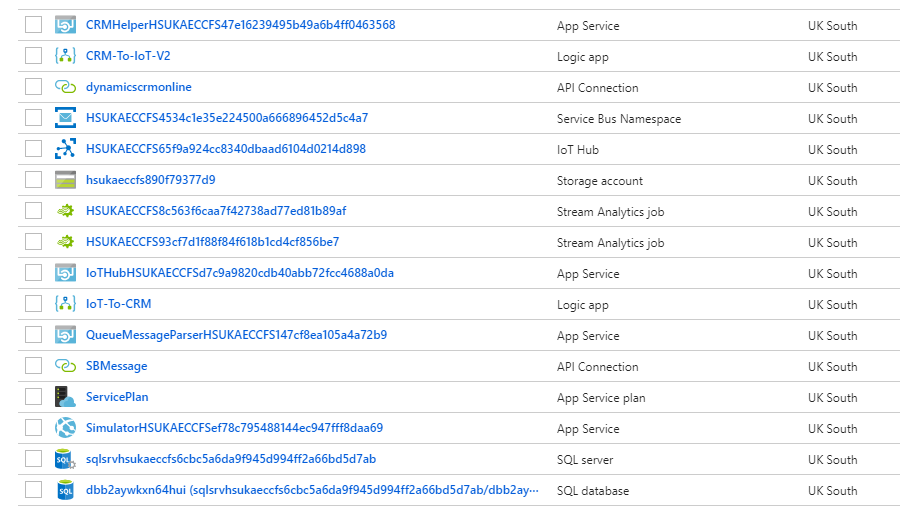
From the above, this is how the elements map to the blocks from the Customer Azure Account component:
Azure Service Bus (from the Customer Azure Account block) maps to the 'ServiceBus' and 'QueueMessageParserApiApp' elements from the CFS deployment (first) image above. In the Azure Resource Group (second) image above, the 'HSUKAECCFS4534c1e35e224500a666896452d5c4a7' and 'QueueMessageParserHSUKAECCFS147cf8ea105a4a72b9' elements represent the actual items deployed.
Thermostat Simulator (from the Customer Azure Account block) maps to the 'Simulator' element from the CFS deployment (first) image above. In the Azure Resource Group (second) image above, the 'SimulatorHSUKAECCFSef78c795488144ec947fff8daa69' element represents the actual item deployed.
Logic Apps (from the Customer Azure Account block) maps to the 'CrmToIoTLogicApp' and 'IoTToCrmLogicApp' elements from the CFS deployment (first) image above. In the Azure Resource Group (second) image above, the 'CRM-To-IoT-V2' and 'IoT-To-CRM' elements represent the actual items deployed.
IoT Hub (from the Customer Azure Account block) maps to the 'IotHub' and 'IoTHubApiApp' elements from the CFS deployment (first) image above. In the Azure Resource Group (second) image above, the 'HSUKAECCFS65f9a924cc8340dbaad6104d0214d898' and 'IoTHubHSUKAECCFSd7c9a9820cdb40abb72fcc4688a0da' elements represent the actual items deployed.
Stream Analytics (from the Customer Azure Account block) maps to the two 'StreamAnalytics' elements from the CFS deployment (first) image above. In the Azure Resource Group (second) image above, the 'HSUKAECCFS8c563f6caa7f42738ad77ed81b89af' and 'HSUKAECCFS93cf7d1f88f84f618b1cd4cf856be7' elements represent the actual items deployed.
Azure Storage (from the Customer Azure Account block) maps to the 'StorageAccount' element from the CFS deployment (first) image above. In the Azure Resource Group (second) image above, the 'hsukaeccfs890f79377d9' element represents the actual item deployed.
Database (from the Customer Azure Account block) maps to the 'SqlDatabase' element from the CFS deployment (first) image above. In the Azure Resource Group (second) image above, the 'sqlsrvhsukaeccfs6cbc5a6da9f945d994ff2a66bd5d7ab' and 'dbb2aywkxn64hui (sqlsrvhsukaeccfs6cbc5a6da9f945d994ff2a66b' elements represent the actual items deployed.
*There are also some additional connection and helper components ('ServicePlan', 'ServiceEndpointSetup', 'CrmHelperConnector') that are deployed that make up the remainder of the assets in the Azure Resource Group. As these are generally support functions, we will not be focusing on them for now.
Now that we have an understanding of what's what, and the actual resources that have been deployed, we can dig into the actual data flows that enable the solution to operate. For this scenario we will be using the simulator to generate alerts so that we don't introduce a dependency on a physical device... for now.
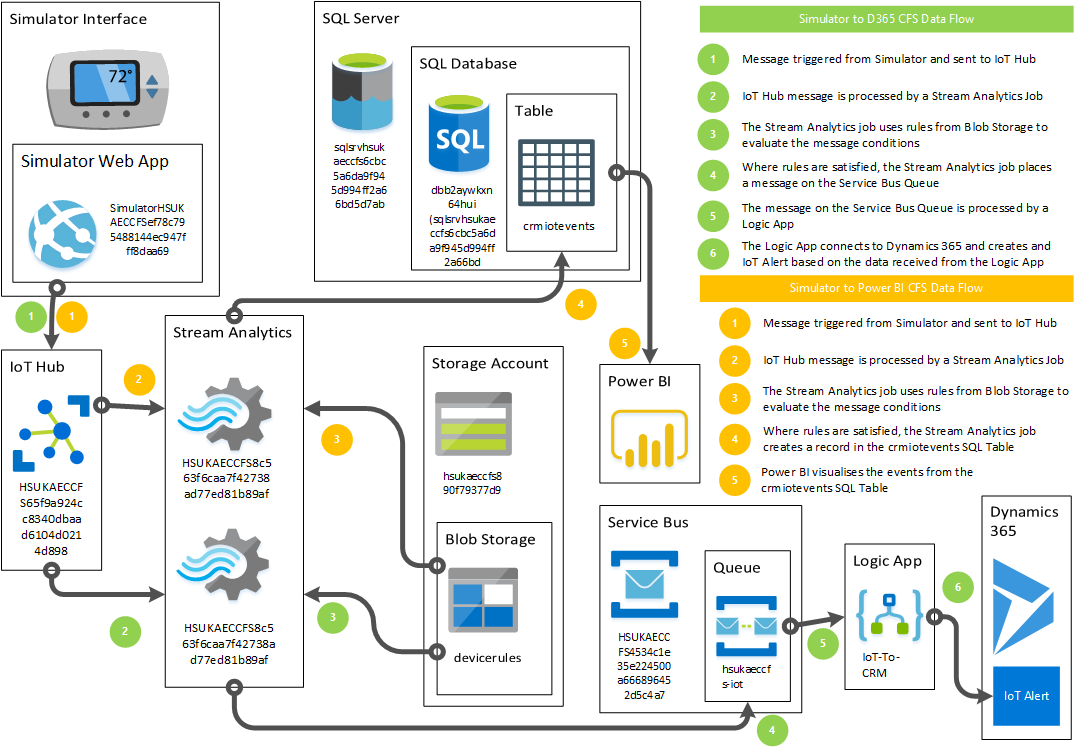
Complementing this is the ability to send a command back to the 'device', which is achieved as follows:
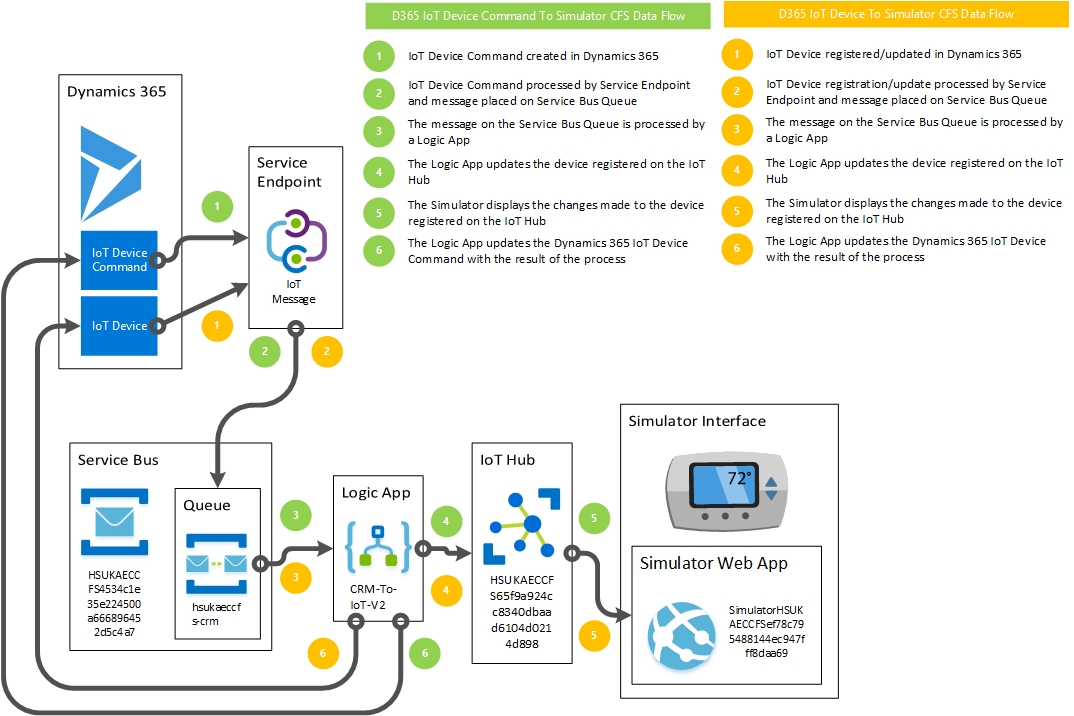
*For your convenience, the Visios are also available here.
Now that we have a solid understanding of the fundamentals of the CFS solution, it should make it much easier to extend as we will see in the next post.


 Like
Like Report
*This post is locked for comments