


 3,566
3,566 Like
Like Share
Share
 Report
In this blogpost, we examine the process of hiring a new employee to salary generation in Microsoft Dynamics AX for Finance and Operation. Some of the key points this blogpost is:
- Defining and understanding titles, jobs, positions required for the hiring a new employee
- Worker setup (like fixed compensation plan, default tax region) that is a critical aspect of the salary generation
- Salary generation, which will differ in each company, but has become a part of almost every implementation.
Let’s dive in and hire a new employee, and to do that we will need to follow a five-step process.

Business scenario:
Imagine that your company has a job – let’s say “Accounts payable controller”. What will be the job, title, and position in this case?
Commonly, job is a list of responsibilities, competencies and tasks required to perform the job. In this case, job will be “Accounts payable controller”.
Job must have a title. So, think of a title as a job title. In our case, title might be AP Controller, Controller, Accounts payable controller etc.
For each job, you can have one or many positions. For instance, you would like to have Accounts payable controller per each department in your company or one Accounts payable controller per region. The more people you have for this job, the more positions you will have.
Titles
Navigate to Human resources > Setup > Titles
Click the New button. Once you open the form, you will see the list of titles available in your company.
Provide the title in the Title field.

Later on, you can select any of these titles when you create a job.
Jobs
Navigate to Human resources > Jobs > Jobs
Click the New button.
Provide the Job and Job Description.
Select the Title for the created job.

Positions
Navigate to Human resources > Positions > Positions
Click the New button.
Select the Job and Department.
Later on, you can assign only one worker to the created position. If you hire additional recourse for the same position, you will need to create a new position.

Pay attention to the title. Title will be inherited from the Job assigned to the position.

Expand Payroll tab.
Select Pay cycle – weekly.

Select Paid by and Annual hours. Make sure that Generate salary flag is marked.

Select Default earning code with Hourly rate basis.
Earning code will define the type of earning that worker receives. For our particular case, we will calculate regular salary.

Select the Schedule – Normal working schedule (working days and hours).

Worker
Navigate to Human recourses > Workers > Employees
Click the New button.
Provide First name and Last name.
Select Employment start date.
Select created position in the Position field.
Specify the Assignment start date. Keep in mind that the assignment start date must be later than or equal to the activation date of the Position.

Click the Hire button.
Fixed compensation plan
Navigate to Human recourses > Compensation > Fixed compensation > Fixed compensation plan
Click the New button.
Provide Plan name, Description, Type, Currency, Pay rate conversions.
In our case, we will be using 52 working weeks for our employees. These pay rate conversions will be used to calculate the different pay rates shown on an employee’s fixed compensation plan.


Save the plan and click Set up compensation button.
Fill in Reference setup field.

Click OK button.
Click Compensation structure button (Initially it was called Compensation grid).
Create the structure of your rates.

Open worker details form and switch to the Compensation tab.

Click Fixed plan link.
Click the New button.
Select Hire action and select created position.
In the Plan field, select the created plan. Basic plan that we created is invisible since Eligibility rules were not set up.

Let’s navigate to the Human resources > Compensation > Eligibility > Eligibility rules.
Eligibility rules need to be assigned to each plan. Eligibility rules determine the eligible employees based on the jobs, job functions, job types, departments, labor unions or compensation regions/locations.
Create new rule by clicking New button.
Specify the Plan, and Job.

Now, if you go back to the employee compensation plan, you will be able to select the created plan.

After plan selection, choose the Step.

The reason why Step is not displayed here, it’s because the Step was not assigned to the Job of the employee.
Let’s switch to the Job form and populate the Level.

Go back, and now it should be possible to select the rate.

Pay rate will be automatically displayed after Reference point selection.

Review Employee fixed compensation.

Click OK button and close the form.
Worker tax region and Default tax region
On the Employees from, click Payroll tab on the Action pane.

Select Worker tax region button.
Click the New button and select Tax region from the drop-down list.

Close the form.
Select Default tax region button.
Make sure that Default tax region is selected.

Close the form.
Salary generation
We will go through the following process to generate the salary:

Earning statements
Earning statement will provide information about how many hours employee worked.
There are 2 options how you can create Earning statement.
Manual Earning statement creation
Navigate to Payroll > Earning statements > All earning statements
Click the New button.
Populate the following fields:
- Worker
- Pay cycle
- Pay period
- Earning date
- Earning code

Rate was automatically calculated.
Now let’s stop for a second and I will describe how this rate was calculated.
The calculation below based on the Hourly rate basis of the Earning code. The logic of the calculation is the following:
- The system calculates Annual pay rate:
In order to calculate Annual pay rate, first, need to define Pay rate from fixed compensation plan assigned to the worker. In our case it’s 18$
- Next, Annual conversion factor needs to be defined based on the Pay rate conversion identified in the fixed compensation plan. In our case it’s 52$

- Next, pay rate multiplied by annual conversion factor
Annual pay rate = Pay Rate * Annual Conversion Factor. In our case, Annual pay rate = 18 * 52 = 936
- The system calculates Hourly Rate:
The system determines the annual normal hours from the position assigned to the worker. In our case, it’s 2080

Next, the system divides Annual pay rate by Annual normal hours. In our case, it’s 936/2080 = 0.45
To sum up, Rate = (Pay Rate * Annual Conversion Factor) / Payroll Normal Hours
Rate = (18 * 52)/2080 = 0.45
Automatic Earning statement creation
Navigate to Payroll > Workers > Employees
Click Payroll tab on the Action pane.
Click Earning statement button.

Select Pay cycle, Pay period and click OK.

You will see the message that earning statement was created.

Navigate to All earning statements, find the created one.

Quantity was automatically calculated.
Now let’s stop for a second and I will describe how this quantity was calculated.
The logic of the calculation is the following:
- The system identifies annual payroll normal hours from the position. In our case it’s 2080
- The system calculated annual number of days. In our case it’s 365 days
- The system divided payroll normal hours by annual number of days. In our case it’s 2080 / 365 = 5.698630136986301. It means that every day, worker should work 5.698630136986301 hours. Assume that this is work hours per day;
- Since we have weekly pay period and we selected the following pay period 1/8/2019-1/14/2019, let’s calculate how many days from this he actually worked. We hired our worker 1/11/2019. Form 1/11/2019 till 1/14/2019 it’s only 4 days.
- Multiply work hours per day by worked number of days within the week. In our case, it’s 698630136986301*4=22.79452054794521
To sum up, Quantity = (Annual Payroll Normal Hours/ Annual number of days)* Worked Number of Days)
Quantity = (2080/365)*4 = 22.7945 hours.
Release earning statement
Navigate to Payroll > Earning statements > All earning statements
Click Release earning statement button.

Keep in mind that in order to proceed with releasing of the earning statement, accounting setup must be completed. In our case, Salaries and Wages expense account has been selected.

Payment status will be changed to Released.

Click Pay statement button on the Action pane after refreshing the form.
On the Generate pay statement form, chose the payment date and click OK.

Message that pay statement was generated would appear.

Navigate to Payroll > Pay statements > All pay statements
Open the Detail form of the created pay statement.

Submit for payment
Click Submit for payment button on the Action pane

Click Submit button.
Message that payment journal was created would appear.

Payment journal
Navigate to Payroll > Pay statement processing > Payment journal
Find recently created journal and click Lines button.
You will notice that Amount = Salary amount – Deducted taxes.

Click Functions -> Generate payments button.

Click OK.
Validate check number.

Click Document link and instead of Printer, select the Screen.

Review the check.

Status has been set to Sent.
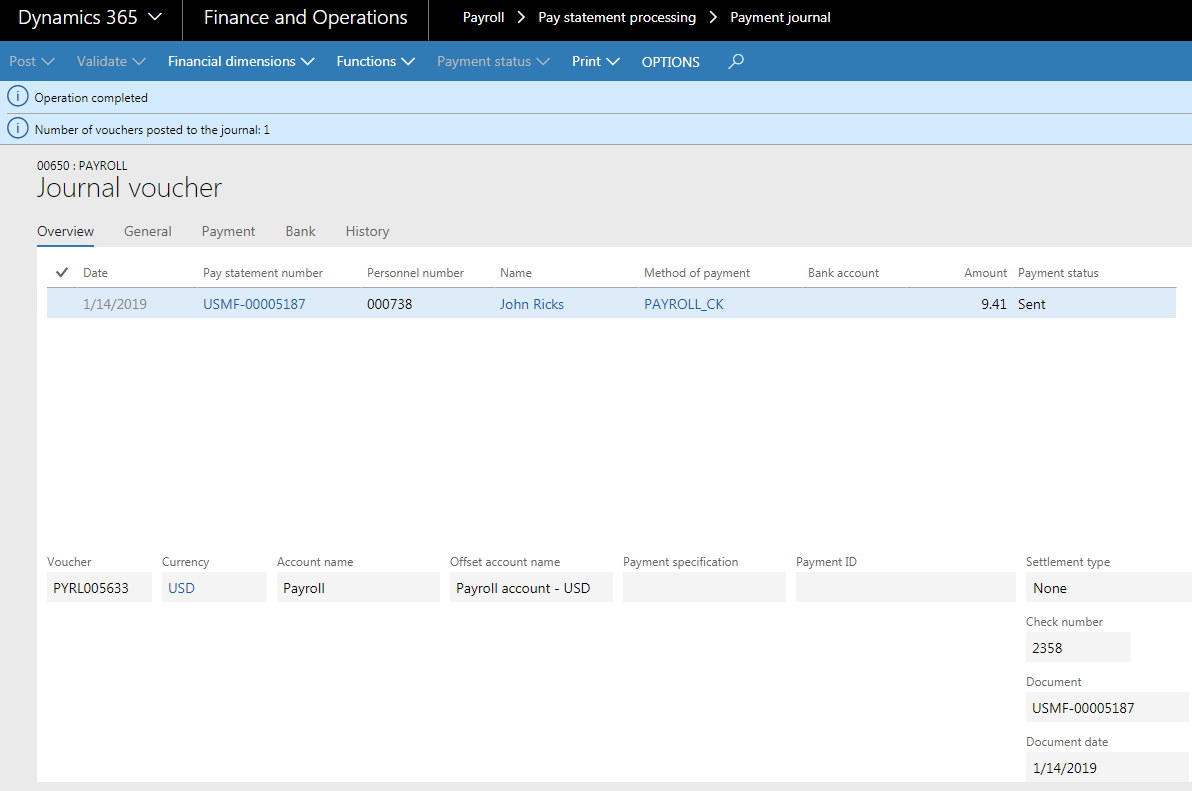
Go ahead and Post the journal by clicking the Post button.
Message that journal was posted would appear.
That’s it for now!
*This post is locked for comments