In Short:
1. create a configuration, derived on the Fixed asset data model
2. create a configuration, derived on the fixed asser roll forward format / report (data model: the new one you just created)
3. Click on 'Designer' when you are on the new data model
4. Add a field under FixedAssetEntryPoint->FixedAssetRollForwardTemp (child with active node)
5. Map to model
6. Designer
7. In the most right list, unfold your FixedAssetRollForwardTemp and go to the added field. You will see that it is not bold as the others, because no mapping has been done yet.
8. Find the right value that you want to add from under the unfoldable related tables in the FixedAssetRollForwardTemp-table in the mid section of your screen
9. For financial dimensions of your asset books, choose:
ProjectDimension: String = @.'>Relations'.AssetId.'book()'.'>Relations'.DefaultDimension.DIM2_PROJECTVALUE (project example)
Unfold AssetId -> Book() -> relations -> and choose the financial dimension that you want. Add another dimension if you want the 'Name' of that dimension.
10. Make sure you are on the added field in the data model on the right-menu in the screen
11. Click on 'Bind'
12. Save
13. esc esc (return to the Main Electronic Configuration Menu.
14. Change the status of your data model to 'complete'
15. Select your fixed asset roll format -format and click on 'attachments'
16. Designer
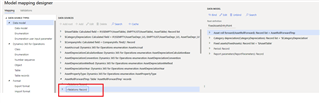
17. Open
18. Add a column where you want to add a field in Excel and 'summarize and merge'. Give it a fixed name 'FinancialDimension2'
19. Go to Formulas > Name Definitions and add the name of the values you want to add (remember this, you'll need it later: for instance (FinDim2Value)
20. Select the cell under the header where you want the records to show.
21. Save.
22. Go back to D365FO and Delete the Excel. Don't worry it will not do anything bad. You still have a copy in the original one.
23. Select New -> File -> Browse and choose the Excel you just created.
24. Expand all fields and go all the way to vm_range.
25. Click on 'add-> Cell'. In Excel range, paste the same values as you typed in for the name definition of the formula 'FinDim2Value'
26. The cell will be added all the way on the bottom. Move it up with the arrow (create more than one to move multiple fields simultanuously).
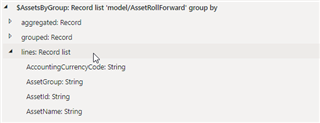
27. Make sure it's at the same place as you placed in the Excel.
28. Select the field and click on mapping
29. Open '$AssetByGroup' and 'lines: Record list'. Select the record you mapped to the data model in step 10 and click on bind.
30. Save (this might take a while)
31. Ignore the errors
32. Go back to the Configuration-menu and change the status to complete of your format.
33. Your format will be available if you run the fixed asset roll forward report from the dropdown.
This video is really good, the only thing is that he doesn't give the example of going another level deeper (financial dimensions of AssetBooks). He binds something from the AssetTable, which is less complicated.
If you want to add financial dimensions from AssetBooks, be sure to go through the relationship of AssetId, just unfold and go to Books(), than to financial dimension, or the relationship of the dimension (and the relationship of that value, if you want to add the 'Name' instead of the code)
It's doable without creating a calculated field, and just 'binding' the right added field in the data model to the field in the data source.
The solution of adding a calculated field will be more clean, because you prevent errors for null-values.


