


Azure AD Authentication with Dynamics CRM
 Danish N.
 255
255
 Like
Like Share
Share
 Report
People have been asking me on how to setup Azure Active Directory Authentication in order to authenticate D365 without using username and password; especially when you want to write the authentication in a sandbox mode.
Let’s take a look at it.
First you would need to register your App in Azure Active Directory.
App Registration in Azure AD
Browse to portal.azure.com and login with your Azure credentials. From “Home” navigate to “Azure Active Directory”. Now, click on “App Registration (preview)”. On the top ribbon you will see a button called “New Registration”; clicking it will open an interface where you will need to enter the name of your app – specify something that you will remember, the reason for creating this app, in future.


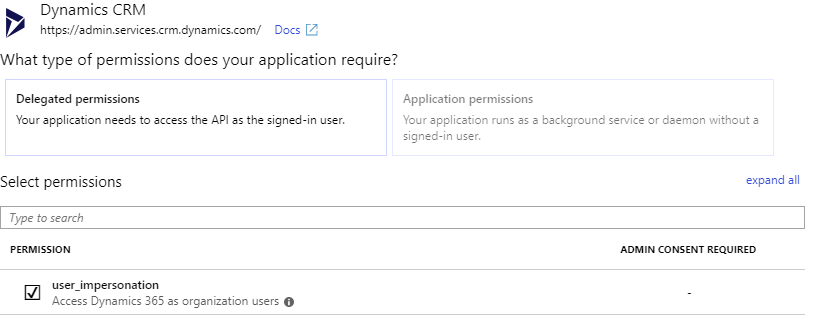
Add API Permission to App
Once you have created the App, you will now need to add API Permission to Dynamics 365. To do so, you will have to click on the App and then click on “Add Permission”. From the list of Microsoft API presented select Dynamics 365 and click “Add”.
Create Client Secret
Now, you will have to create “Client Secret” this is nothing but replacement of password. Instead of exposing the actual password you need to use client secret. To create client secret, click on Certificates & secrets. Click on “New client secret”; copy the client secret and store it somewhere safe as this is non-recoverable.
Create Application User in D365 CE
To create the application user in CRM, navigate to Settings -> Security -> Users. Click “New”; if the form loaded is named “User” then change the form to “Application User”. Populate Full Name and Email Address of this user – you can specify anything you would want in the email address. Now, copy the Application Id from Azure App you registered during this process (shown below). Once you save it, CRM will populate the Application ID URI & Azure AD Object ID.
Application User in CRM does not consume license

Authenticate D365 in custom app using ADAL libraries
Install ADAL libraries in your project
You can install the libraries from NuGet – search for name “Microsoft.IdentityModel.Clients.ActiveDirectory”
Configure project to use ADAL settings
In your app settings, configure Tenant, ClientId and Redirect URI.
Tenant – it is the domain of your Azure AD
ClientId – it is same as Application Id
Redirect URI – this is the redirect URL that you have registered on your App
Using ADAL
First initialize AuthenticationContext in your application by specifying the ‘authority’.
string authority = String.Format(CultureInfo.InvariantCulture, "https://login.microsoftonline.com/{0}", "your_azure_AD_domain");
var authContext = new AuthenticationContext(authority);
Now initialize ClientCredentials. For this you will need ClientId (same as Application Id) and Client Secret (created in earlier stage).
var clientCredential = new ClientCredential(clientId, clientSecret);
Let’s get the authentication token.
try
{
    // ADAL includes an in memory cache, so this call will only send a message to the server if the cached token is expired.
    AuthenticationResult result = await authContext.AcquireTokenAsync("your_dynamics_crm_url", clientCredential);
}
catch (AdalException ex)
{
    // Handle error
}
Once you have retrieved the authenticated token you can use it to query CRM data by passing the token as an “Authorization” header to your request.
Authenticate D365 in custom app using Web Request
Sometimes using ADAL libraries can pose problems but you can still get the token with clientId and clientSecret using Web Request.
var resource = "crmurl";
var clientId = "clientid";
var clientSecret = "clientsecret";

var uri = string.Format("https://login.microsoftonline.com/{0}/oauth2/token","azure_ad_domain");
var request = (HttpWebRequest)WebRequest.Create(uri);
request.Method = "POST";
request.Headers.Add("Cache-Control", "no-cache");
request.ContentType = "application/x-www-form-urlencoded";

using (var streamWriter = new StreamWriter(request.GetRequestStream()))
{
    string data = string.Format("client_id={0}&resource={1}&grant_type=client_credentials&client_secret={2}", clientId, resource, clientSecret);
    streamWriter.Write(data);
    streamWriter.Flush();
    streamWriter.Close();
}

Token tokenObj = new Token();
using (var response = request.GetResponse())
using (var stream = response.GetResponseStream())
{
    var settings = new DataContractJsonSerializerSettings()
    {
    UseSimpleDictionaryFormat = true
    };
    var serializer = new DataContractJsonSerializer(typeof(Token), settings);
    tokenObj = (Token)serializer.ReadObject(stream);
}

var _token = tokenObj.AccessToken; // this gives me the actual token
Hope this helps.
Please leave a comment with your questions and share it if you like it.
This was originally posted here.
*This post is locked for comments