


 958
958 Like
Like Share
Share
 Report
Power Platform Dataflow Tutorial Deep Dive
Introduction
Dataflows are a self-service, cloud-based, data preparation technology. Dataflows enable customers to ingest, transform, and load data into Dataverse environments, Power BI workspaces, or an organization's Azure Data Lake Storage account.
Dataflows are authored by using Power Query, a unified data connectivity and preparation experience already featured in many Microsoft products, including Excel and Power BI.
Customers can trigger dataflows to run either on demand or automatically on a schedule.
Dataflows are featured in multiple Microsoft products and don't require a dataflow-specific license to be created or run. They are available in Power Apps, Power BI, and Dynamics 365 Customer Insights.
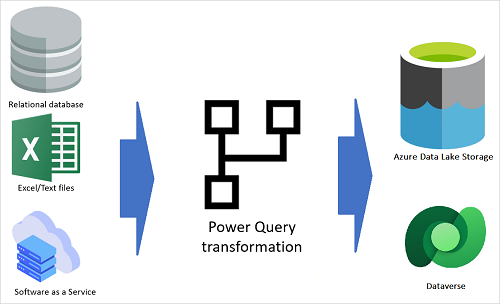
The previous image shows an overall view of how a dataflow is defined.
A dataflow gets data from different data sources.
Then, based on the transformations configured with the Power Query editor, the dataflow transforms the data by using the dataflow engine.
Finally, data are loaded to the output destination, which can be a Power Platform environment, a Power BI workspace, or the organization's Azure Data Lake Storage account.
Dataflows are cloud-based. A dataflow is stored and runs in the cloud. However, if a data source is on-premises, an on-premises data gateway can be used to extract the data to the cloud.
Power Query is the data transformation engine used in dataflow. This engine supports many transformations. It also uses a graphical user interface called Power Query Editor.
In this article we will study the use of dataflow in the Power Platform through a tutorial.
Dataflow in practice
In this tutorial we will import a CSV file into a Dataverse custom table.
Create a dataflow
To create a dataflow just go to make.powerapps.com on your Power Platform environment and select 'Dataflows' in the left pane.
Then click on '+ New dataflow' on the top.
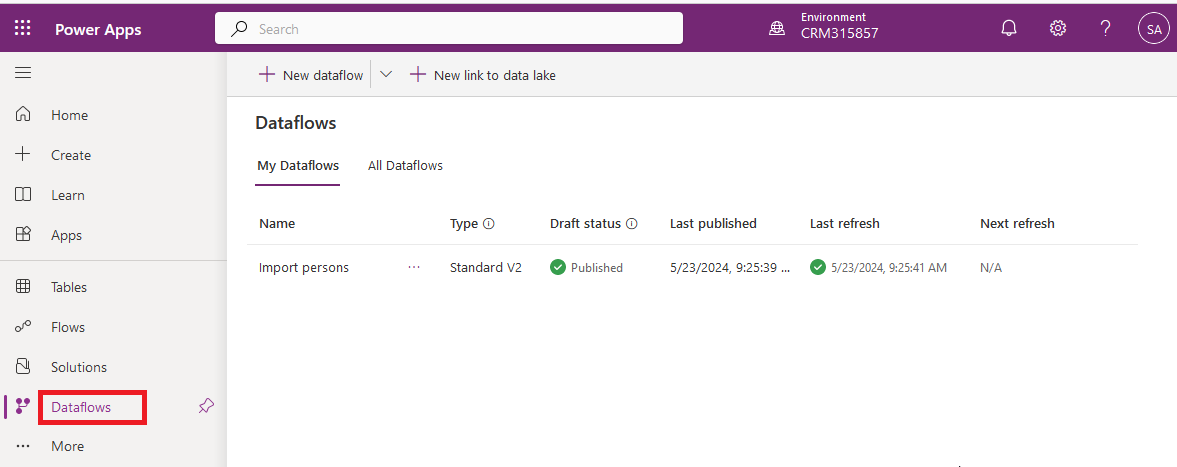
You will get the following screen:

I named my dataflow 'Import persons'.
If you want to load data to an Azure data lake for analytical purposes check 'Analytical entities only'.
In this tutorial I leave the checkbox unchecked as I want to load data into a Dataverse table.
Data sources
First step is to select a data source.
Around 50 data sources are available as you can see below.
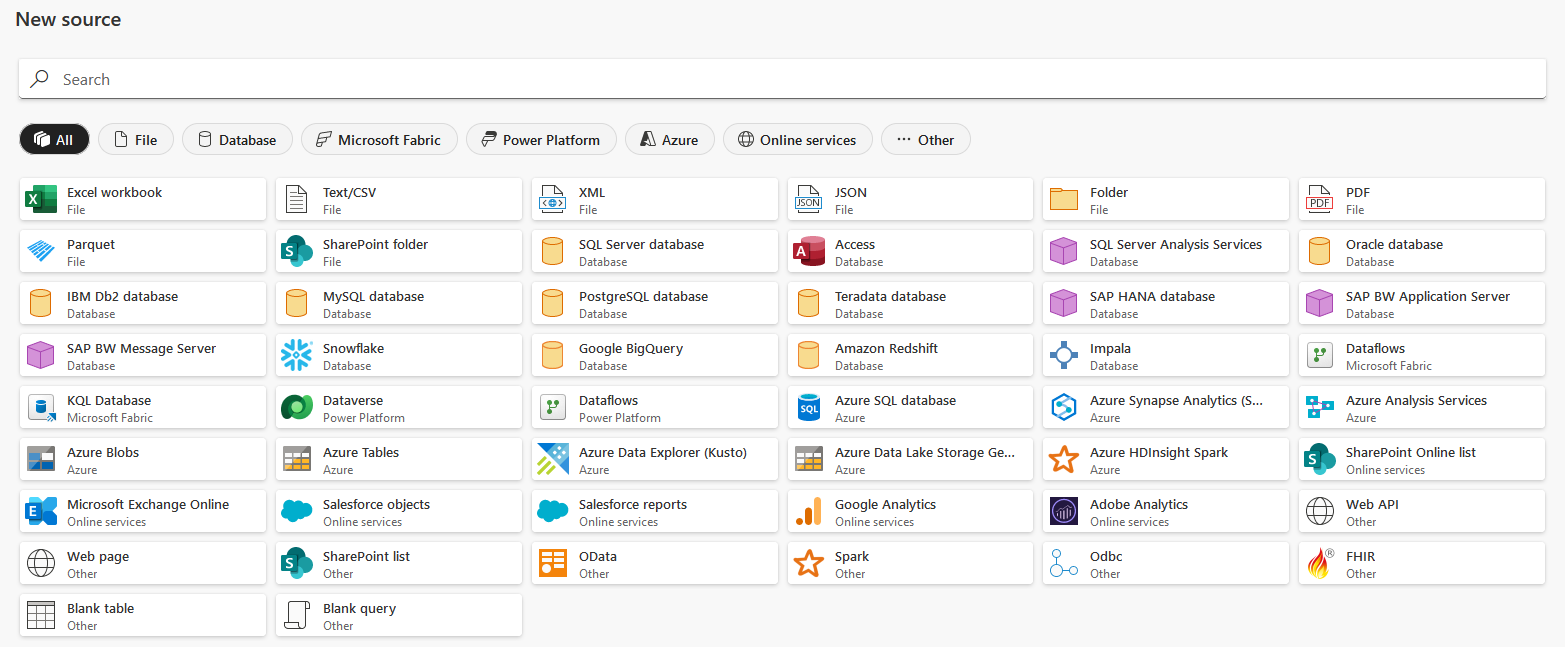
Main types of source:
- Files : Excel, Text/CSV, XML/JSON, ...
- Databases : SQL Server, Oracle, MySQL, PostgreSQL, ...
- Azure : Azure SQL Database, Synapse Analytics, Blobs, Data Lake Storage Gen2, ...
- Online services : Sharepoint, Exchange, Google Analytics, ...
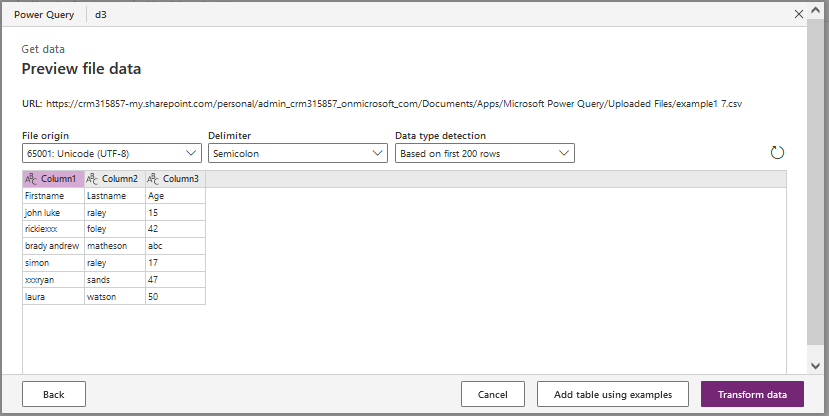
In this tutorial I will use a CSV file. You can directly drag&drop your file in the interface.
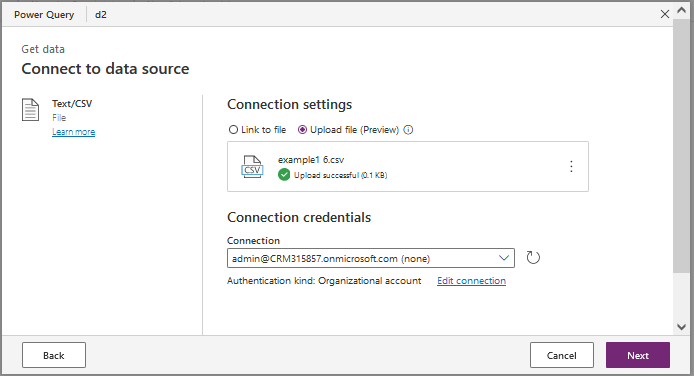
You get a preview of your file. Then click on 'Transform Data'.
Data filtering
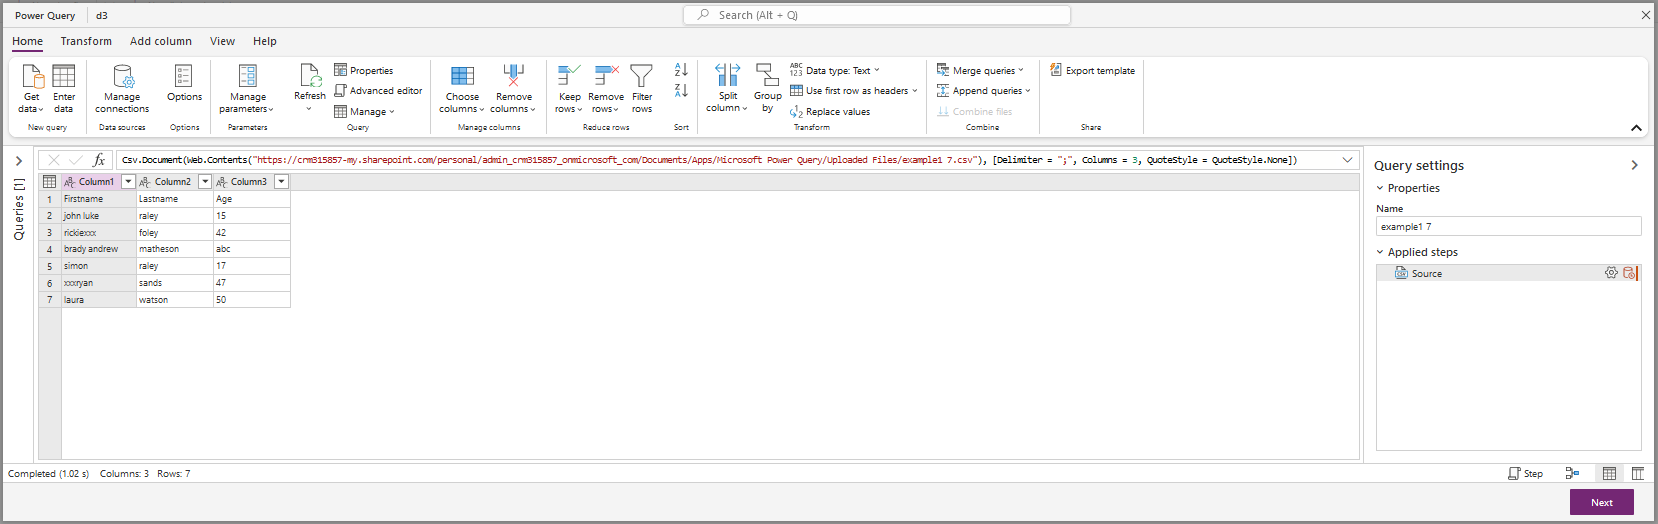
You get the screen of Power Query Editor
At the top we have the formula bar (as in Excel or Power-fx). We will see in this article that we can display the current formula, the full script or hide this formula bar.
Below you can see your data.
And on the right side we have the 'Applied steps' pane with all steps/actions performed. It's a little empty because we've just started, but don't worry it will fill up:
We have several tabs:
- Home : functionalities to filter data and some features of other tabs
- Transform: data transformations
- Add column: add a new column to apply a transformation
- View : display settings
In this tutorial I first click on 'Use first column as headers' in the ribbon as the first line of my CSV file contains column names.
The tab 'Home' contains several interesting features: for instance you can filter rows.
To perform that action you first have to select a column and then click on the button 'Filter Rows'.
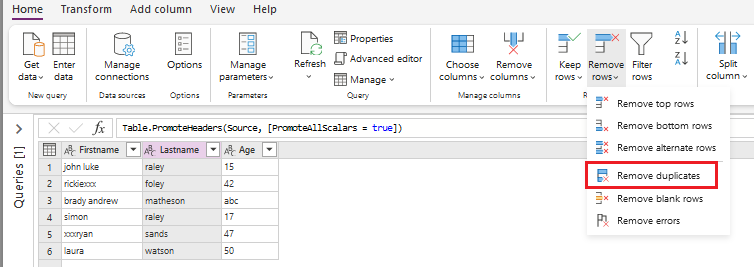
Another interesting feature is the possibility to remove duplicates.
As previously you first have to select a column and then click on the command 'Remove duplicates' in the menu 'Remove rows'.
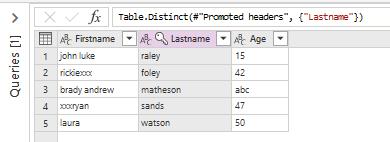
In my example I apply this command on the column LastName : we can see in the screenshot below that we have a duplicate in this column (raley - lines 1 and 4)
And we obtain the expected result:
You can also remove blank rows or lines with errors.
Transformations
When you have filtered your data you can now apply some transformations.
Click on 'Transform' tab. You will get a ribbon dedicated to transformation features.

You can perform many data transformations. This is a non-exhaustive list of transformation features:
- Transform any column:
- Replace values
- Change type
- Detect data type
- Mark column as key
- Rename column
- Pivot/Unpivot columns
- Fill up/down
- Move column
- Transform text column
- Split (by delimiter, number of characters, lower/upper case and more)
- Format (lower/upper case capitalize words, trim, clean and more)
- Extract (length, first/last characters, range and more)
- Statistics (count/distinct values)
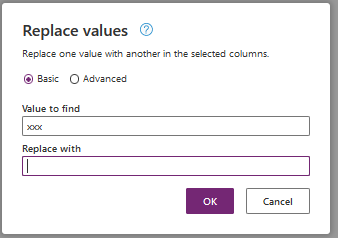
As a first example let's remove the characters 'xxx' in the column Firstname (in rickiexxx or xxxryan).
Select column Firstname and then select the command 'Replace values...' in the menu 'Replace values'
In my example I want to remove 'xxx' so I leave 'Replace with' empty.
And we obtain the expected result:
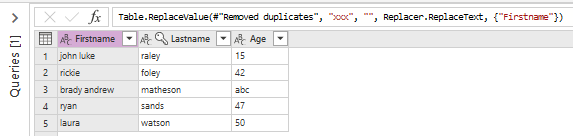
Note that at the top in the formula bar you can see the source code (Power Query M) of the last command :
Table.ReplaceValue(#"Removed duplicates", "xxx", "", Replacer.ReplaceText, {"Firstname"})
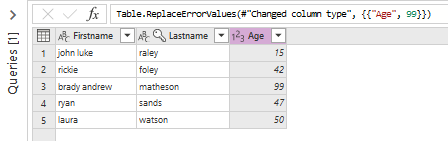
Now let's change data type of column Age. It is currently a text column and I will change it to a whole number column.
We can see that in line 3 the column Age contains 'abc' : let's say that it is an error as this column should contain only whole numbers.
So I first select column Age and then in the menu 'Data type' I select the item 'Whole number'.
This is the result:
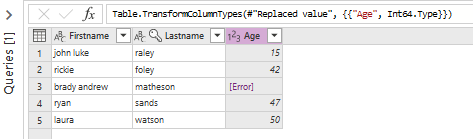
We get an error in line 3. This makes sense as original data 'abc' is not a number.
To solve this problem I select the column Age and select the command 'Replace errors...' in the menu 'Replace values'.
In my example I set value to 99
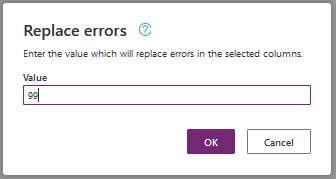
And I get the expected result:
The menu 'Format' contains several interesting commands:
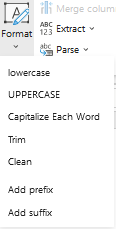
We have the classic commands lowercase, uppercase, trim.
But we also have the nice command 'Capitalize Each Word' (first letter of each word converted into an uppercase letter) and the command 'Clean' that removes all non-printable characters.
Now I apply the command 'Capitalize Each Word' on column FirstName and the command UPPERCASE on the column Lastname.
This is the result:

Add new column
Click on 'Add column' tab, you will get a ribbon dedicated to new columns.

With commands in tab 'Transform' you apply the transformation to the original column (in-place) as we have seen previously.
Commands in tab 'Add column' store the result of the transformation in a new column.
The menu 'Format' we used previously in tab 'Transform' is also in tab 'Add column'.
But if you use one the commands (for instance UPPERCASE) you will see that a new column is created.
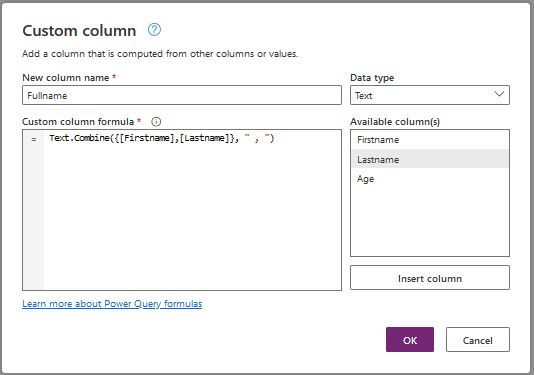
With the command 'Custom column' you add a new column but you cannot select a built-in command : you have to write your code (formula) in Power Query M language.
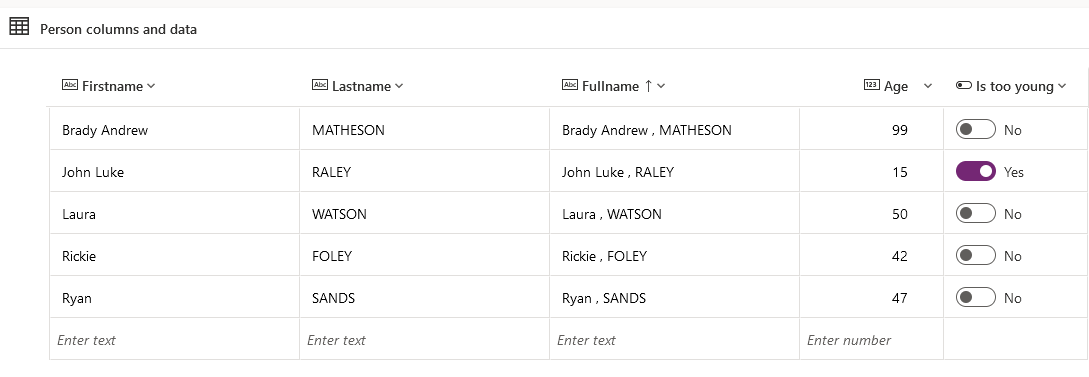
As an example, let's create a column Fullname that concatenates columns Firstname and Lastname separated by a comma.
Click on the command 'Custom column' and set the parameters:
- New column name : Fullname
- Datatype : Text
- Custom column formula: I use the Power Query M functionText.Combine() with the 2 columns Firstname and Lastname and comma as separator
You only have to type your function in the editor and click on fields in the section 'Available columns(s)' on the right to add the columns to the formula.
And we obtain the expected result:

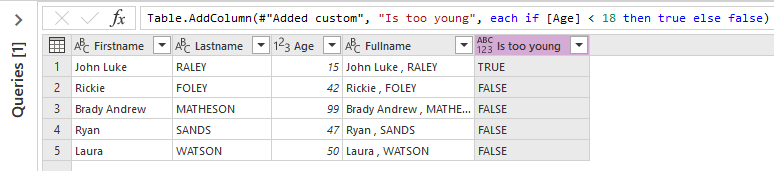
Another interesting feature is Conditional column : with this feature you can create new columns whose values are based on one or more conditions applied to other columns.
Let's create a conditional column named 'Is too young' : the result will be set to TRUE is Age < 18 otherwise result will be FALSE.
You just have to click on the command 'Conditional column' and fill the data as below.

In my example I use a static value (18) but it is possible to specify another column as value.
And this is the result:
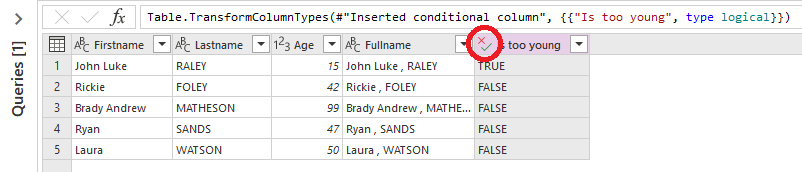
And now I change the data type of column 'Is too young'. I select the command 'Detect data type' in tab 'Transform': it automatically detects the best data type for the selected column.
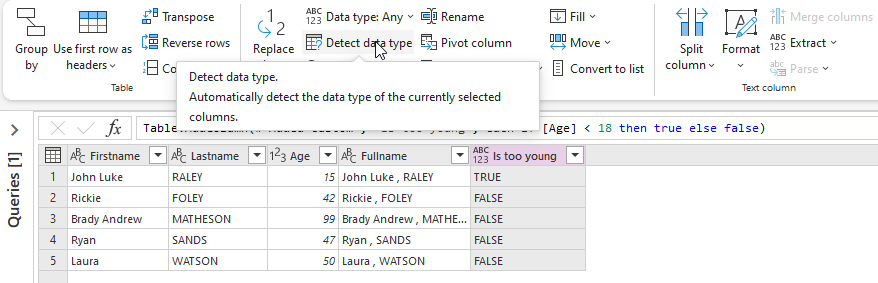
As this column contains only strings 'TRUE' or 'FALSE' the best data type is logical true/false (boolean).
And as you can see below it worked : the icon in the header of the column has changed to indicates that the column is now a logical column.
'Applied steps' pane
And what about the 'Applied steps' pane on the right side?
It displays all the steps executed until now.
If you want to view the content of a specific step, simply click on the gear wheel on the right.
To remove a step click on the cross on the left.
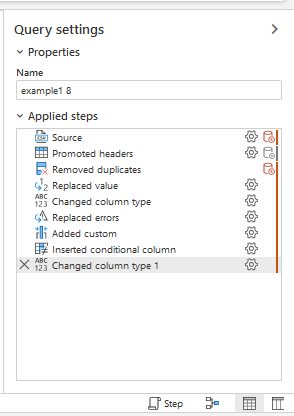
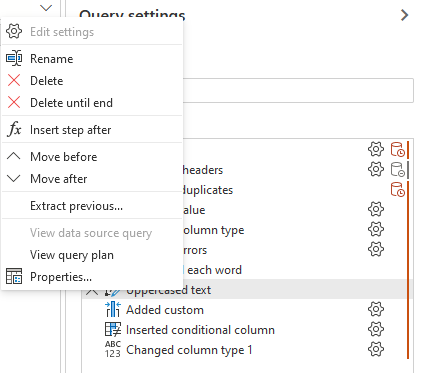
If you right-click on a step you access a context menu : rename the step, insert a new step, move the step, ...
At the bottom of the pane you have a menu 'Step'. If you click on it you will have 3 choices: Off, Query script, Step script (default).
This defines what is displayed in the formula bar.
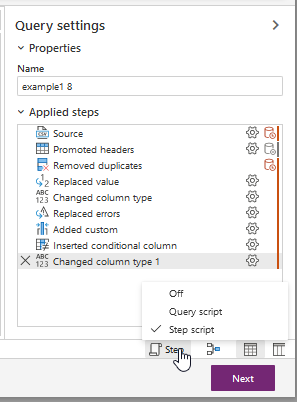
'Off' : hide the formula bar
'Step script' : display in the formula bar the formula (code M) of the selected step.

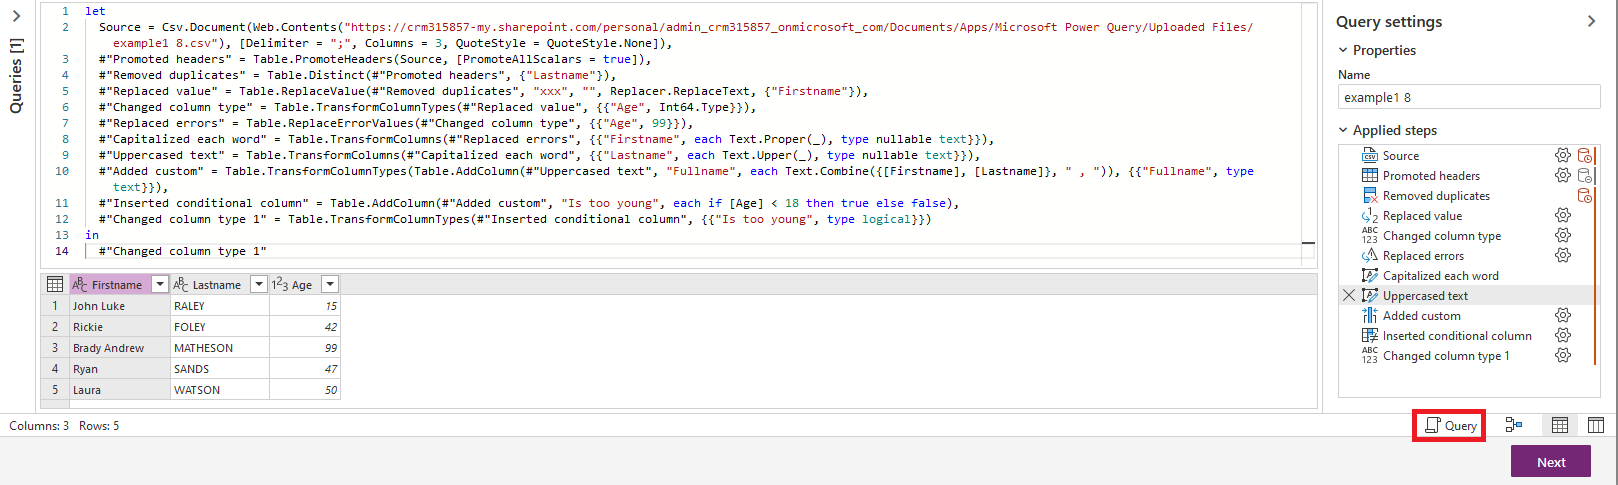
'Query script' : display in the formula bar the full script (all steps).
Next to the 'Step' button there is 'Diagram view' button. It displays in the formula bar the diagram of all steps.
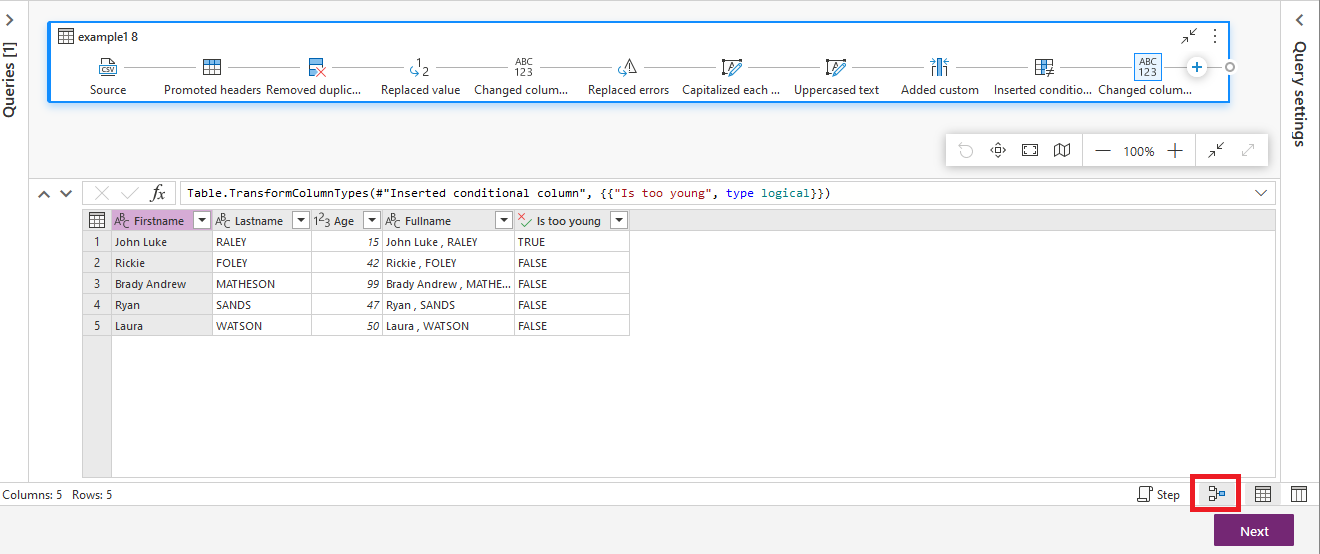
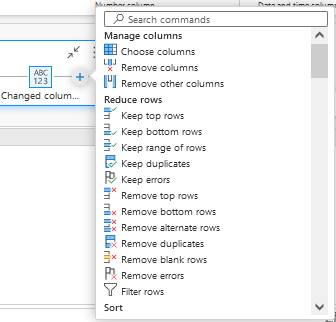
If you click on the '+' in the diagram a context menu is displayed : you can filter data, add a step, etc...
The 'View' tab contains several display settings including those we have just seen (step script, query script, diagram view),
Importing data into Dataverse
When you have finished applying transformations to you data you can click on button 'Next' at the bottom of the screen and move to next step to import transformed data into a Dataverse table.
You can choose whether you want to load data into a new table or an existing one.
In my example I create a new table Person.
To do that simply name the table and choose which column is your unique primary column.
An automatic mapping is performed.
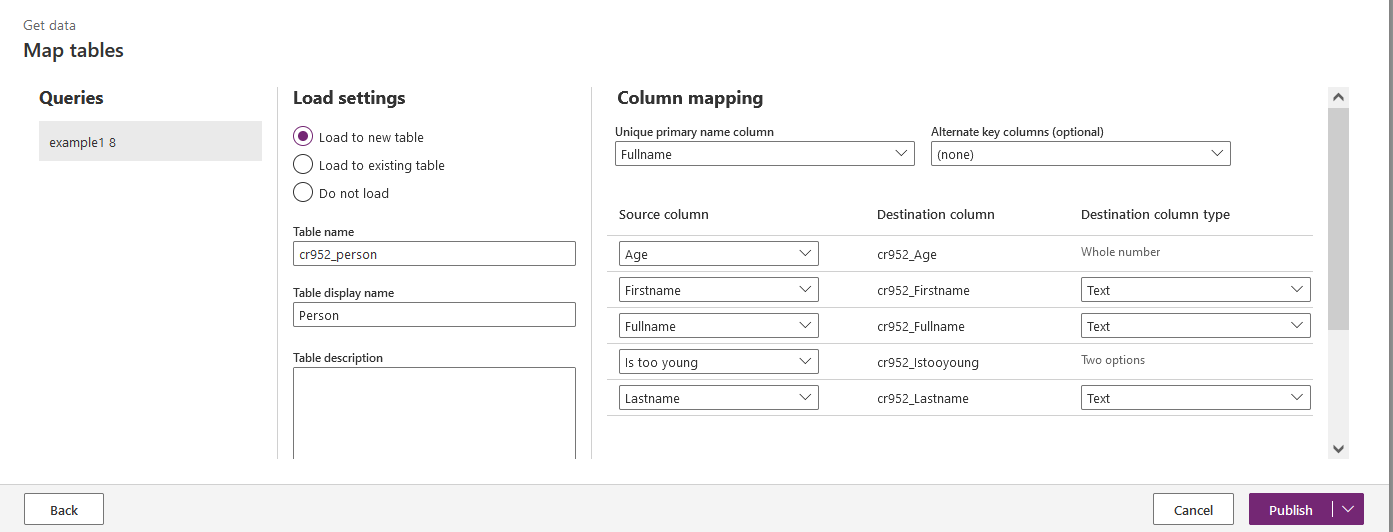
Then click on 'Publish'.
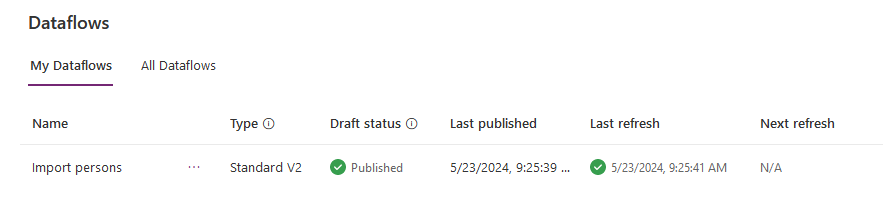
If the publish is successful you get the following screen:
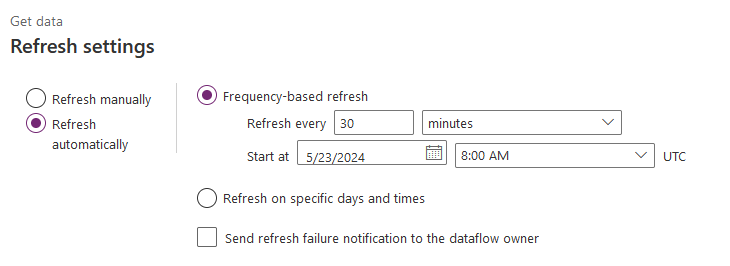
Finally you can schedule your dataflow : click on the 3 dots '...' and select 'Edit Refresh settings'
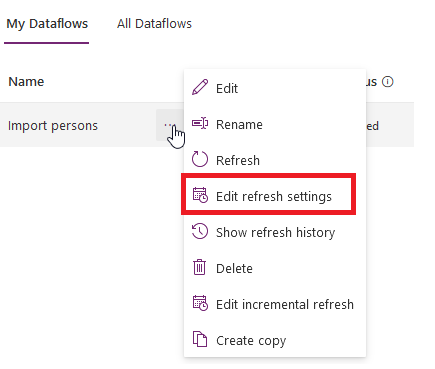
You can run your dataflow manually or schedule it based on a specific frequency.
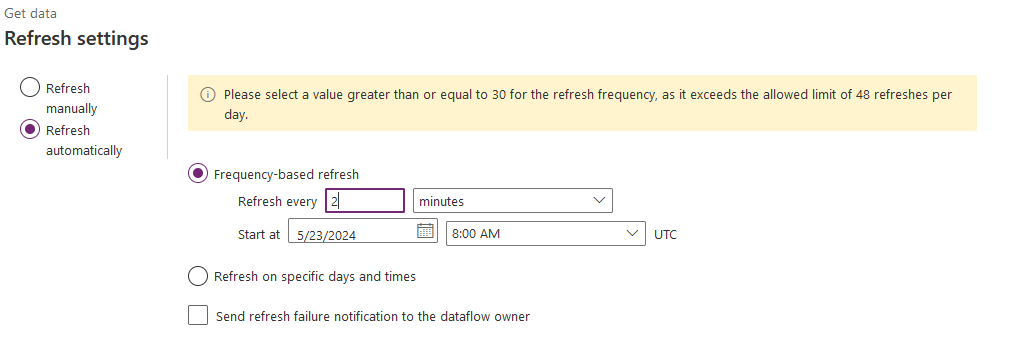
Note that you can get the following message if your refresh frequency exceeds the allowed limit of 48 refreshes per day.
And the result in the Power Platform:
Dataflow refresh
Each time you refresh a dataflow, it fetches records from the source and loads data into Dataverse.
If you run the dataflow more than once you can:
- Create new records for each dataflow refresh, even if such records already exist in the destination table. In this case you will create duplicates.
- Create new records if they don't already exist in the table, or update existing records if they already exist in the table. This behavior is called upsert.
Using an alternate key column indicates to the dataflow to upsert records into the destination table, while not selecting a key indicates to the dataflow to create new records in the destination table.
For instance if your data source has a column that is different for all rows (a guid or any unique identifier) you can use this column has an alternate key in your Dataverse table.
You can get details here: https://learn.microsoft.com/en-us/power-query/dataflows/get-best-of-standard-dataflows
Power Query M language
As mentioned previously Dataflow is based on Power Query and its related language.
The Power Query editor contains many built-in commands to perform basic operations and transformations.
But you will probably have to use the language to write your own transformations. It is what we call 'writing code M'.
The M stands for data Mash-up, as Power Query is all about connecting to various different data sources and “Mashing” them up.
The Power Query M formula language is optimized for building flexible data mashup queries. It's a functional, case sensitive language similar to F#.
Power Query Formula Language is used in a number of Microsoft products such as Power BI Desktop, Excel, and Analysis Services.
Details about Power Query M language are out of the scope of this article.
Specifications of the language can be found here:
https://download.microsoft.com/download/8/1/A/81A62C9B-04D5-4B6D-B162-D28E4D848552/Power%20Query%20M%20Formula%20Language%20Specification%20(July%202019).pdf
The specification describes the values, expressions, environments and variables, identifiers, and the evaluation model that form the Power Query M language’s basic concepts.
The official reference guide : https://learn.microsoft.com/en-gb/powerquery-m/power-query-m-function-reference
Many categories are available:
- Accessing data functions
- Binary functions
- Combiner functions
- Comparer functions
- Date functions
- DateTime functions
- DateTimeZone functions
- Duration functions
- Error handling
- Expression functions
- Function values
- List functions
- Lines functions
- Logical functions
- Number functions
- Record functions
- Replacer functions
- Splitter functions
- Table functions
- Text functions
- Time functions
- Type functions
- Uri functions
- Value functions
Some basics about the language:
A Power Query M formula language query is composed of formula expression steps that create a mashup query.
A formula expression can be evaluated (computed), yielding a value.
The let expression encapsulates a set of values to be computed, assigned names, and then used in a subsequent expression that follows the in statement.
For example, a let expression could contain a Source variable that equals the value of Text.Proper() and yields a text value in proper case.
let
    Source = Text.Proper("hello world")
in
    Source
In this tutorial we wrote a formula to concatenate first name and last name:
Text.Combine({[Firstname],[Lastname]}, " , ")
Note that function name (Combine) is prefixed by the category name (Text).
For example : Date.AddMonths(), Splitter.SplitTextByDelimiter()
Below the full script of this tutorial:
let
  Source = Csv.Document(Web.Contents("https://crm315857-my.sharepoint.com/personal/admin_crm315857_onmicrosoft_com/Documents/Apps/Microsoft Power Query/Uploaded Files/example1 8.csv"), [Delimiter = ";", Columns = 3, QuoteStyle = QuoteStyle.None]),
  #"Promoted headers" = Table.PromoteHeaders(Source, [PromoteAllScalars = true]),
  #"Removed duplicates" = Table.Distinct(#"Promoted headers", {"Lastname"}),
  #"Replaced value" = Table.ReplaceValue(#"Removed duplicates", "xxx", "", Replacer.ReplaceText, {"Firstname"}),
  #"Changed column type" = Table.TransformColumnTypes(#"Replaced value", {{"Age", Int64.Type}}),
  #"Replaced errors" = Table.ReplaceErrorValues(#"Changed column type", {{"Age", 99}}),
  #"Capitalized each word" = Table.TransformColumns(#"Replaced errors", {{"Firstname", each Text.Proper(_), type nullable text}}),
  #"Uppercased text" = Table.TransformColumns(#"Capitalized each word", {{"Lastname", each Text.Upper(_), type nullable text}}),
  #"Added custom" = Table.TransformColumnTypes(Table.AddColumn(#"Uppercased text", "Fullname", each Text.Combine({[Firstname], [Lastname]}, " , ")), {{"Fullname", type text}}),
  #"Inserted conditional column" = Table.AddColumn(#"Added custom", "Is too young", each if [Age] < 18 then true else false),
  #"Changed column type 1" = Table.TransformColumnTypes(#"Inserted conditional column", {{"Is too young", type logical}})
in
  #"Changed column type 1"
A major drawback of Power Query editor :
There is no intellisense/auto-completion when you type a formula (like in Microsoft Visual Studio or with Power-fx editor).
This technology is very useful when you do not know the exact name of a function.
And don't forget that code M language is case sensitive: so any case error in a function name and your code will not work.
Mass import
In order to evaluate the performance I have imported to Dataverse a CSV file with 100'000 rows.
Format of each row:
- Id : incremental number (unique value in order to perform updates)
- Firstname : string
- Lastname: string
- Age : integer
Transformations applied:
- Firstname : Capitalize Each Word
- Lastname : Uppercase
- Add new column : Fullname = Firstname , Lastname
The Dataverse custom table has a column Id as primary column and alternate key to be able to perform updates.
I performed the import first in creation mode : import of transformed data into an empty Dataverse table.
Then I performed an import in update mode : I modified all data in the CSV file (firstname/lastname/age but not Id of course) and imported transformed data in the same Dataverse table.
Creation mode : the 100'000 transformed rows have been imported in 58 minutes.
Update mode : the 100'000 transformed rows have been imported in 52 minutes.
Licenses
To create dataflows in Power Apps a license is required (per-user or per-app).
If you want to create analytical dataflows that store data in your organization's Azure Data Lake Storage Gen2 account, you or your administrator need access to an Azure subscription and an Azure Data Lake Storage Gen2 account.
Limitations
- Maximum of 48 runs per day for a dataflow
- Only one owner is currently enabled. If another user wants to modify the dataflow you must change the owner
- Mapping to polymorphic lookup fields is currently not supported.
- Mapping to Status and Status Reason fields is currently not supported.
- Mapping data into multi-line text that includes line break characters isn't supported and the line breaks get removed. Instead, you could use the line break tag
to load and preserve multi-line text - Mapping to Choice fields configured with the multiple select option enabled is only supported under certain conditions. The dataflow only loads data to Choice fields with the multiple select option enabled, and a comma-separated list of values (integers) of the labels are used.
For example, if the labels are "Choice1, Choice2, Choice3" with corresponding integer values of "1, 2, 3", then the column values should be "1,3" to select the first and last choices.
*This post is locked for comments