


Reassign leads on zip codes
 dian74
 2,481
Most Valuable Professional
2,481
Most Valuable Professional
 Like
Like Share
Share
 Report
Last week I received a very interesting requirement during one of my discovery calls, which I’m sure many of you have heard before or maybe even wanted to implement yourself! The sales manager wanted to assign leads based on the zip code of the lead. They explained to me that each zip code would be assigned to one rep and that sales reps have multiple zip codes assigned to them. Each time a lead comes in, they would want Dynamics 365 to automatically assign the lead to the rep that owns that zip code. I thought this was a very interesting way of assigning leads and started thinking about how we can accomplish this with the tools that are available to us today using the Power Platform. Keep in mind, not too long ago this wasn’t something we could easily do; we would have to get a developer involved to create a plugin to get this accomplished!
Zip Code Entity
The first thing I did was create a new entity called ‘Zip Codes’. I made this an organization owned entity, but of course you can also choose to make this user or team ownership and then use the out of the box owner field to store the sales rep (user record) in that field. I created a system user lookup field called ‘Sales Rep’ and added it to the form. This is the field I am using to show which rep is assigned to the zip code record. Then I updated the ‘Active Zip Codes’ view by adding the ‘Sales Rep’ field to the view. Done! That was easy enough!
Now of course I could remove the out of the box zip code field ‘address1_postalcode’ (which is a single line of text field) from the lead form and replace it with a lookup to my zip code entity, but I wanted to keep the out of the box zip code field on the form. (I.E Other add-ons like Inside View or D&B populate data in the out of the box zip code field which is why I wanted that field to stay on the form.)
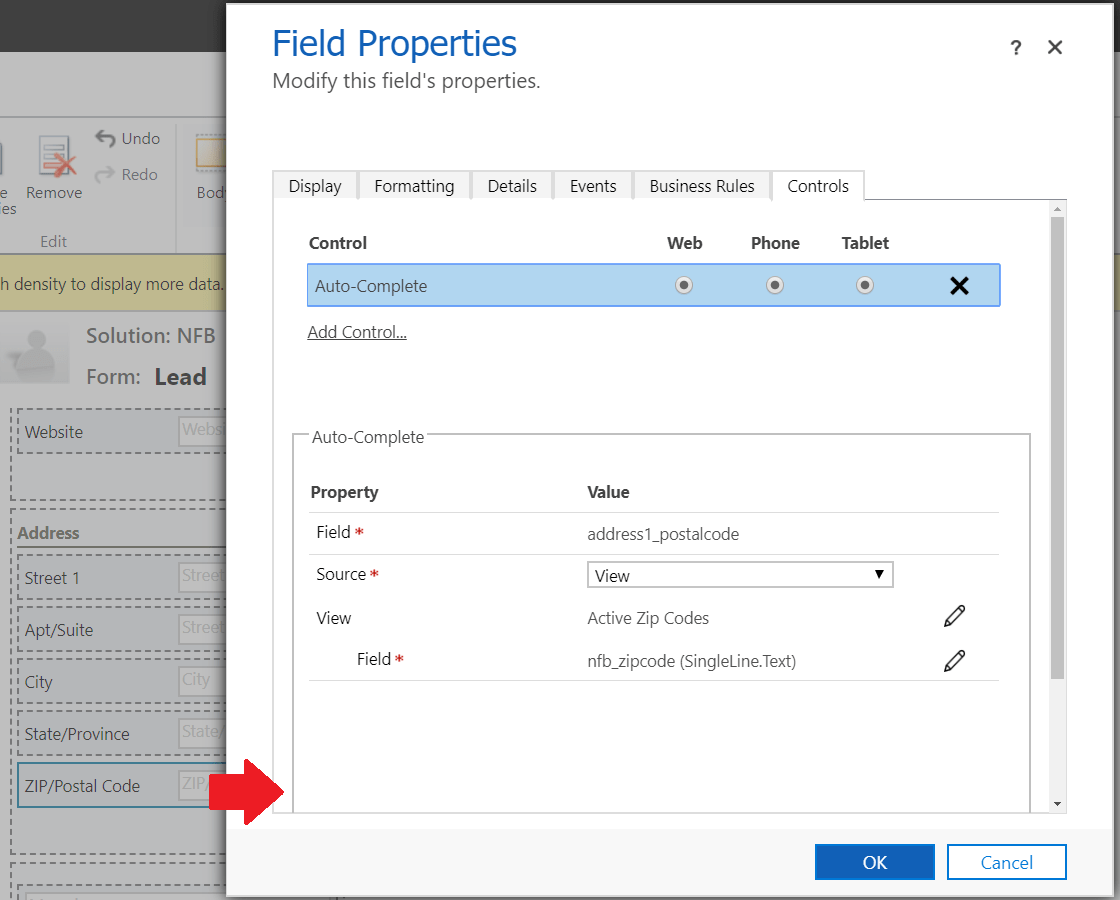
Configure out of the box zip code field control
I configured the address1_postalcode field using the auto-complete control on the form. This control allows admins to ‘point’ a single line of text field to values in either an entity related option set type of field or values in an entity view. (What this means is that the single line of text field kinda turns into an option set type of field.)
When you configure the control to use a view you have to define the entity you want to use and the entity view. Obviously I choose to use a view and I selected the ‘Zip Codes’ entity and the ‘Active Zip Codes’ view. Lastly I needed to select the field of the view’s primary entity to use as the data source. This will normally be the primary entity field, which I had renamed from ‘name’ to ‘zip code’ when I created the entity.
I uploaded some zip code records in the system and tested my form. It looked good and worked exactly how I intended it to work!
Assign lead to sales rep
Now lets focus on the automation of this. What we need the system to do is take a look at the zip code of the lead, and then look at our zip code entity and find the zip code record that matches the zip code on the lead record. We all know we can’t query the data base using work flows, so I am going to use Power Automate for this.
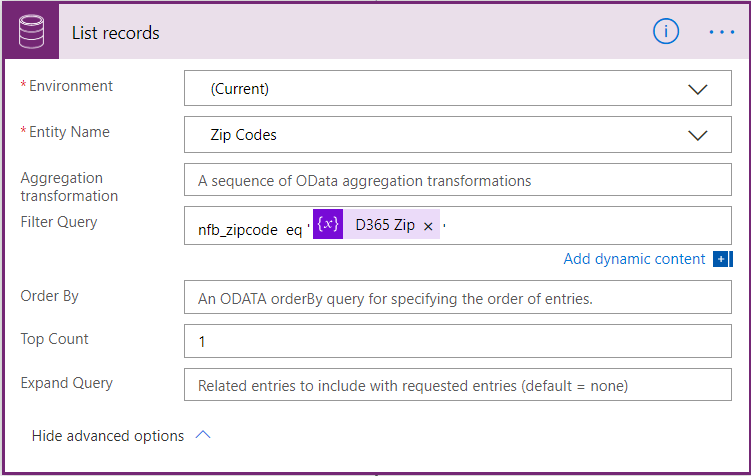
I logged into Power Automate and clicked the ‘+ New’ button to create a new flow. I selected ‘automated from blank’ and then ‘when a record is created’ under the common data service. When clicking ‘Create’ the flow page is loaded and you need to pick your environment and entity name. I selected ‘current environment’ and selected the lead entity. For scope I selected ‘organization’. The next step is to initialize a variable, this is where I will store the value of the lead records’ zip code from Dynamics 365. I named it D365 Zip, but obviously you can name it whatever you want. For Type I selected String and I selected ‘Zip/Postal Code’ as the value. (This is the field on the lead form.) The next step is to initialize another variable also with a type of string. This is where we will store the value of the sales rep related to the zip code record. Right now by creating this step, we’re just creating an empty container where we can store this data in later.
The next step in this flow is ‘list records’ (common data service). In this step we are querying the Dynamics 365 data base. We will be using the zip code that was entered in the lead record as a filter. Since we are looking for zip code records, that’s what we enter as the entity. Under filter query, I typed the primary field of the entity (in my case ‘nfb_zipcode’) then ‘eq’ and then I picked the variable D365 Zip. Make sure you use single quotes around the variable! We are only expecting to get one record in the query, so set the top count to 1. Below is an example of what this looks like.
In the next step I’m going to store data from the zip code record that we got from the query, into the variable (container) we created earlier. I clicked ‘+ next step’ and selected ‘Append to string variable’. For the name, select ‘Sales Rep from Zip’ from the drop down. I clicked my mouse in the value field and from below the ‘list records’ I picked ‘Sales Rep’. This will add the ‘apply to each’ around the step, which is fine. If you would want to add additional field data, you can do this by clicking ‘+ Add Action’ in the ‘Apply to each’ box. Make sure you have enough string variables to add the values to.
Again I clicked on ‘+ New Step’ and selected ‘Update a Record’ from the common data service. This is where I am going to reassign the lead to the sales rep related to the zip code record. I selected current environment, and ‘Leads’ as the entity. I want to update the lead that kicked off this flow, so after I clicked in the ‘record identifier’ field under the ‘update a record’ step, I need to scroll down to the ‘When a record is created’ section to find the lead (unique identifier) field. I then expanded the advanced options and here is where I am going to reassign the lead. The first thing I did was set the ‘owner type’ field to ‘system users’. I am not assigning it to a team. Then I click my mouse in the ‘Owner’ field and from under ‘variables’ I select the ‘Sales Rep from Zip’ variable. Make sure to test your flow after you saved it!
I hope you enjoyed this post! Be sure to check back next week for a new article or subscribe here to never miss another post!
This was originally posted here.
*This post is locked for comments