Gmail Integration with Dynamics 365
Configuring Gmail for the Integration
Firstly, we will have to look at taking a look at our settings in Gmail to permit external access to the mailbox using POP3 protocol.
- From mail.google.com, navigate to Settings > Forwarding and POP/IMAP
- Select Enable POP for mail that arrives from now on and for When messages are accessed with POP select archive Gmail’s copy.
- Click on Save Changes.

Gmail will at times block connections from third party apps. To enable this connection:
- Go to https://myaccount.google.com/lesssecureapps
- Toggle Allow less secure apps: ON

Creating a Gmail Email Server Profile in Dynamics
We must next configure the Email Server Profile in Dynamics 365 to connect to Gmail. Dynamics 365 will want to use Exchange Online by default, so we must create an entirely new profile so the mailboxes can connect to Google’s servers.
- Navigate to your Dynamics 365 instance using your custom URL.
- Go to Settings > Email Configuration > Email Server Profiles

- Click on + New> POP3/SMTP Server

- Type in a name, such as “Gmail”
- Input the following values:
-
- Incoming Server Location: pop.gmail.com
- Outgoing Server Location: smtp.gmail.com
- Authenticate Using Credentials Specified by a User or Queue
- Use same settings for Outgoing Yes
- Expand the Advancedtab and enter the following values:
-
- Incoming Port: 995
- Outgoing Port: 465
- Click Save and Close.

Enabling Server-Side Synchronization in Dynamics
Server-side synchronization is the mechanism that provides the integration between Dynamics 365 and an email server. This is Microsoft’s preferred method of synchronization, with the other two options (Outlook and the Email Router) being gradually phased out. To ensure that this is enabled:
- Navigate to Settings > Email Configuration > Email Configuration Settings
- Verify that Process Email Using is set to Server-Side Synchronization
- Verify that the Server Profile is populated with the Gmail Server Profile you just created. If not, change it as such.
- Click OK.

Setting-up Mailboxes
Our final steps will be to approve our mailboxes to use the Email Server Profile we created to communicate with Google’s servers.
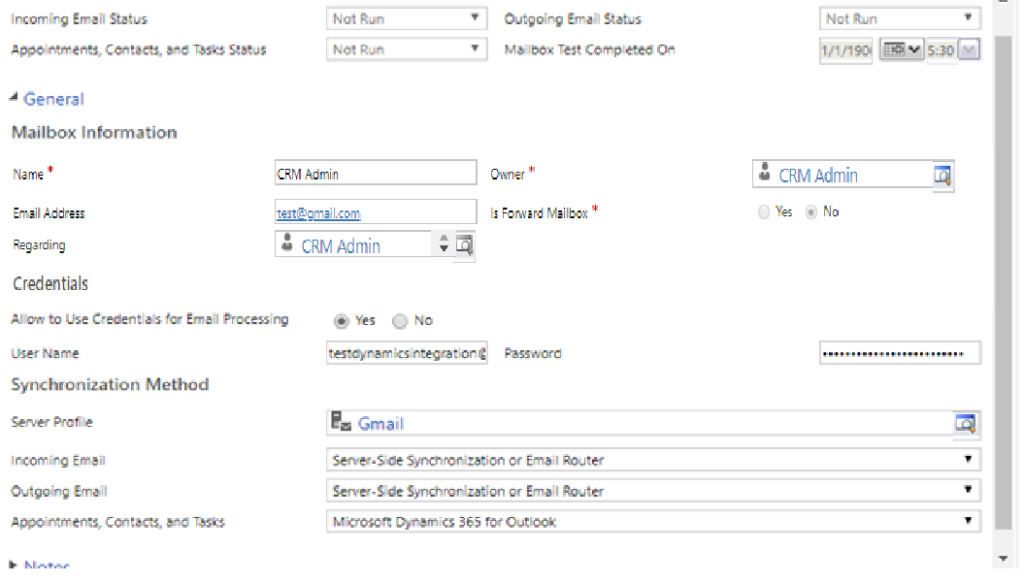
- Go to Settings > Email Configuration > Mailboxes
- Double-click on the mailbox you would like to configure.
- Modify the following values:
- Allow to Use Credentials for Email Processing: Yes
- Enter the Gmail account credentials in the username and password section.
- Server Profile: <Name of the Gmail server profile>
- Incoming Email: Server-Side Synchronization or Email Router
- Outgoing Email: Server-Side Synchronization or Email Router

4. Click on Save.
5. Click on Approve Email (note that this will only work if you are an Office 365 Global Admin)
6. Click OK.

7. Click on Test and Enable Mailbox
8. Note that, when you are prompted to “Sync items with Exchange from this Dynamics 365 Organization only,” leave the box unchecked and hit Ok.
9. You should be able to see the status of the mailbox in the alerts section.

10. You can now see the status of the mailbox you just configured in My Active Mailbox.

The post Gmail Integration with Dynamics 365 appeared first on Nebulaa IT Solutions.


 Like
Like Report
*This post is locked for comments