


 21
21 Like
Like Share
Share
 Report
Adaptive cards are amazing tools available in Copilot Studio, that can turn your boring looking Copilot Chatbot answers look more colorful, vivid and more insightful. Actually, Adaptive Cards are a great way to share information across multiple platforms leveraging JSON, that can turn answer in key-value pairs into any intended format, that include text, images, buttons, and input fields – and what not?!
This article is intended to give you an ideation of getting responses from D365F&O and present them into gorgeous looking Adaptive cards in Copilot Chatbot Sidecars.
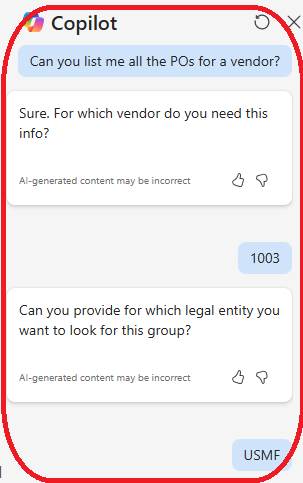
To which the Copilot lists out in bullets, the list, using an adaptive card:
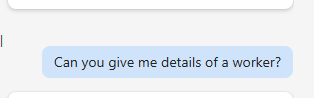
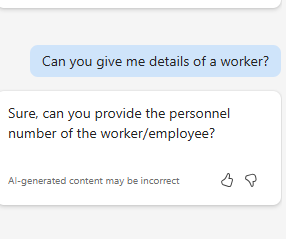
Or imagine if I ask the Copilot about the details of a worker like this:
To which the Copilot asks me back:
On giving the personnel number, the Copilot responds like this:
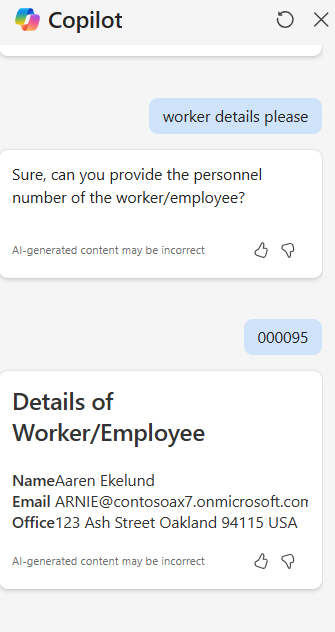
Which is quick snapshot of the worker, indicating his/her name, Email, office address etc. in a much presentable/professional format, using adaptive card.
Here are the steps to implement the same.
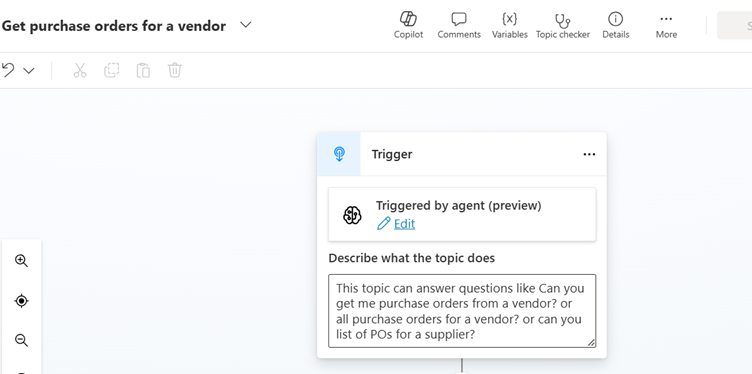
Indicating the keywords which might trigger the Copilot topic.
To which I am asking a question back:
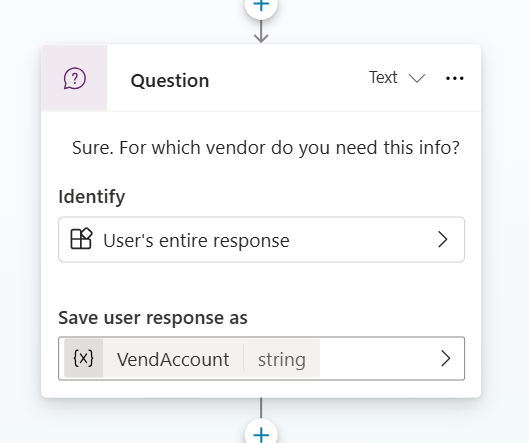
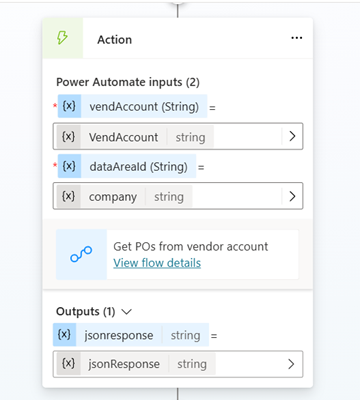
I am storing the user response in a local variable called VendAccount.
N.B. I am storing the user answer using an Entity Called ‘User’s entire response’. You can use your Custom entity to store the VendAccount, for better results (for ex: if the user answers: ‘Ok, my vendor number is V-12121’, instead of just ‘V-12121’, which will certainly lead to erroneous results. Using a custom entity that defines the pattern of the vendor number using in your system, is actually a very design).
I am again asking the question to get the legal entity:
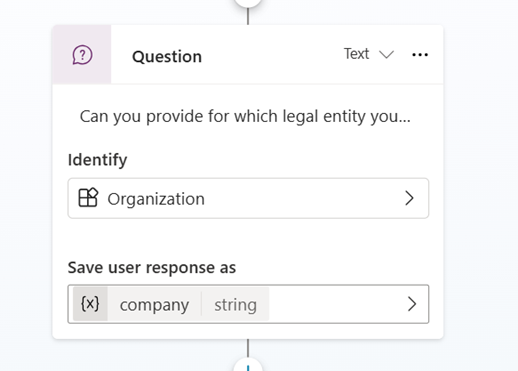
I am storing the same in a local variable called company.
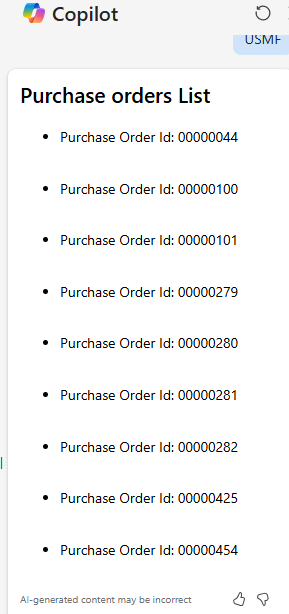
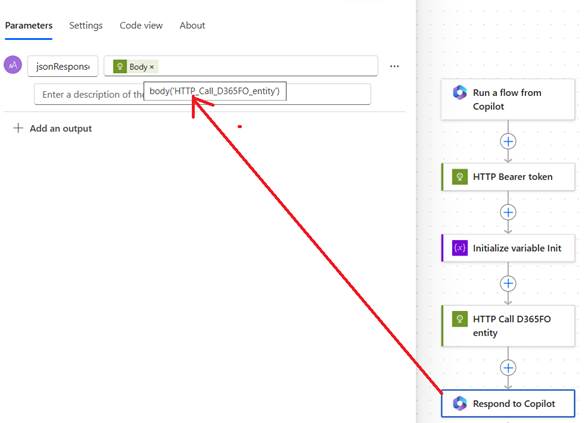
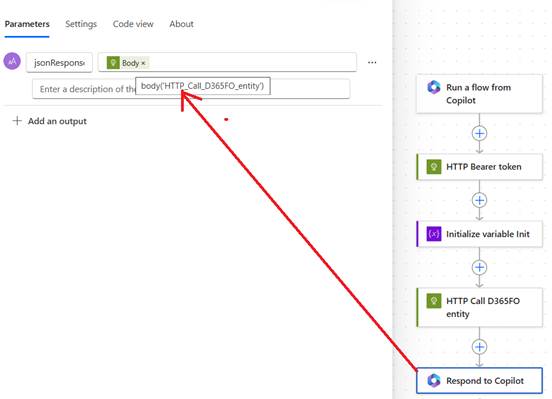
At this point, I am calling a Flow which is returning the list of Purchase orders:
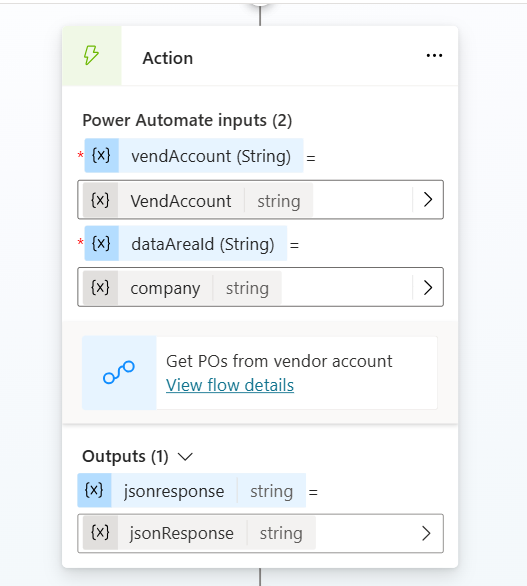
Let us now inspect what is written inside this flow.
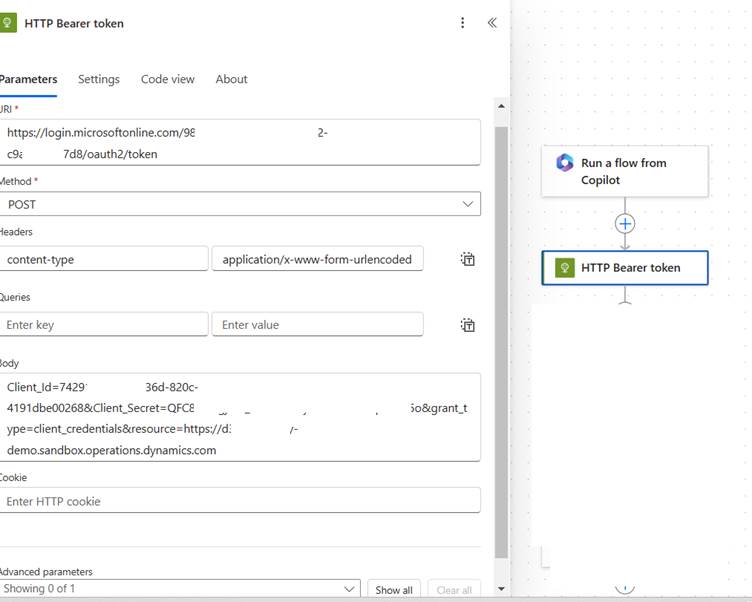
And then it calls the bearer token generation logic to call the Authentication URL:
And in the next step I am doing a GET to fetch the list of POs:
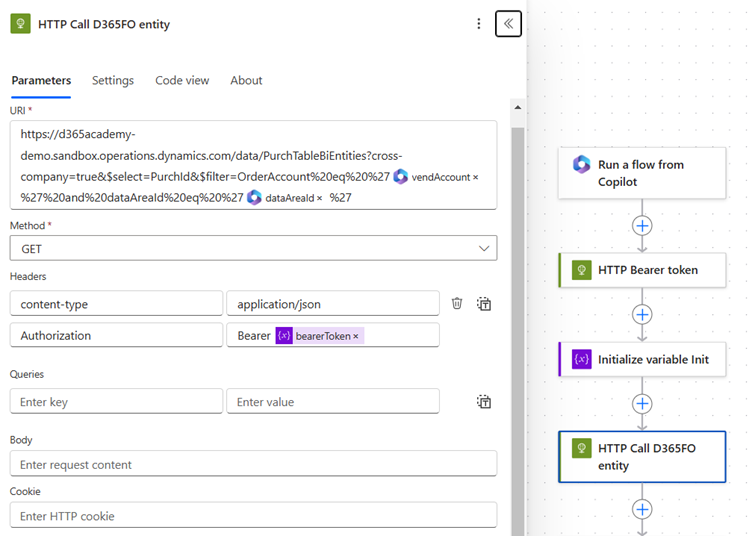
Note how I am calling the OData endpoint. In this case, I am selecting just column I need (PurchId). To do this, I am calling the Odata like this:
<Base_URL>/data/PurchTableBiEntities?cross-company=true&$select=PurchId&$filter=OrderAccount eq '1003' and dataAreaId 'usmf'
This will give a response like this:
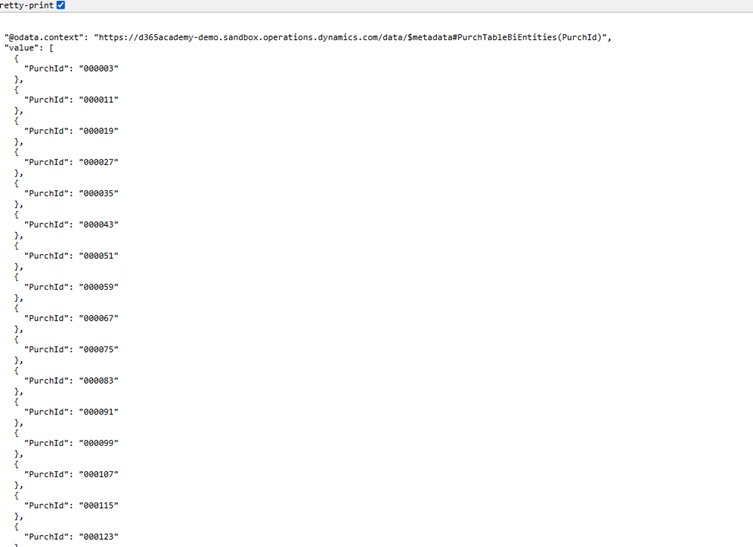
I will now be returning this to the Copilot prompt:
Let us now go back to Copilot Studio.
Click on Variable management >> Parse value:
Here you need to give the input which I am getting from the previous step (response from FLOW):
And then (here comes the trick 😊) I am choosing the selcect type = From Sample Data:
Click on ‘Get Schema and Sample JSON’:

And in the screen that pops up, fill up the JSON value which you got from the above step:
Click on Confirm. And you are done. The step automatically understands that you are trying to get a Record, which I am storing as a variable called ‘poResponse’.
In the card structure that opens up, I am selecting on the ‘Card dessigner’:
The URL: https://adaptivecards.io/designer/ gives a plethora of built-in designs to choose from:
For now, we are going to choose, New Card to continue:

Select Blank Template to begin and you can create the structure here as you wish:
For example, click to add Table or a container or a Factset – anything!!!
For our example, I am using a Container that will get populated with the Purchase Order Ids, which I am getting in the response. Below is the schema:
{
type: "AdaptiveCard",
version: "1.3",
body: [
{
type: "TextBlock",
text: "Purchase orders List",
weight: "bolder",
size: "large"
},
{
type: "Container",
items:
ForAll(Topic.poResponse.value,
{
type: "TextBlock",
text: "- Purchase Order Id: " & PurchId ,
wrap: true
}
)
}
]
}
Few points to note here:

Which I am looping in the counter below, just by saying text: text: "- Purchase Order Id: " & PurchId .
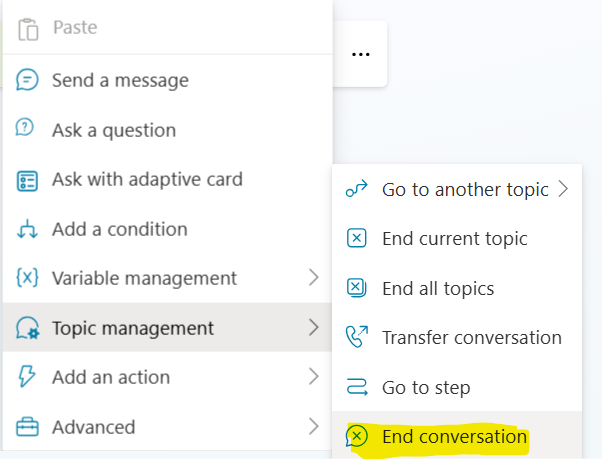
And finally, I am concluding the conversation like this:
That’s it, just publish the changes to make it available to D365F&O front end. Of course you can add more information to your list by selecting more columns (ex: site and warehouse) and displaying them along with Purch Ids in the list.
{
type: "AdaptiveCard",
'$schema': "http://adaptivecards.io/schemas/adaptive-card.json",
version: "1.3",
body: [
{
type: "TextBlock",
text: "Details of Worker/Employee",
wrap: true,
style: "heading"
},
{
type: "FactSet",
facts: [
{
title: "Name",
value: Topic.hcmWorker.NameAlias
},
{
title: "Email",
value: Topic.hcmWorker.IdentityEmail
},
{
title: "Office",
value: Topic.hcmWorker.AddressStreet & " " & Topic.hcmWorker.AddressCity &" "& Topic.hcmWorker.AddressZipCode & " " & Topic.hcmWorker.AddressCountryRegionId
}
]
}
]
}
Please note the following:
You can choose as many number of columns here as possible, depending on your need.
This article is intended to give you an ideation of getting responses from D365F&O and present them into gorgeous looking Adaptive cards in Copilot Chatbot Sidecars.
What am I trying to do
Let me ask the following to D365F&O:To which the Copilot lists out in bullets, the list, using an adaptive card:
Or imagine if I ask the Copilot about the details of a worker like this:
To which the Copilot asks me back:
On giving the personnel number, the Copilot responds like this:
Which is quick snapshot of the worker, indicating his/her name, Email, office address etc. in a much presentable/professional format, using adaptive card.
Here are the steps to implement the same.
Displaying list in an adaptive card
Step 1
Start defining your copilot studio topic like this:Indicating the keywords which might trigger the Copilot topic.
To which I am asking a question back:
I am storing the user response in a local variable called VendAccount.
N.B. I am storing the user answer using an Entity Called ‘User’s entire response’. You can use your Custom entity to store the VendAccount, for better results (for ex: if the user answers: ‘Ok, my vendor number is V-12121’, instead of just ‘V-12121’, which will certainly lead to erroneous results. Using a custom entity that defines the pattern of the vendor number using in your system, is actually a very design).
I am again asking the question to get the legal entity:
I am storing the same in a local variable called company.
At this point, I am calling a Flow which is returning the list of Purchase orders:
Let us now inspect what is written inside this flow.
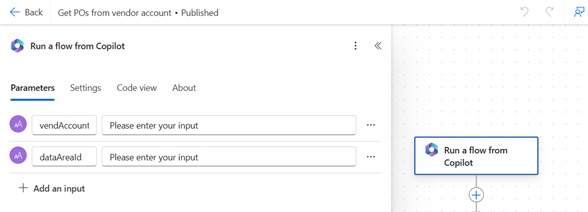
Step 2
The flow accepts the input from the user like this:And then it calls the bearer token generation logic to call the Authentication URL:
And in the next step I am doing a GET to fetch the list of POs:
Note how I am calling the OData endpoint. In this case, I am selecting just column I need (PurchId). To do this, I am calling the Odata like this:
<Base_URL>/data/PurchTableBiEntities?cross-company=true&$select=PurchId&$filter=OrderAccount eq '1003' and dataAreaId 'usmf'
This will give a response like this:
I will now be returning this to the Copilot prompt:
Let us now go back to Copilot Studio.
Step 3
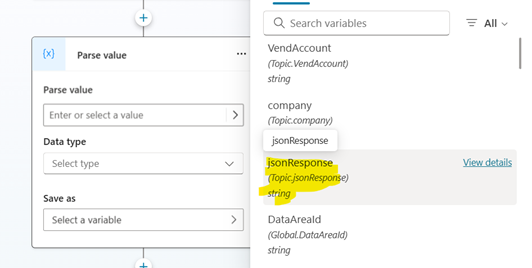
I am storing the response as a variable called jsonResponse:Click on Variable management >> Parse value:
Here you need to give the input which I am getting from the previous step (response from FLOW):
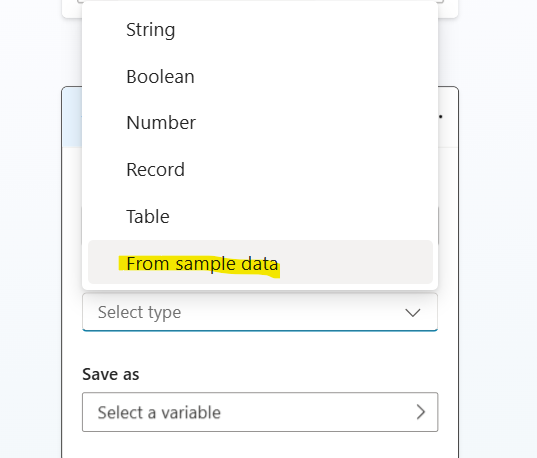
And then (here comes the trick 😊) I am choosing the selcect type = From Sample Data:
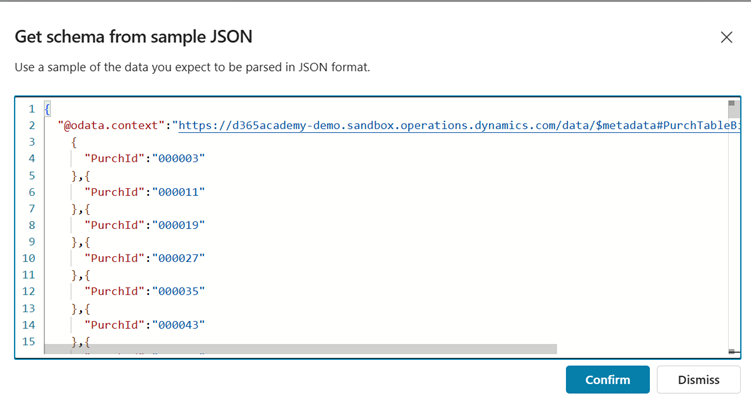
Click on ‘Get Schema and Sample JSON’:
And in the screen that pops up, fill up the JSON value which you got from the above step:
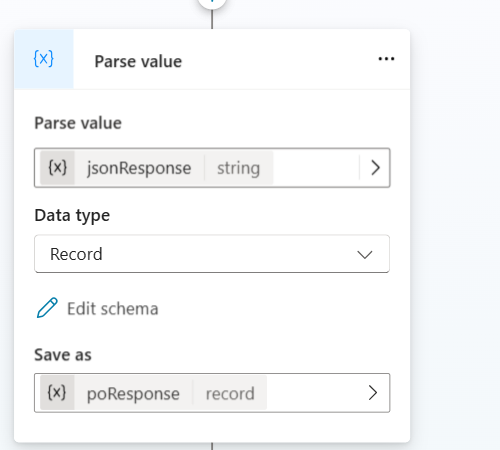
Click on Confirm. And you are done. The step automatically understands that you are trying to get a Record, which I am storing as a variable called ‘poResponse’.
Step 4
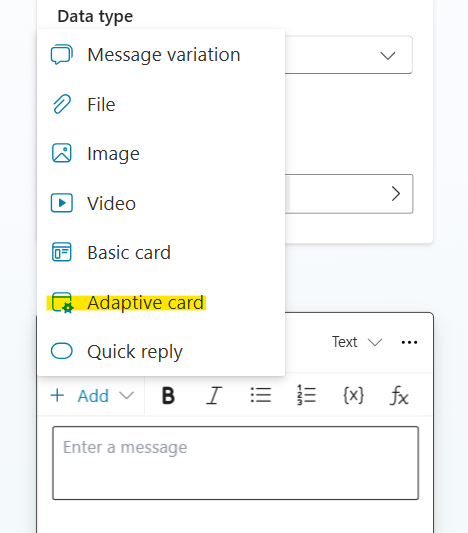
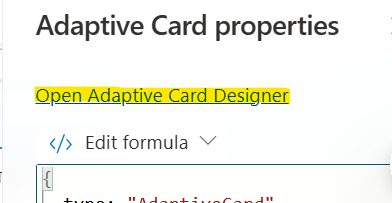
In the final step, I am creating a response and adding an Adaptive card:In the card structure that opens up, I am selecting on the ‘Card dessigner’:
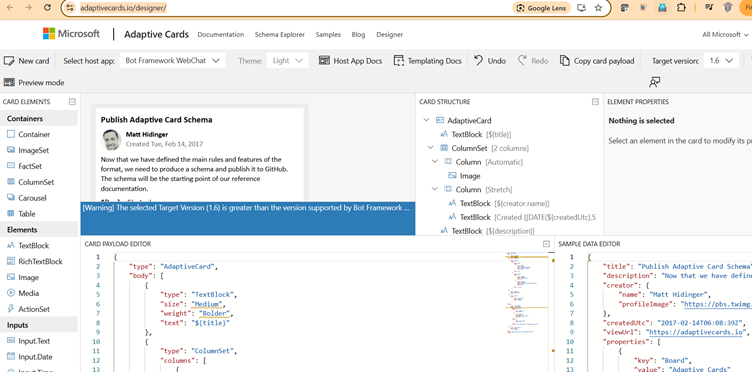
The URL: https://adaptivecards.io/designer/ gives a plethora of built-in designs to choose from:
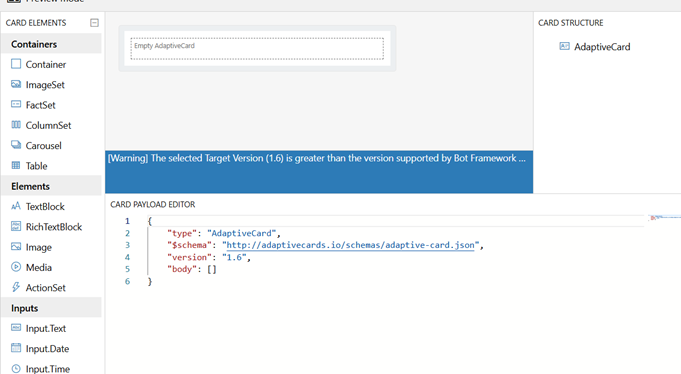
For now, we are going to choose, New Card to continue:
Select Blank Template to begin and you can create the structure here as you wish:
For example, click to add Table or a container or a Factset – anything!!!
For our example, I am using a Container that will get populated with the Purchase Order Ids, which I am getting in the response. Below is the schema:
{
type: "AdaptiveCard",
version: "1.3",
body: [
{
type: "TextBlock",
text: "Purchase orders List",
weight: "bolder",
size: "large"
},
{
type: "Container",
items:
ForAll(Topic.poResponse.value,
{
type: "TextBlock",
text: "- Purchase Order Id: " & PurchId ,
wrap: true
}
)
}
]
}
Few points to note here:
- I am choosing the version as 1.3, currently the version that Copilot Studio BOT-framework can support is up to 1.3.
- I am using the Type = Container and then I am looping through all the available Purchase Order Ids as ‘ForAll(Topic.poResponse.value’: this will give you the main array element of the response:
Which I am looping in the counter below, just by saying text: text: "- Purchase Order Id: " & PurchId .
- Wrap: true is done, just so as to avoid unnecessary stretching of the result form.
And finally, I am concluding the conversation like this:
That’s it, just publish the changes to make it available to D365F&O front end. Of course you can add more information to your list by selecting more columns (ex: site and warehouse) and displaying them along with Purch Ids in the list.
Displaying results in factbox:
This is an example which I showed you by using employee/worker details. The process is exactly the same as above, only the difference is the card structure which I am using here:{
type: "AdaptiveCard",
'$schema': "http://adaptivecards.io/schemas/adaptive-card.json",
version: "1.3",
body: [
{
type: "TextBlock",
text: "Details of Worker/Employee",
wrap: true,
style: "heading"
},
{
type: "FactSet",
facts: [
{
title: "Name",
value: Topic.hcmWorker.NameAlias
},
{
title: "Email",
value: Topic.hcmWorker.IdentityEmail
},
{
title: "Office",
value: Topic.hcmWorker.AddressStreet & " " & Topic.hcmWorker.AddressCity &" "& Topic.hcmWorker.AddressZipCode & " " & Topic.hcmWorker.AddressCountryRegionId
}
]
}
]
}
Please note the following:
- I am using the D365F&O OData entity called Workers. And in that I am selecting just the few columns for my example purpose:
You can choose as many number of columns here as possible, depending on your need.
- The Type: Factset is an array, that contains elements called Facts, where you can keep adding information to it, as key-value pairs (ex: employee name, phone number, email, address, etc.)
- The heading is encompassed as a TextBlock, which contains the header/heading of the info.
*This post is locked for comments