


 21
21 Like
Like Share
Share
 Report
FetchXMLs are amazing functionalities that can be used to bring data from Dataverse, into Fabric. And just not bring data, you can compose a query by selecting necessary fields from a Dataverse table, use filter conditions, make joins and – what not?!! You don’t need to write a single line of code for this: just fetch data from any source table, loop through the data and feed into any Lakehouse/Destination table.
FetchXml is a proprietary XML based query language used to retrieve data from Dataverse, which you can find when you are using Pipelines from Data-engineering in Fabric/ADF.
This article chiefly focusses on the steps to do so:
a. You have to create an App registration under Azure EntraId
b. Valid D365F&O access
c. A valid Fabric license (preferably F64/above. With FT1 fabric license (Trial) you can get FetchXML or other components of Pipeline, but it won’t let you switch between personas/experiences and thereby you won’t be able to choose Datasource Type and other utilities.
d. Let us also assume you have created a Workspace and Lakehouse inside it, to let your source data be trickle down into it. But saying that, you can also use this architecture/strategy for any destination type, viz.: Azure SQL, Data Warehouses, etc.

I am using a Workspace called “Dataverse Collection” and am creating the pipeline into it. And then in the prompt that ensues, I am giving a name like this:

And then in the next screen, I will selecting an empty canvas to create my pipeline design:

And then from the available options you select the Lookup activity:

Lookup activity lets you synthesize your query, with any datasource of your choice.
Before you get into the next step, lets define some variable:

And then in the settings tab >> in the Connection field, Click Select >> More:
Whereby you could select any source of your choice. We would select Dataverse in our example:
And in the lookup, you need to administer the necessary settings to connect to your Dataverse source:

In the Authentication Kind >> you can choose
Organizational account: This would enforce you to give your credentials to access the Dataverse account.
Service Principal: Use the Entra-Id’s App registration details to log on to D365F&O. This is a preferred choice, as the Organizational account would make the entire access a dependent connectivity to an impersonated account.
Click on Connect to Continue.

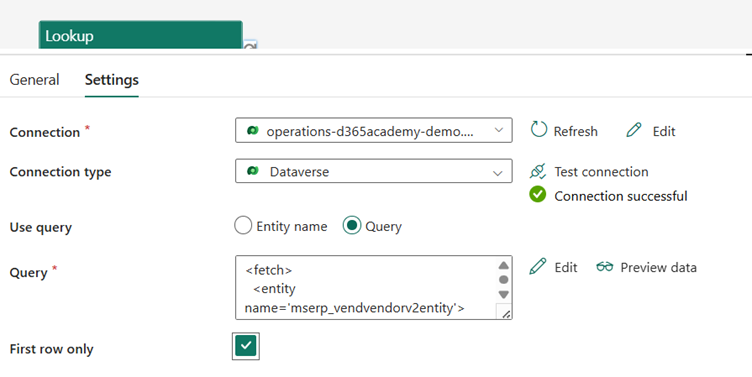
Do a Test Connection >> to see if the Connection succeeds. Choose Connection Type = Dataverse. Click on Edit to let the FetchXML editor window open:
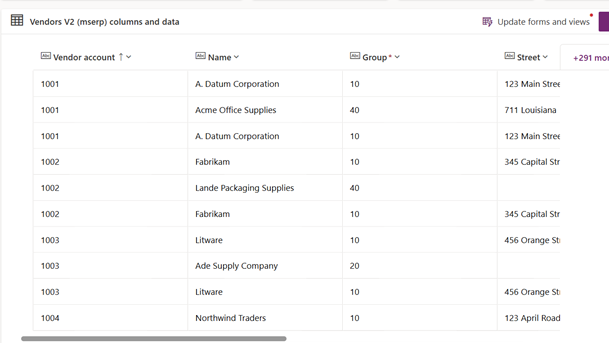
We are going to fetch the details of the Vendors belonging to group ‘40’ department.
Hence we would need to decide what are the columns which we need and the filter we need to add. In our example, it turns out to be a very simple XML like this:
<fetch>
<entity name='mserp_vendvendorv2entity'>
<attribute name='mserp_vendoraccountnumber' />
<attribute name='mserp_vendororganizationname' />
<attribute name='mserp_vendorgroupid' />
<attribute name='mserp_addressstreet' />
<attribute name='mserp_addresscity' />
<attribute name='mserp_addresszipcode' />
<attribute name='mserp_addresscountryregionid' />
<filter type='and'>
<condition attribute='mserp_vendorgroupid'
operator='eq'
value='40' />
</filter>
</entity>
</fetch>
We can find out the name of associated table by scouping it out from the Logical name/Sxchema name:
Which means, I am trying to select fields like Name, Created on, Email from the table: crf5a_Employee, with filter Department = ‘IT’:
Or if you want to include All the Vendors who belong to either 10 or 40, then your filter should like this:
<filter type='or'>
<condition attribute=’Group’
operator='eq'
value='10' />
<condition attribute='Group'
operator='eq'
value='40' />
</filter>
Press Ok to continue.
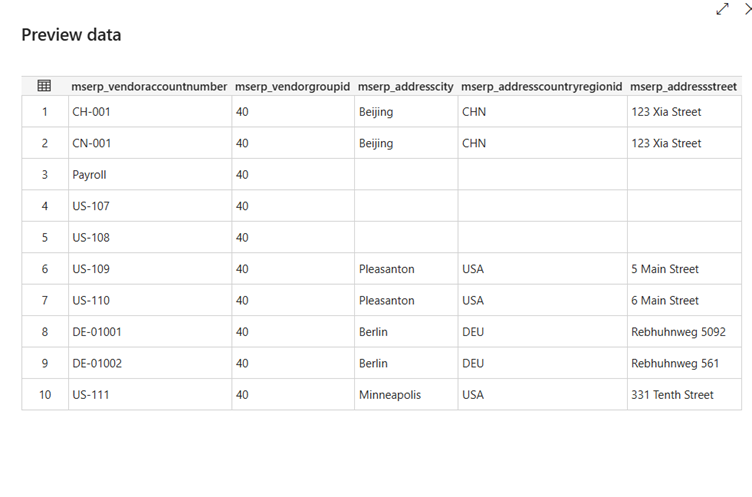
At this point of time, if you select Save and Select on preview Data, you should be able to see the records:
As I have checked only the First row, I would be able to see just first of the records:

Turning the key off would give me all the records:
As you can see we are using the variable which we defined and assigning it to a value (like Concatenating Street, City, Postal code and Country into one string):

And finally you can add the Copy-data activity to carry the transformed variables into the target table of your destination:
With that let me conclude this topic. Requesting you to please try the same from your end and let me know how it goes. Namaste and much love.....
FetchXml is a proprietary XML based query language used to retrieve data from Dataverse, which you can find when you are using Pipelines from Data-engineering in Fabric/ADF.
This article chiefly focusses on the steps to do so:
Requirements
You need to have the following, before you begin:a. You have to create an App registration under Azure EntraId
b. Valid D365F&O access
c. A valid Fabric license (preferably F64/above. With FT1 fabric license (Trial) you can get FetchXML or other components of Pipeline, but it won’t let you switch between personas/experiences and thereby you won’t be able to choose Datasource Type and other utilities.
d. Let us also assume you have created a Workspace and Lakehouse inside it, to let your source data be trickle down into it. But saying that, you can also use this architecture/strategy for any destination type, viz.: Azure SQL, Data Warehouses, etc.
Step 1
Go ahead and create a new pipeline:I am using a Workspace called “Dataverse Collection” and am creating the pipeline into it. And then in the prompt that ensues, I am giving a name like this:
And then in the next screen, I will selecting an empty canvas to create my pipeline design:
And then from the available options you select the Lookup activity:
Lookup activity lets you synthesize your query, with any datasource of your choice.
Before you get into the next step, lets define some variable:
Step 2
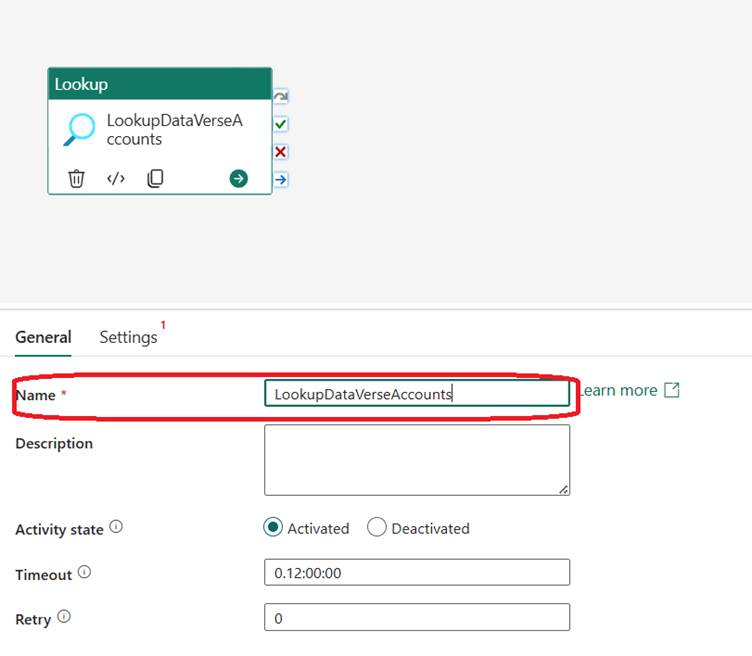
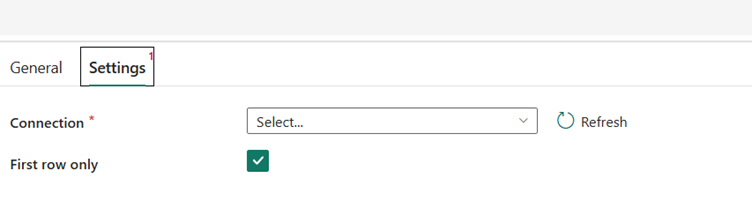
In the next step, once the lookup activity is added, you can give it a proper name and along with it, give some adjoining information like Description, necessary timeout you want to set, etc.:And then in the settings tab >> in the Connection field, Click Select >> More:
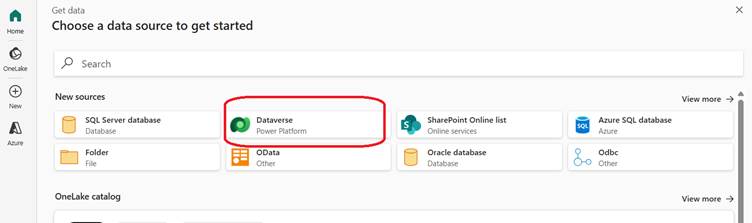
Whereby you could select any source of your choice. We would select Dataverse in our example:
And in the lookup, you need to administer the necessary settings to connect to your Dataverse source:
In the Authentication Kind >> you can choose
Organizational account: This would enforce you to give your credentials to access the Dataverse account.
Service Principal: Use the Entra-Id’s App registration details to log on to D365F&O. This is a preferred choice, as the Organizational account would make the entire access a dependent connectivity to an impersonated account.
Click on Connect to Continue.
Step 3
In the next Step, select/enter the highlighted values to connect to your Dataverse table:Do a Test Connection >> to see if the Connection succeeds. Choose Connection Type = Dataverse. Click on Edit to let the FetchXML editor window open:
We are going to fetch the details of the Vendors belonging to group ‘40’ department.
Hence we would need to decide what are the columns which we need and the filter we need to add. In our example, it turns out to be a very simple XML like this:
<fetch>
<entity name='mserp_vendvendorv2entity'>
<attribute name='mserp_vendoraccountnumber' />
<attribute name='mserp_vendororganizationname' />
<attribute name='mserp_vendorgroupid' />
<attribute name='mserp_addressstreet' />
<attribute name='mserp_addresscity' />
<attribute name='mserp_addresszipcode' />
<attribute name='mserp_addresscountryregionid' />
<filter type='and'>
<condition attribute='mserp_vendorgroupid'
operator='eq'
value='40' />
</filter>
</entity>
</fetch>
We can find out the name of associated table by scouping it out from the Logical name/Sxchema name:
Which means, I am trying to select fields like Name, Created on, Email from the table: crf5a_Employee, with filter Department = ‘IT’:
Or if you want to include All the Vendors who belong to either 10 or 40, then your filter should like this:
<filter type='or'>
<condition attribute=’Group’
operator='eq'
value='10' />
<condition attribute='Group'
operator='eq'
value='40' />
</filter>
Press Ok to continue.
At this point of time, if you select Save and Select on preview Data, you should be able to see the records:
As I have checked only the First row, I would be able to see just first of the records:
Turning the key off would give me all the records:
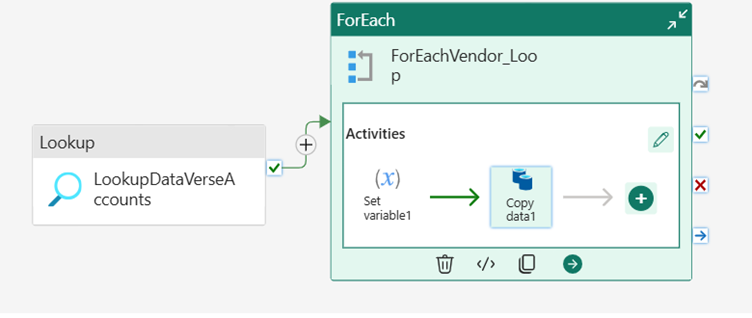
Next is what
You can now add Foreach activity, that will allow you to call a CopyData Activity which in turn can take you to add the records into the target (for ex: a Lakehouse table/field or to an Azure SQL table etc.).As you can see we are using the variable which we defined and assigning it to a value (like Concatenating Street, City, Postal code and Country into one string):
And finally you can add the Copy-data activity to carry the transformed variables into the target table of your destination:
With that let me conclude this topic. Requesting you to please try the same from your end and let me know how it goes. Namaste and much love.....
*This post is locked for comments